

Frappe CRM understands that every business has unique needs. That’s why it offers customization options to tailor the system to your specific workflows. This guide focuses on adding Custom Fields, a powerful tool for capturing additional data relevant to your business.
What are Custom Fields? #
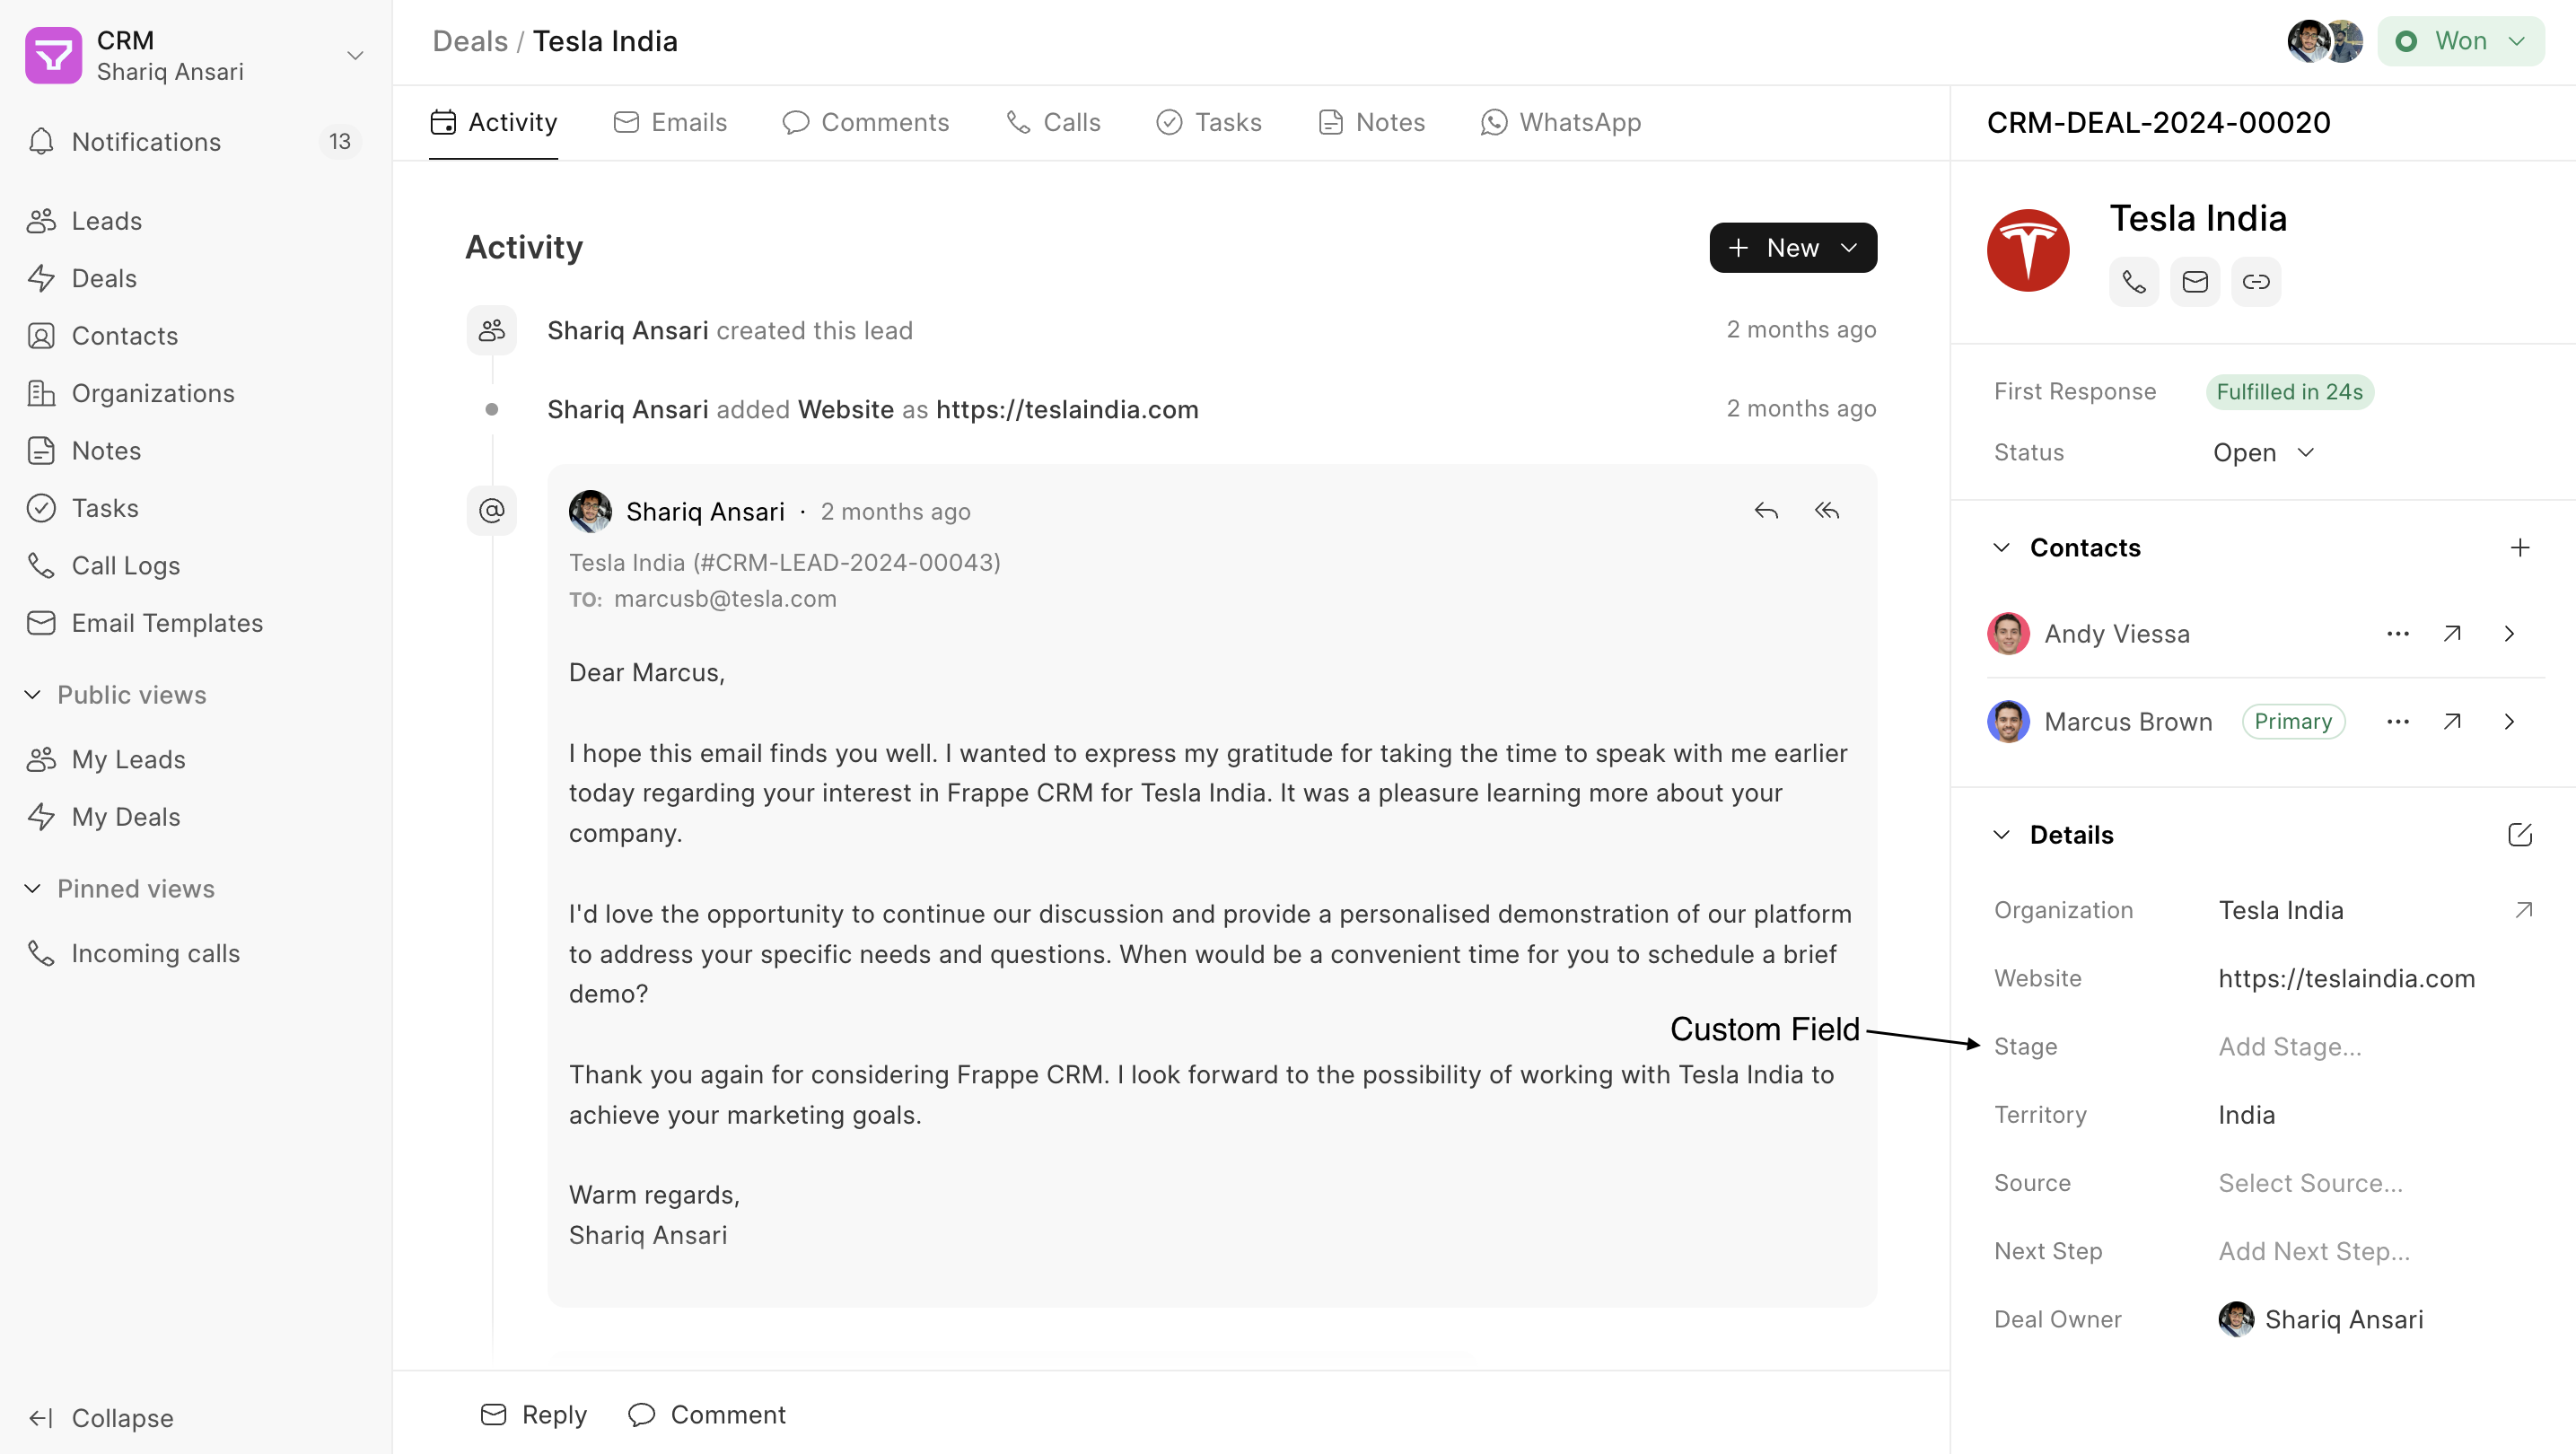
The default Lead/Deal pages in Frappe CRM come with essential fields like contact details, organization, owner etc. However, you might need to capture more information specific to your sales process. Custom Fields allow you to do just that.
Adding Custom Fields #
Here’s how to add Custom Fields to Lead or Deal documents using the side panel layout builder: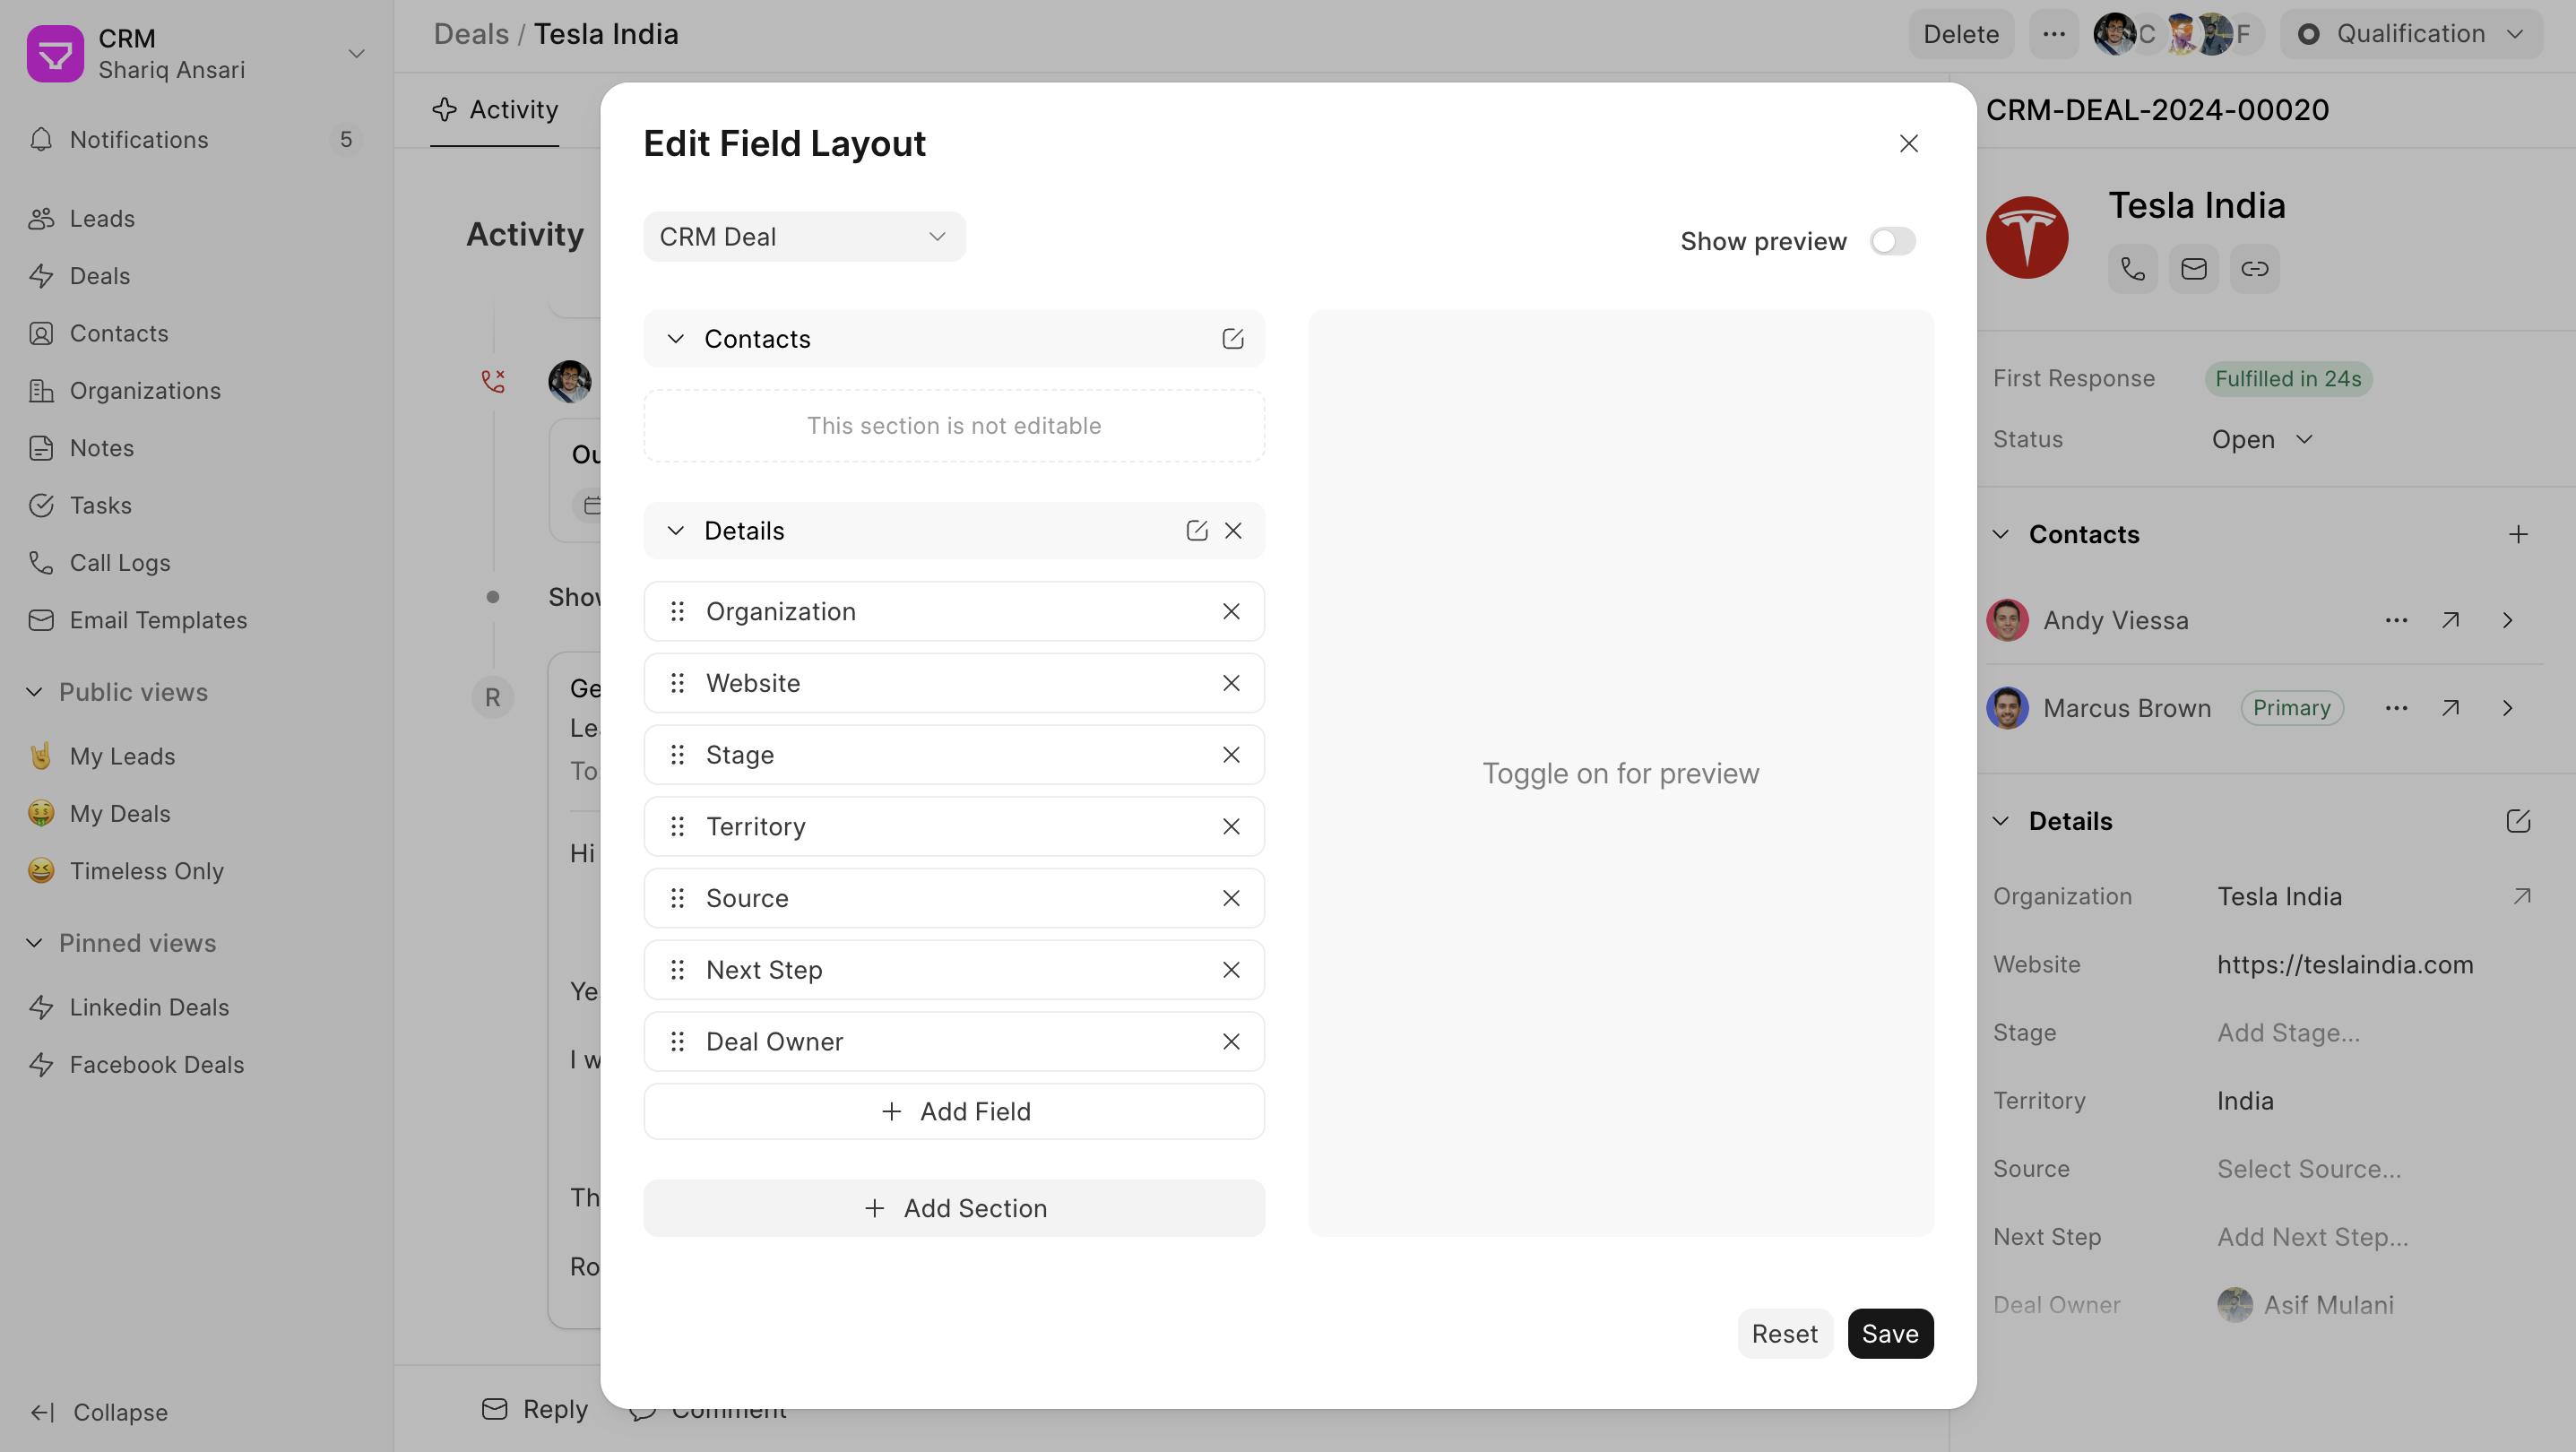
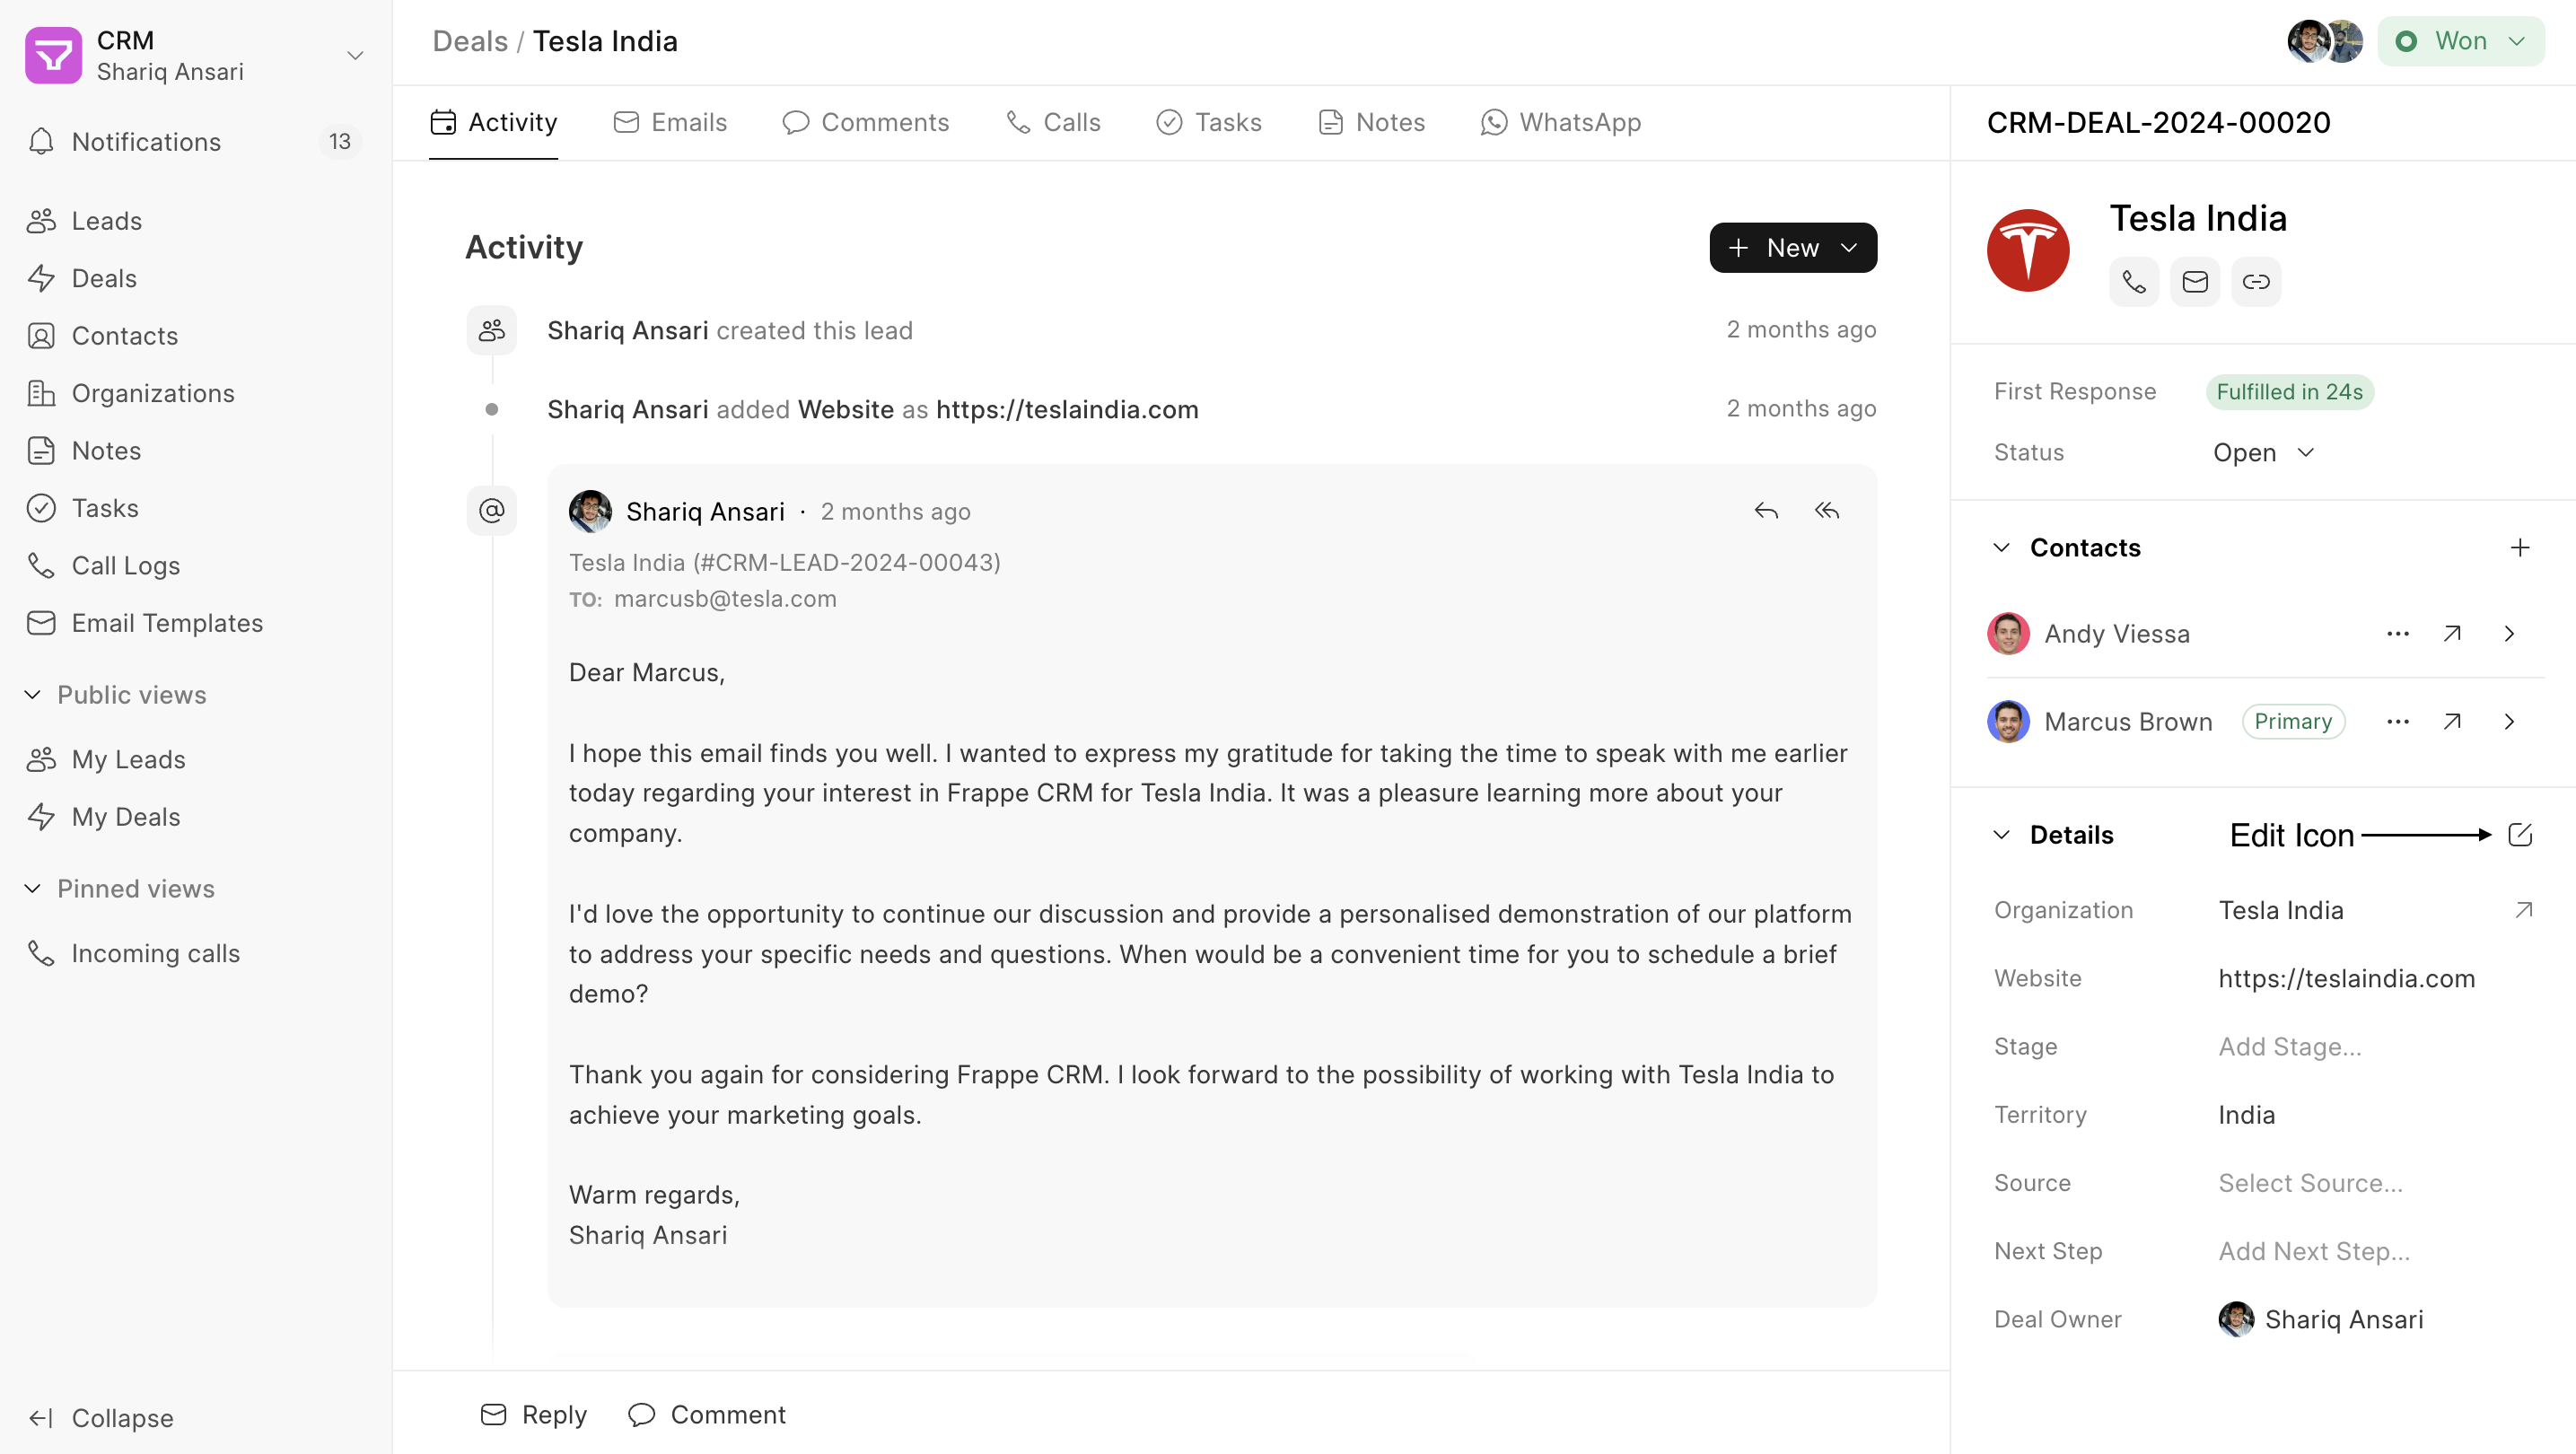
- Navigate to Lead/Deal Page: Go to Lead/Deal Page and click on the edit icon shown on the first section header in the side panel.
- Use the Fields Layout Builder: A modal will open where doctype will be selected automatically. The right side displays a layout builder. Drag and drop existing fields or sections to rearrange them. Use the buttons provided to add new fields or sections.
- Preview Your Work (Optional): The Sidebar Fields Layout Builder offers a Show Preview button. Clicking this button will display a preview of how the customized sidebar panel will look for the chosen doctype. This allows you to visualize your layout changes before saving them.

Important Notes: #
- You can only edit section labels, not field labels. To edit field properties, use the framework’s “Customize Form” feature.
- The “Contacts” section for CRM Deals is non-editable. You can rearrange or rename the section but cannot remove it.
- Currently, not all field types are supported in the new UI. Fields like Rating, Geolocation, and Duration will appear as data fields on the Lead/Deal page.
By effectively utilizing Custom Fields, you can personalize your Frappe CRM experience and capture the data crucial to your sales success.
Custom Actions #
Custom actions allow you to perform specific tasks directly from the Lead or Deal page, aligning with your sales process stages. These actions can be anything from integrating with external apps to updating deal statuses or creating related documents.
Creating Custom Actions #
Custom actions are implemented using Form Scripts in Desk:
- Navigate to Desk: Switch to Desk and navigate to CRM Form Script.
- Select Doctype: Choose the Doctype (e.g., Lead or Deal) where you want to add the custom action. You’ll be presented with a boilerplate code.
- Apply To: Choose “Form”.
- Define Your Action: Here’s how to define different types of actions:
- Single Button: This code creates a single button labelled “Open in Desk” that opens the current Lead/Deal in a new browser tab.
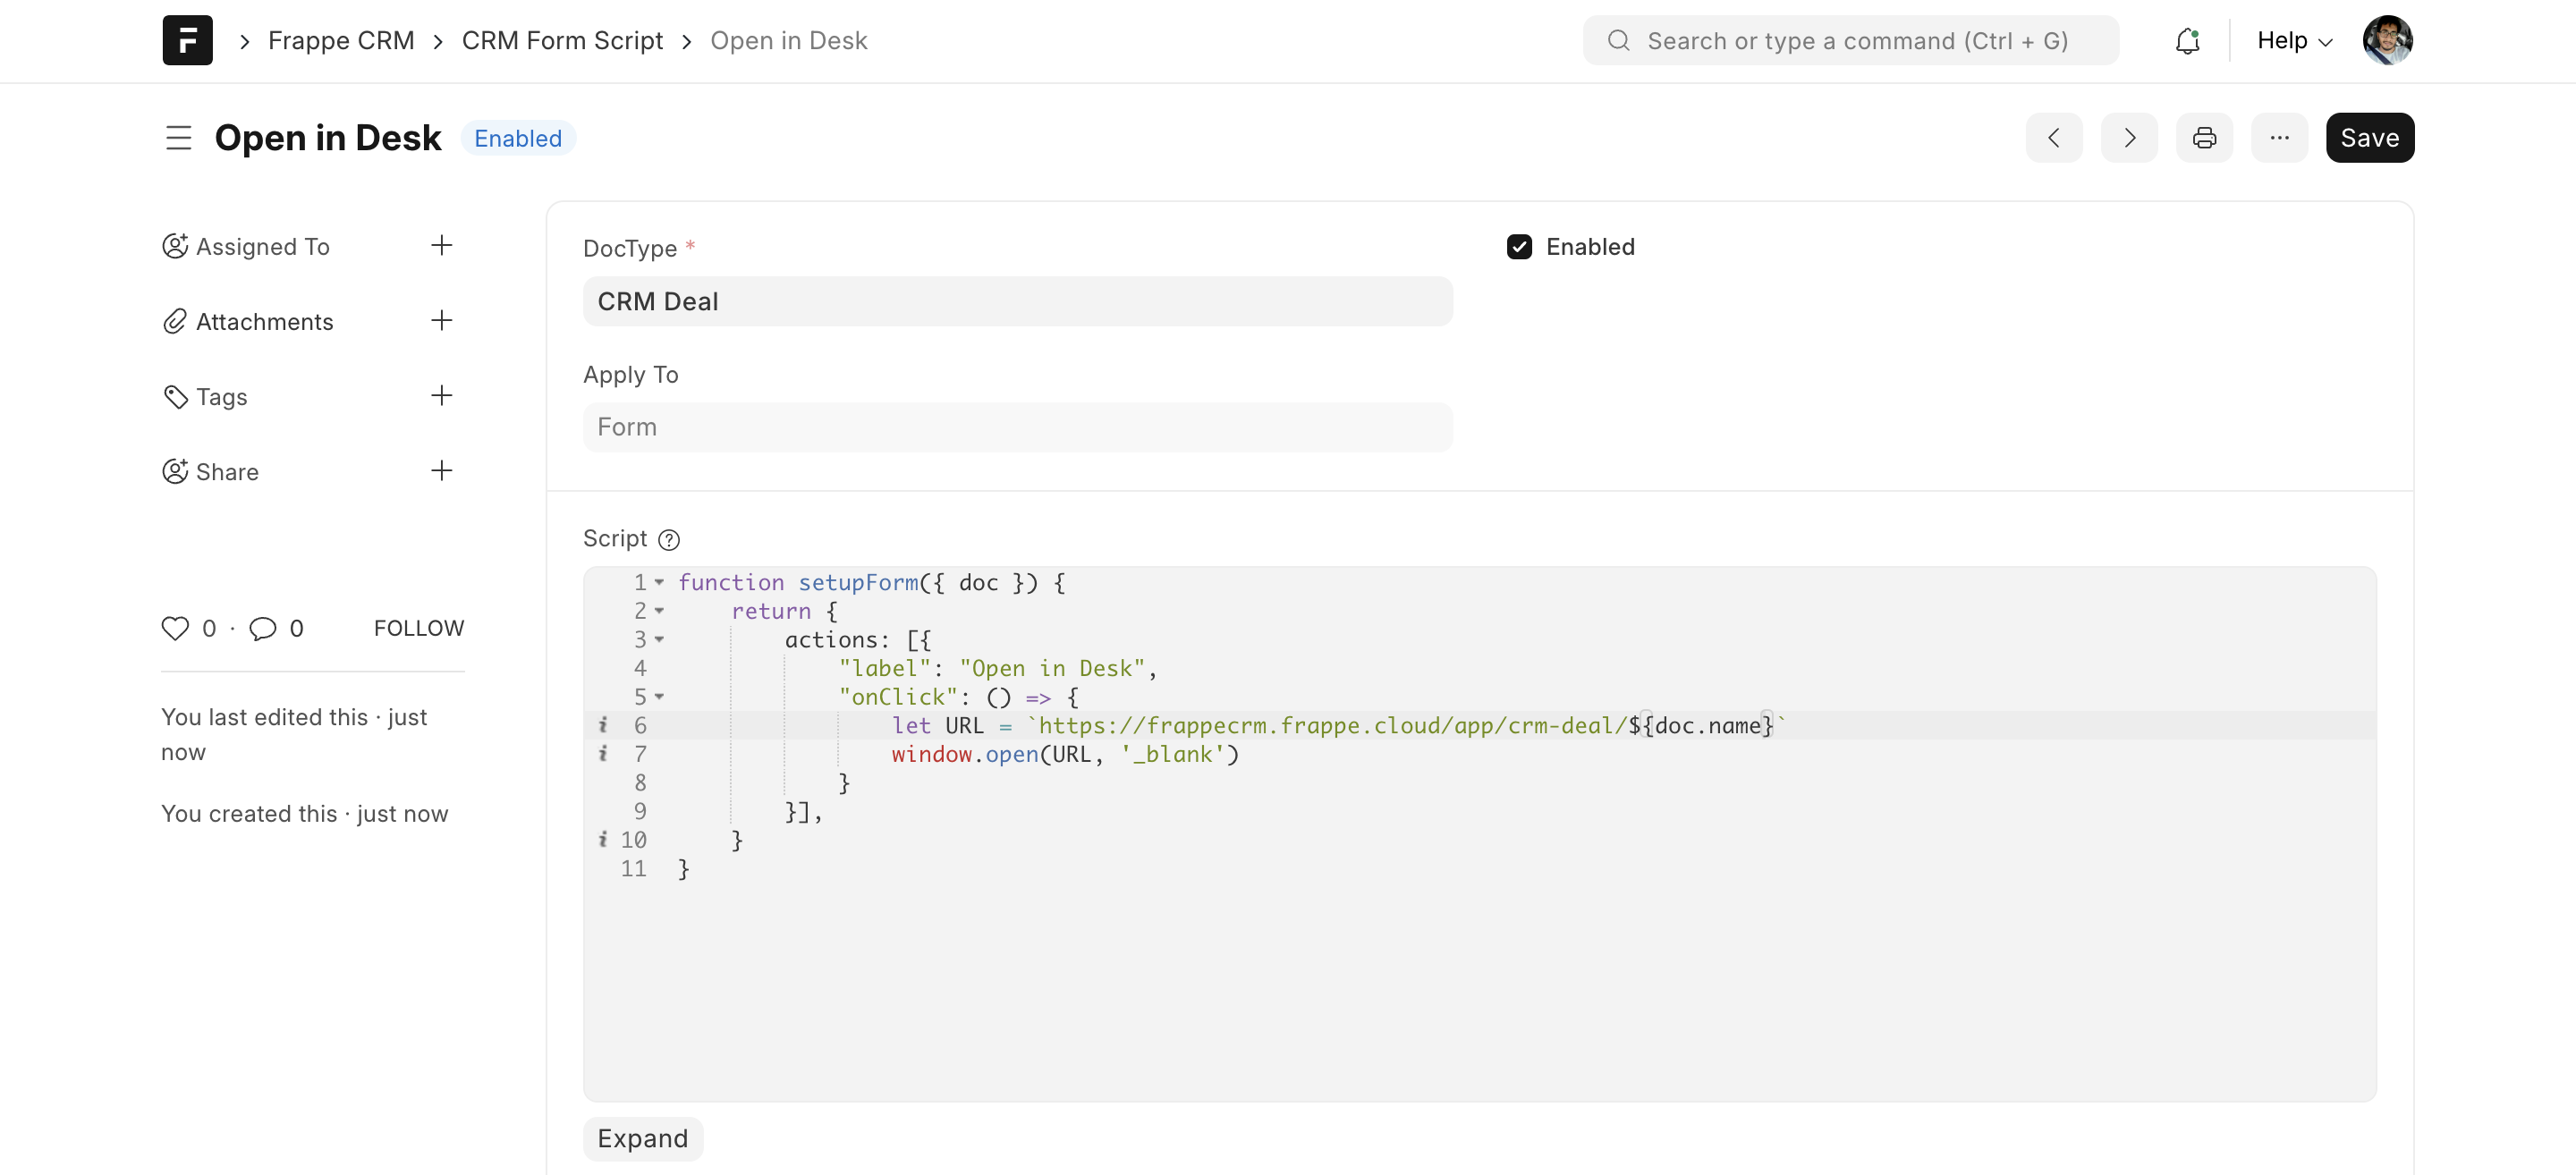
const actions = [{ "label": "Open in Desk", "onClick": () => { let URL = `https://frappecrm.frappe.cloud/app/crm-deal/${doc.name}` window.open(URL, '_blank') } }]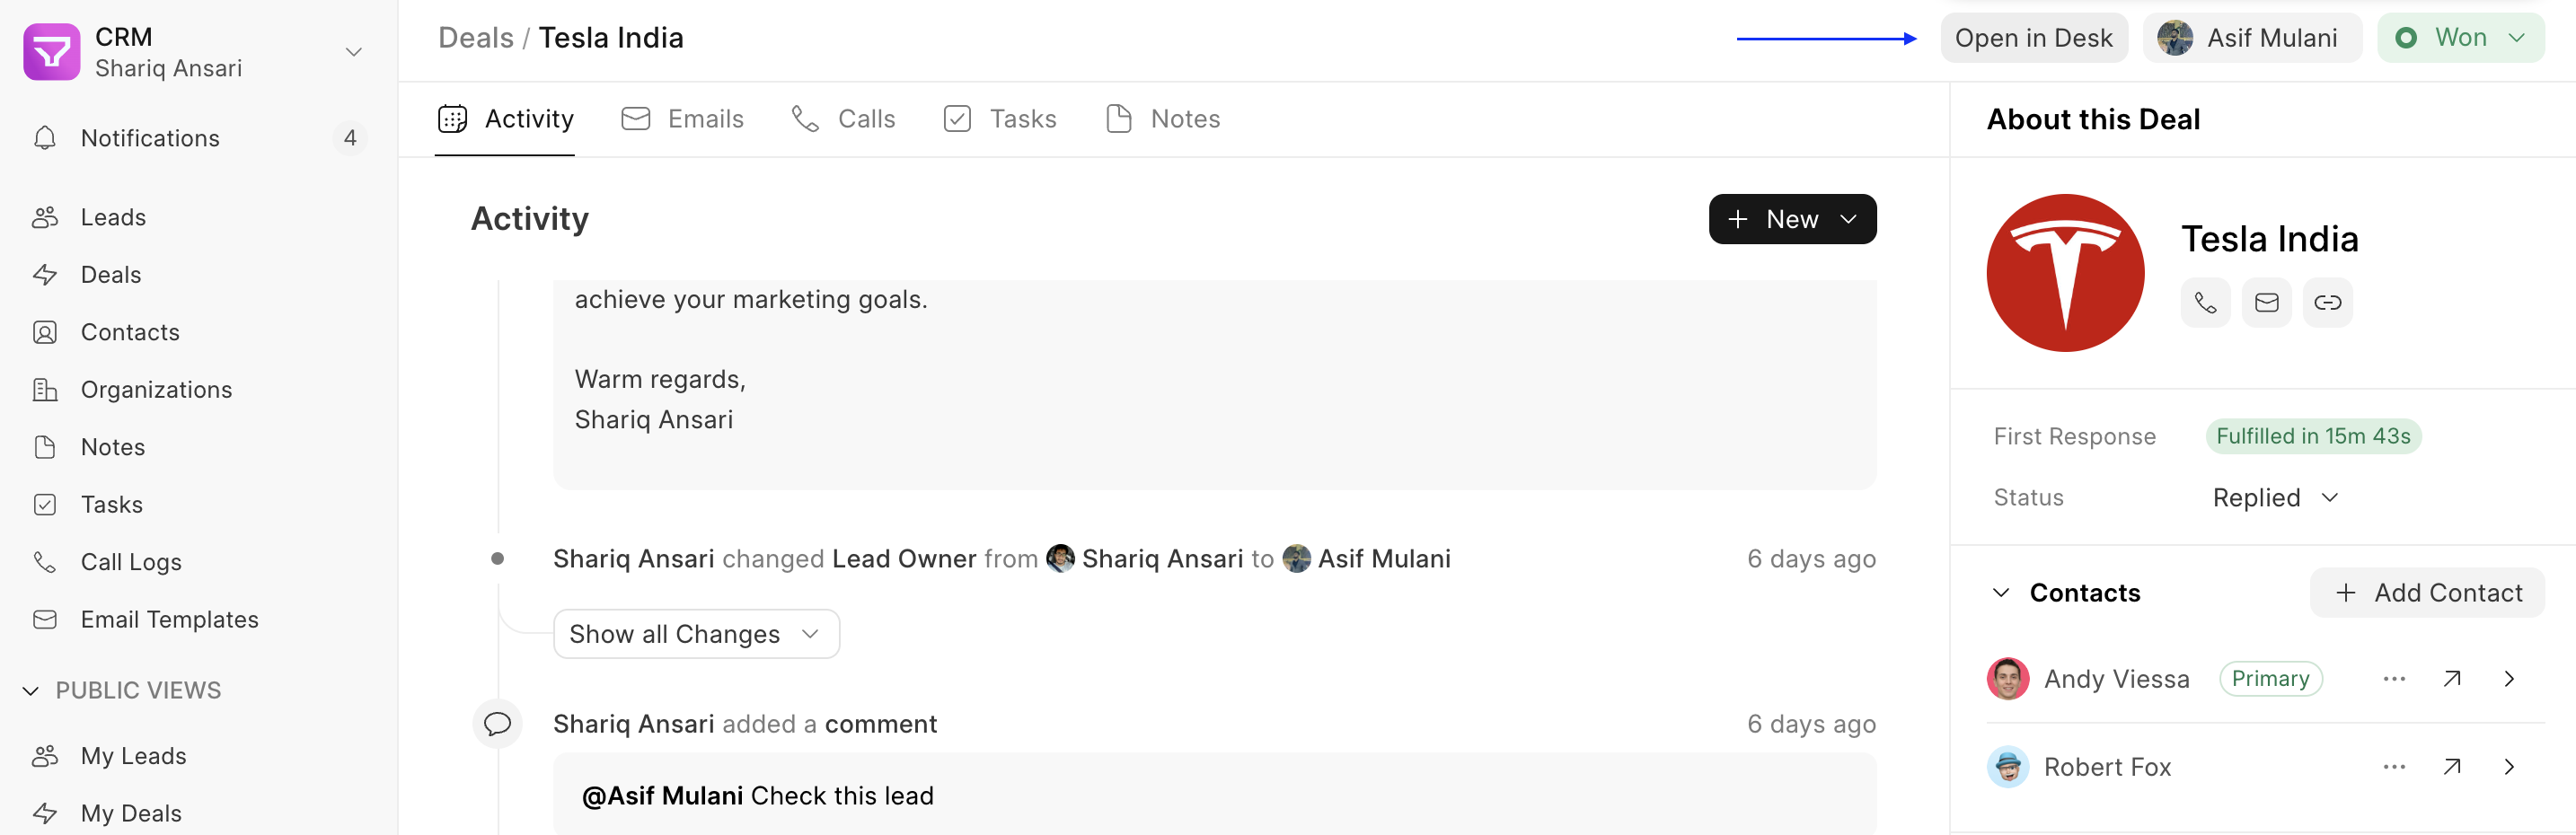
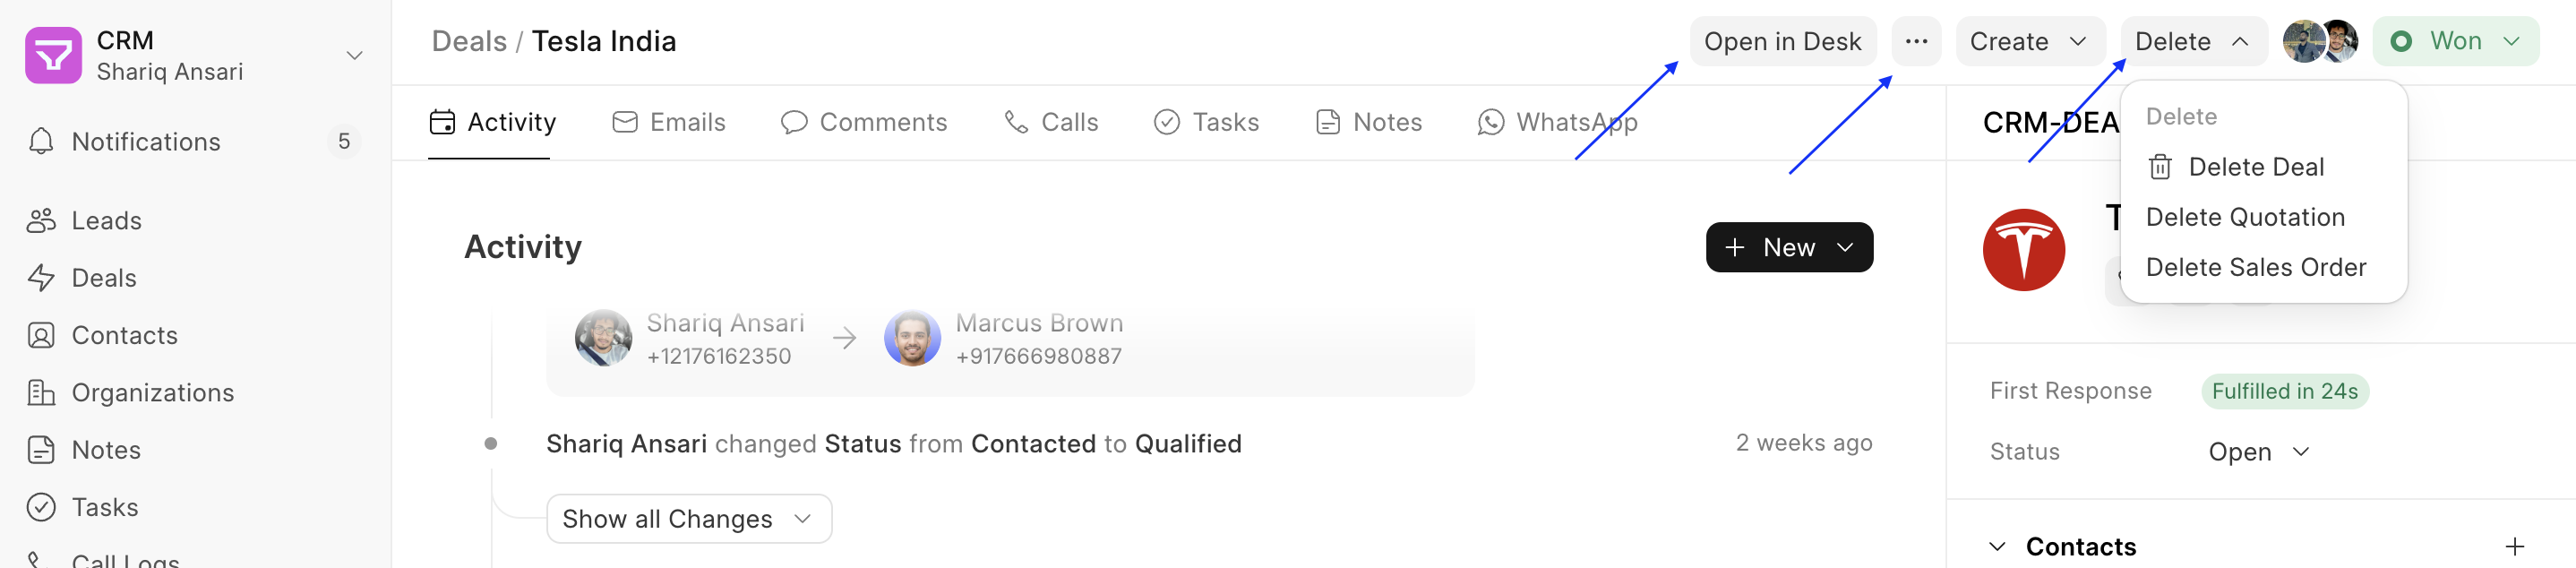
- Grouped Actions: This code creates a group of buttons hidden under a three-dot menu labelled “Add.” Clicking on either “Create Quotation or “Create Sales Order” will trigger their respective onClick functions (defined elsewhere).

const actions = [{ "group": "Add", "hideLabel": true, "items": [ { "label": 'Create Quotation', "onClick": () => {} }, { "label": 'Create Sales Order', "onClick": () => {} }, ] }, { "group": "Delete", "items": [ { "label": 'Delete Quotation', "onClick": () => {} }, { "label": 'Delete Sales Order', "onClick": () => {} }, ] }]
- Grouped Actions with label: This code creates a group of buttons hidden under a dropdown button labelled “Create”. Clicking on either “Create Quotation” or “Create Sales Order” will trigger their respective onClick functions.
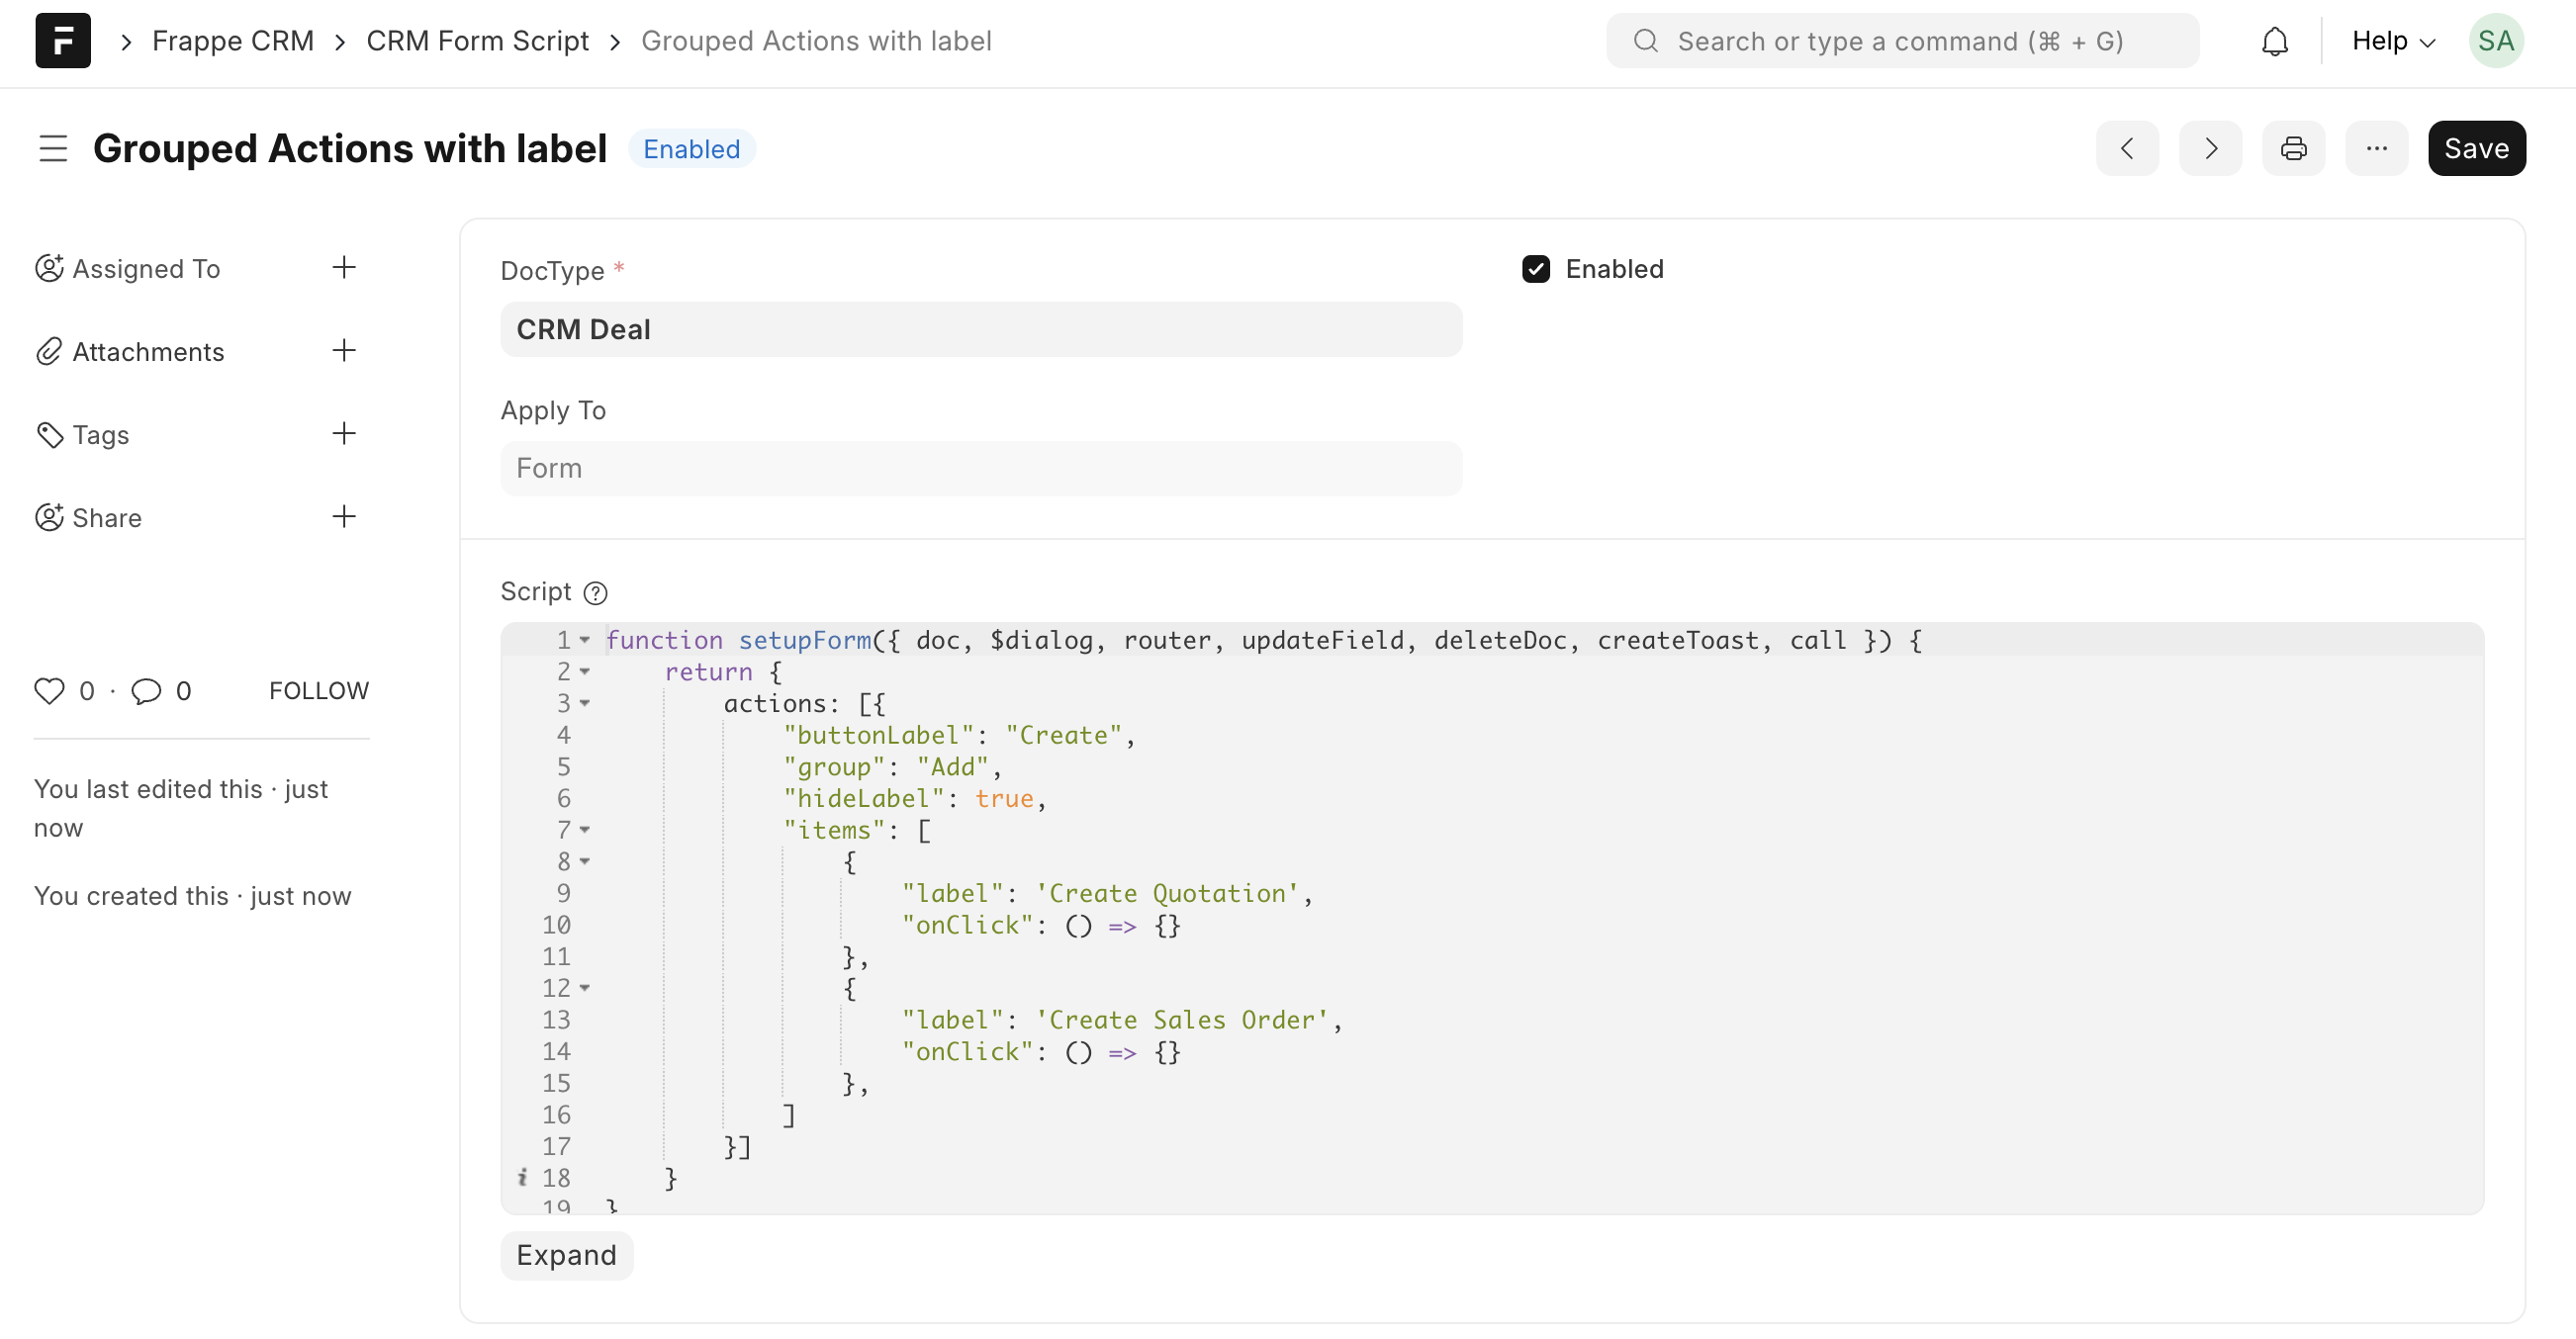
const actions = [{ "buttonLabel": "Create", "group": "Add", "hideLabel": true, "items": [ { "label": 'Create Quotation', "onClick": () => {} }, { "label": 'Create Sales Order', "onClick": () => {} }, ] }]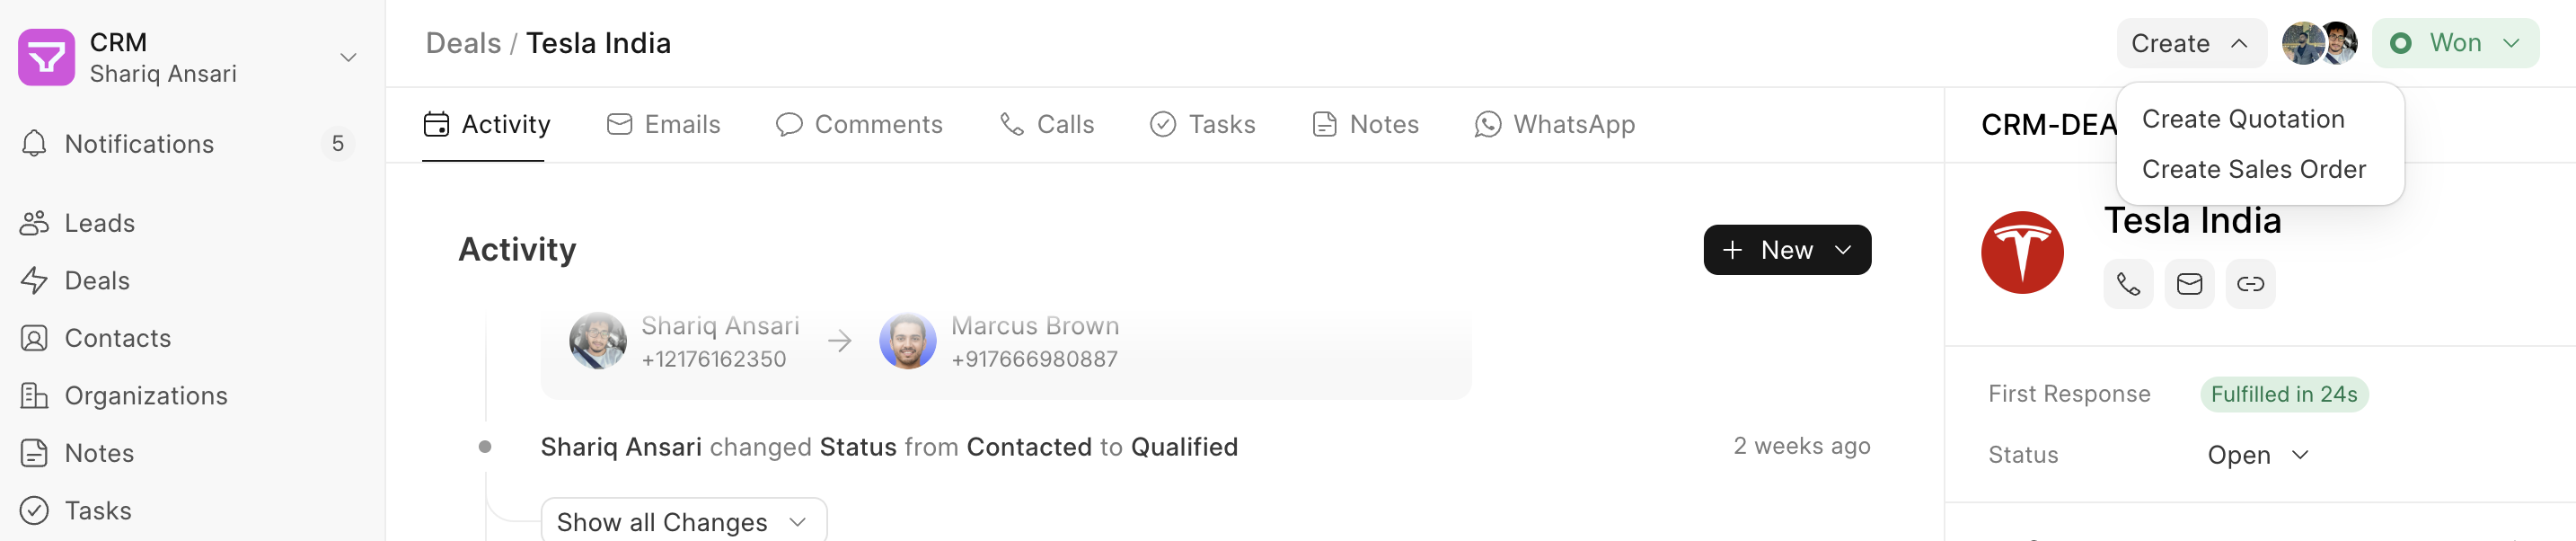
- Combined Actions: You can combine both single buttons and group actions into a single list and pass them as the “actions” property.
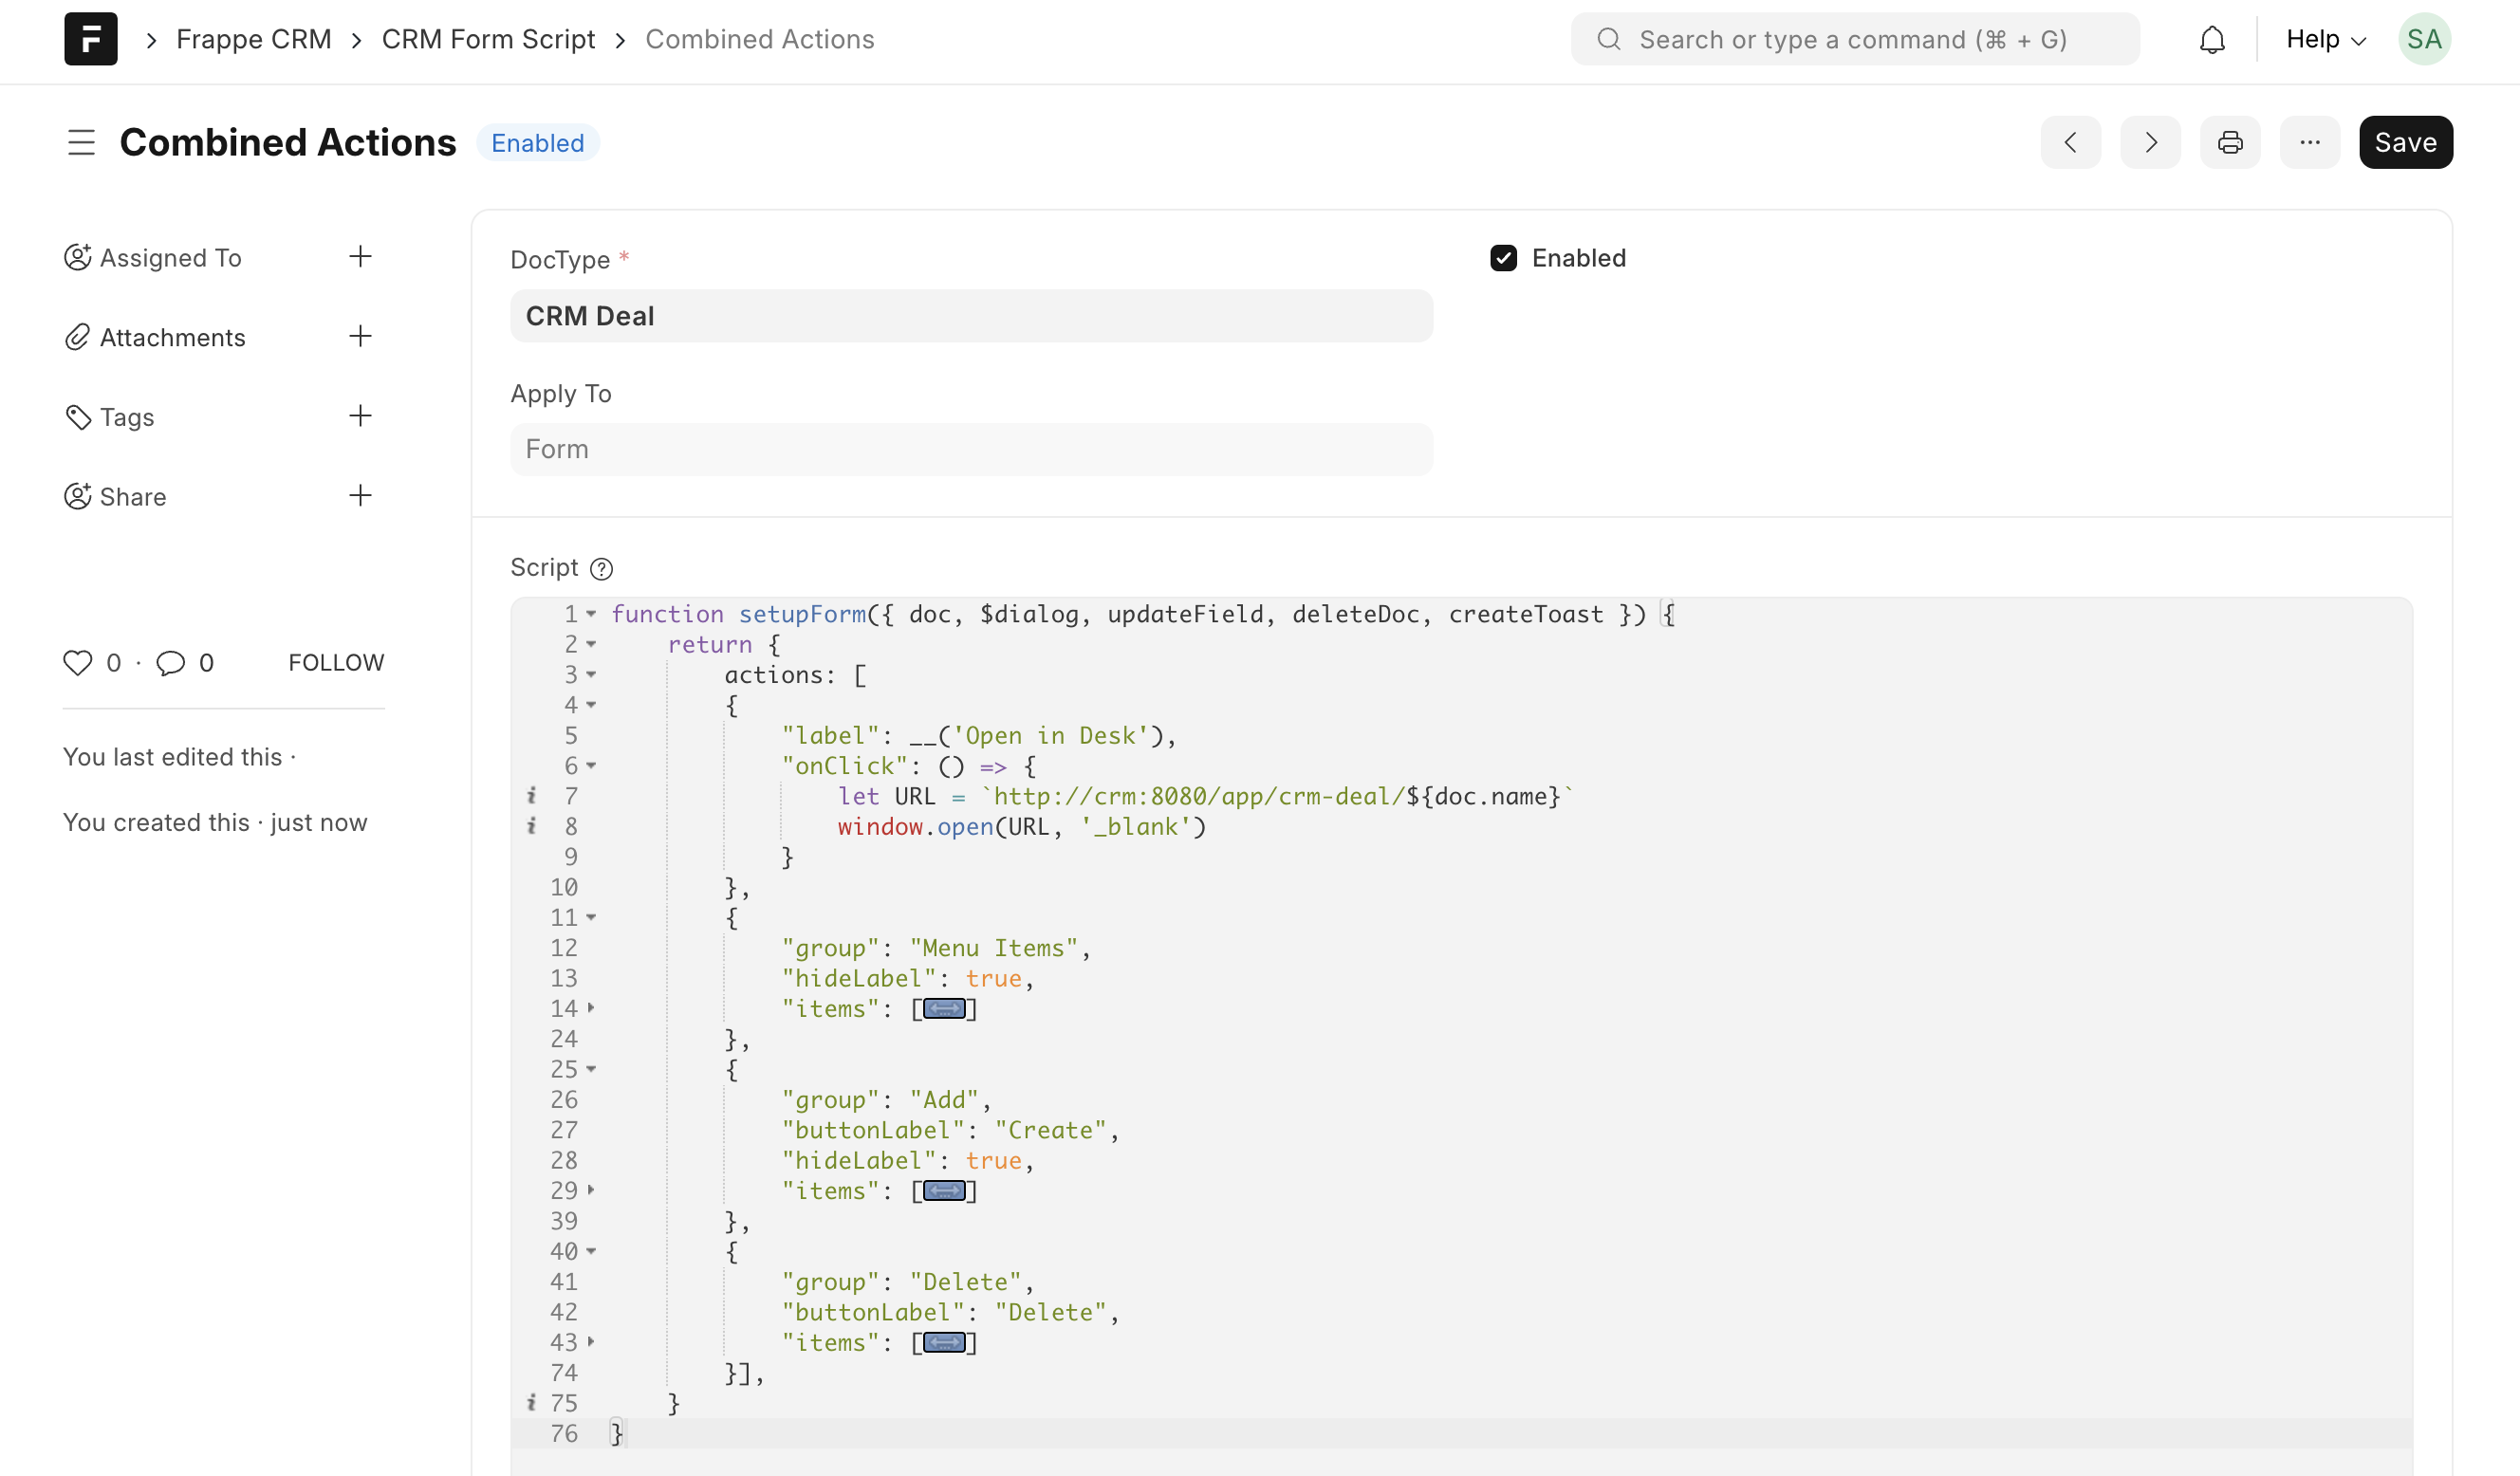
- Single Button: This code creates a single button labelled “Open in Desk” that opens the current Lead/Deal in a new browser tab.
Using Context and Actions #
The doc parameter provides context about the current Lead/Deal page. You can utilize this context along with various functionalities to create your custom actions:
doc: Access Lead/Deal field values (e.g.,doc.lead_owner,doc.name).deleteDoc: Deletes the current Lead/Deal document.$dialog: Opens a confirmation dialog with actions.updateField: Updates a specific field value (e.g.,updateField('status', 'Lost', callback)).router: Navigate to a different page using Vue Router.createToast: Displays success or error messages.call: Calls an API from the client side.
Example: Custom Actions for Deal Management #
Here’s an example showcasing various custom actions you can create to manage Deals:
const actions = [
 {
  group: "Actions",
  hideLabel: true,
  items: [
   {
    label: "Create Quotation",
    onClick: () => {
     if (doc.status === "Won") {
      // Call API to create quotation based on deal fields
      call("create_quotation", {
       deal: doc.name,
       // Include relevant deal fields for quotation creation
      }).then((data) => {
       if (data.name) {
        router.push({ name: "Quotation", params: { name: data.name } });
        createToast({
         title: "Quotation Created",
         icon: "check",
         iconClasses: "text-green-600",
        });
       } else {
        createToast({
         title: "Error Creating Quotation",
         icon: "x",
         iconClasses: "text-red-600",
        });
       }
      });
     } else {
      createToast({
       title: "Action only available for Won Deals",
       icon: "info",
      });
     }
    },
   },
   {
    label: "Mark Lost",
    onClick: () => {
     $dialog({
      title: "Mark Deal Lost",
      message: "Are you sure you want to mark this deal as Lost?",
      actions: [
       {
        label: "Mark Lost",
        theme: "red",
        variant: "solid",
        onClick(close) {
         updateField("status", "Lost", () => {
          createToast({ title: "Deal Marked Lost", icon: "alert-circle" });
          close();
         });
        },
       },
       {
        label: "Cancel",
        variant: "outline",
        onClick(close) {
         close();
        },
       },
      ],
     });
    },
   }
  ],
 },
 {
  label: "Delete",
  onClick: () => {
   $dialog({
    title: "Delete Deal",
    message: "Are you sure you want to delete this deal?",
    actions: [
     {
      label: "Delete",
      theme: "red",
      variant: "solid",
      onClick(close) {
       deleteDoc();
       close();
      },
     },
     {
      label: "Cancel",
      variant: "outline",
      onClick(close) {
       close();
      },
     },
    ],
   });
  },
 }
];
Custom Statuses #
Custom Statuses allow you to tailor the status options available for Leads and Deals to your specific business requirements. By defining custom status lists, you can create more accurate and meaningful workflows that reflect your organization’s unique processes.
Adding Custom Statuses #
Custom statuses are implemented using Form Script in Desk. Here’s a step-by-step guide:
- Navigate to Desk: Switch to Desk and navigate to CRM Form Script.
- Select Doctype: Choose the Doctype (e.g., Lead or Deal). You’ll be presented with a boilerplate code.
- Apply To: Choose “Form”.
- Define Custom Status Lists: Create variables to store the desired status lists based on your business logic. Ensure that these statuses exist in the
Lead/Deal Statusmaster.
- Conditionally Show Statuses: Conditionally return the appropriate status list based on the Lead/Deal’s field values.
Example: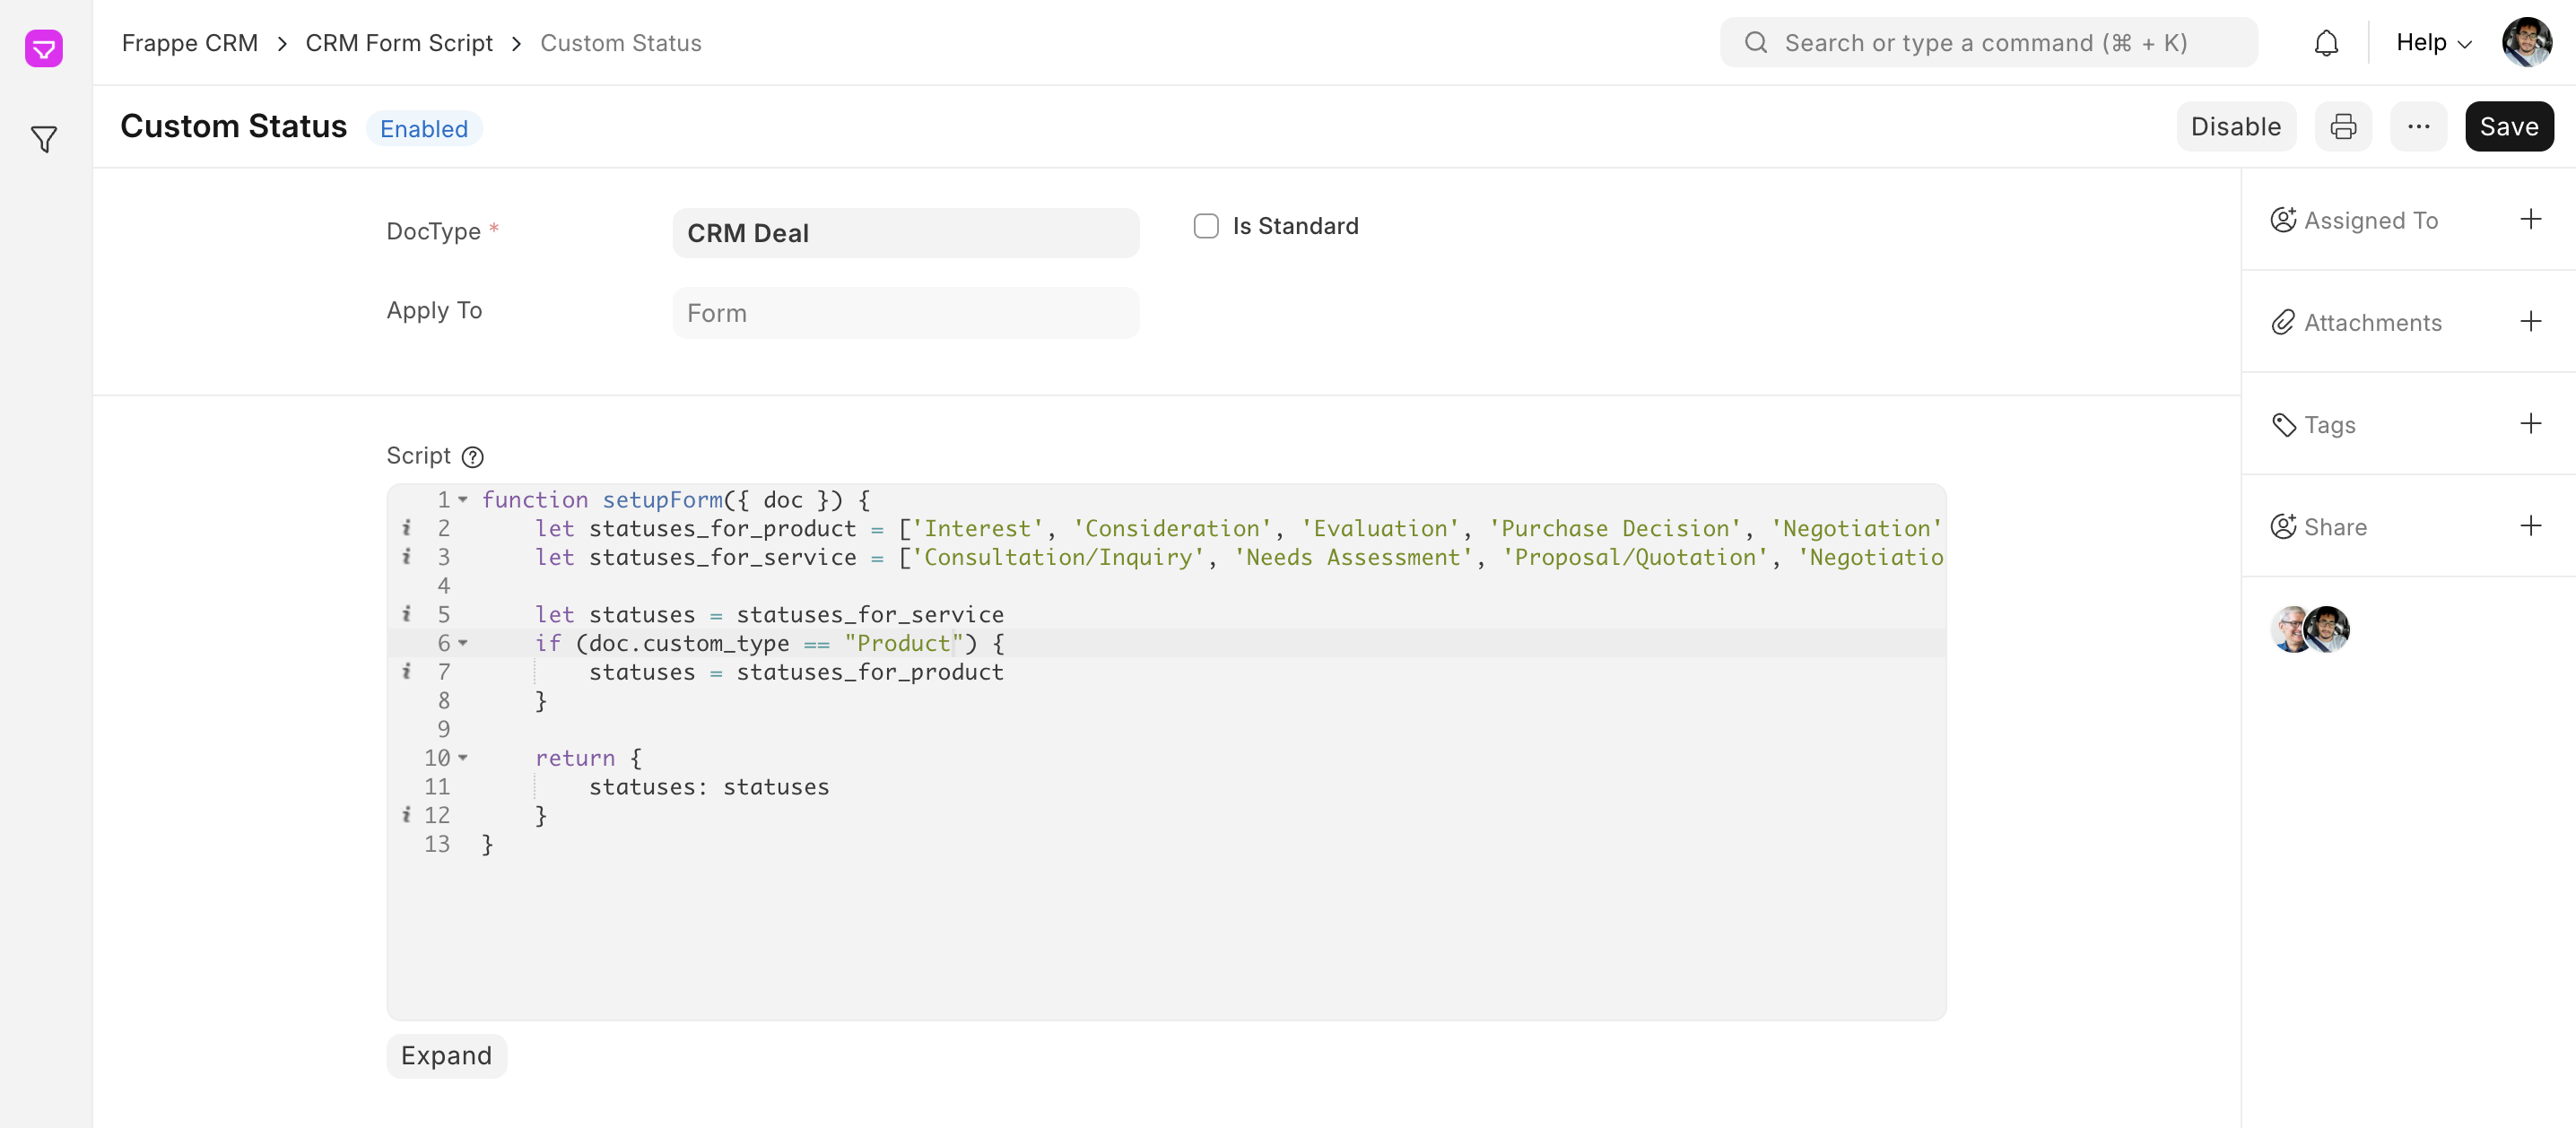
function setupForm({ doc }) {
  let statuses_for_product = ['Interest', 'Consideration', 'Evaluation', 'Purchase Decision', 'Negotiation', 'Won','Lost']
  let statuses_for_service = ['Consultation/Inquiry', 'Needs Assessment', 'Proposal/Quotation', 'Negotiation', 'Commitment', 'Won', 'Lost']

  let statuses = statuses_for_service
  if (doc.custom_type == "Product") {
    statuses = statuses_for_product
  }

  return {
    statuses: statuses
  }
}
Explanation:
- The setupForm function receives the current Lead/Deal document (doc) as input.
- It defines two status lists:
statuses_for_productandstatuses_for_service. - Based on the value of the
custom_typefield, it selects the appropriate status list and returns it as the statuses property.
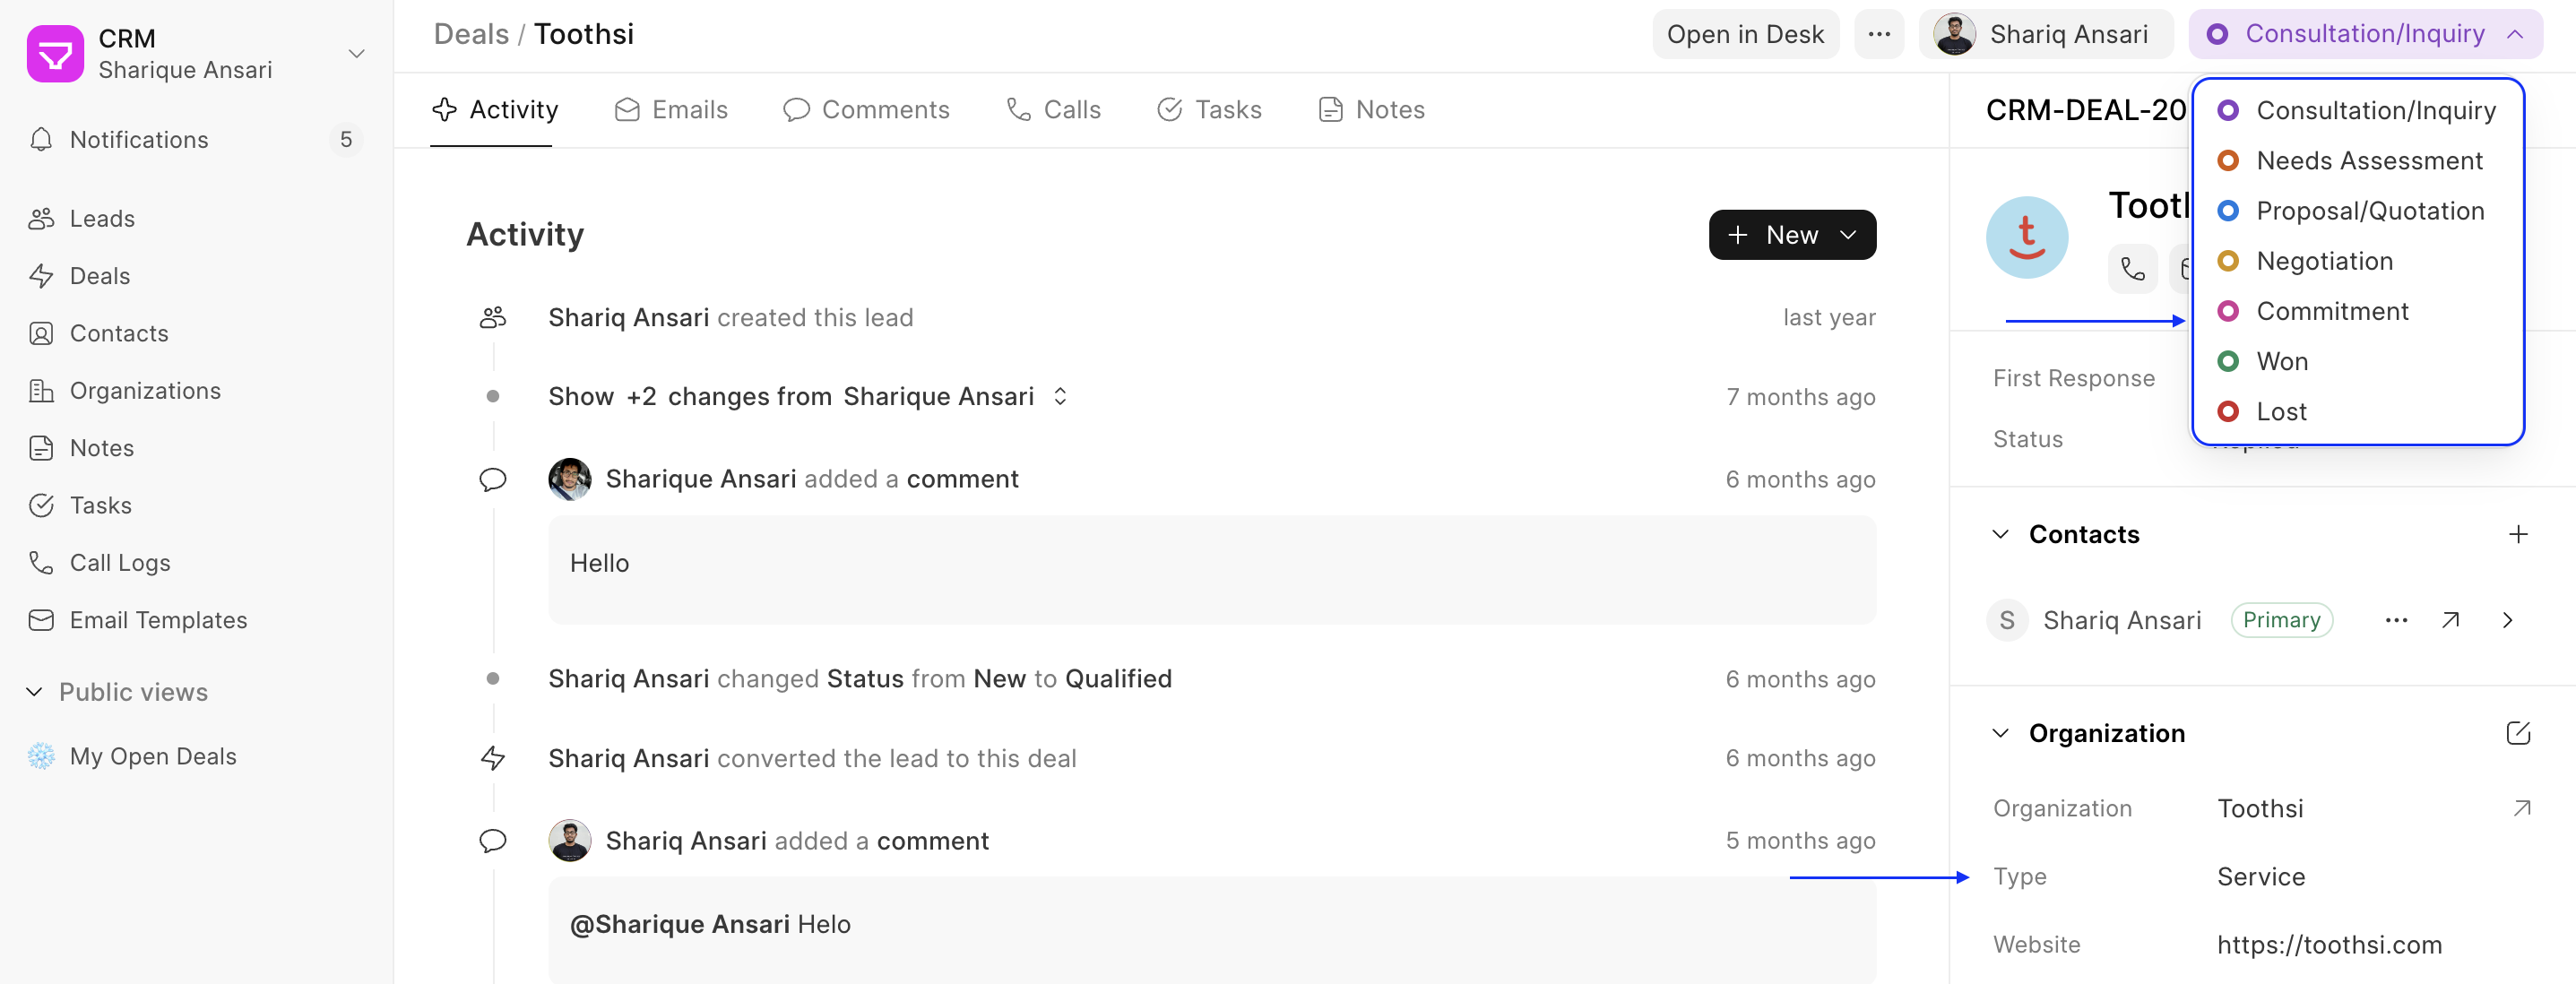
Result #
Once you’ve defined your custom status lists, they will be displayed in the status dropdown on the Lead/Deal form. Users can select the relevant status based on the progress of the Lead/Deal.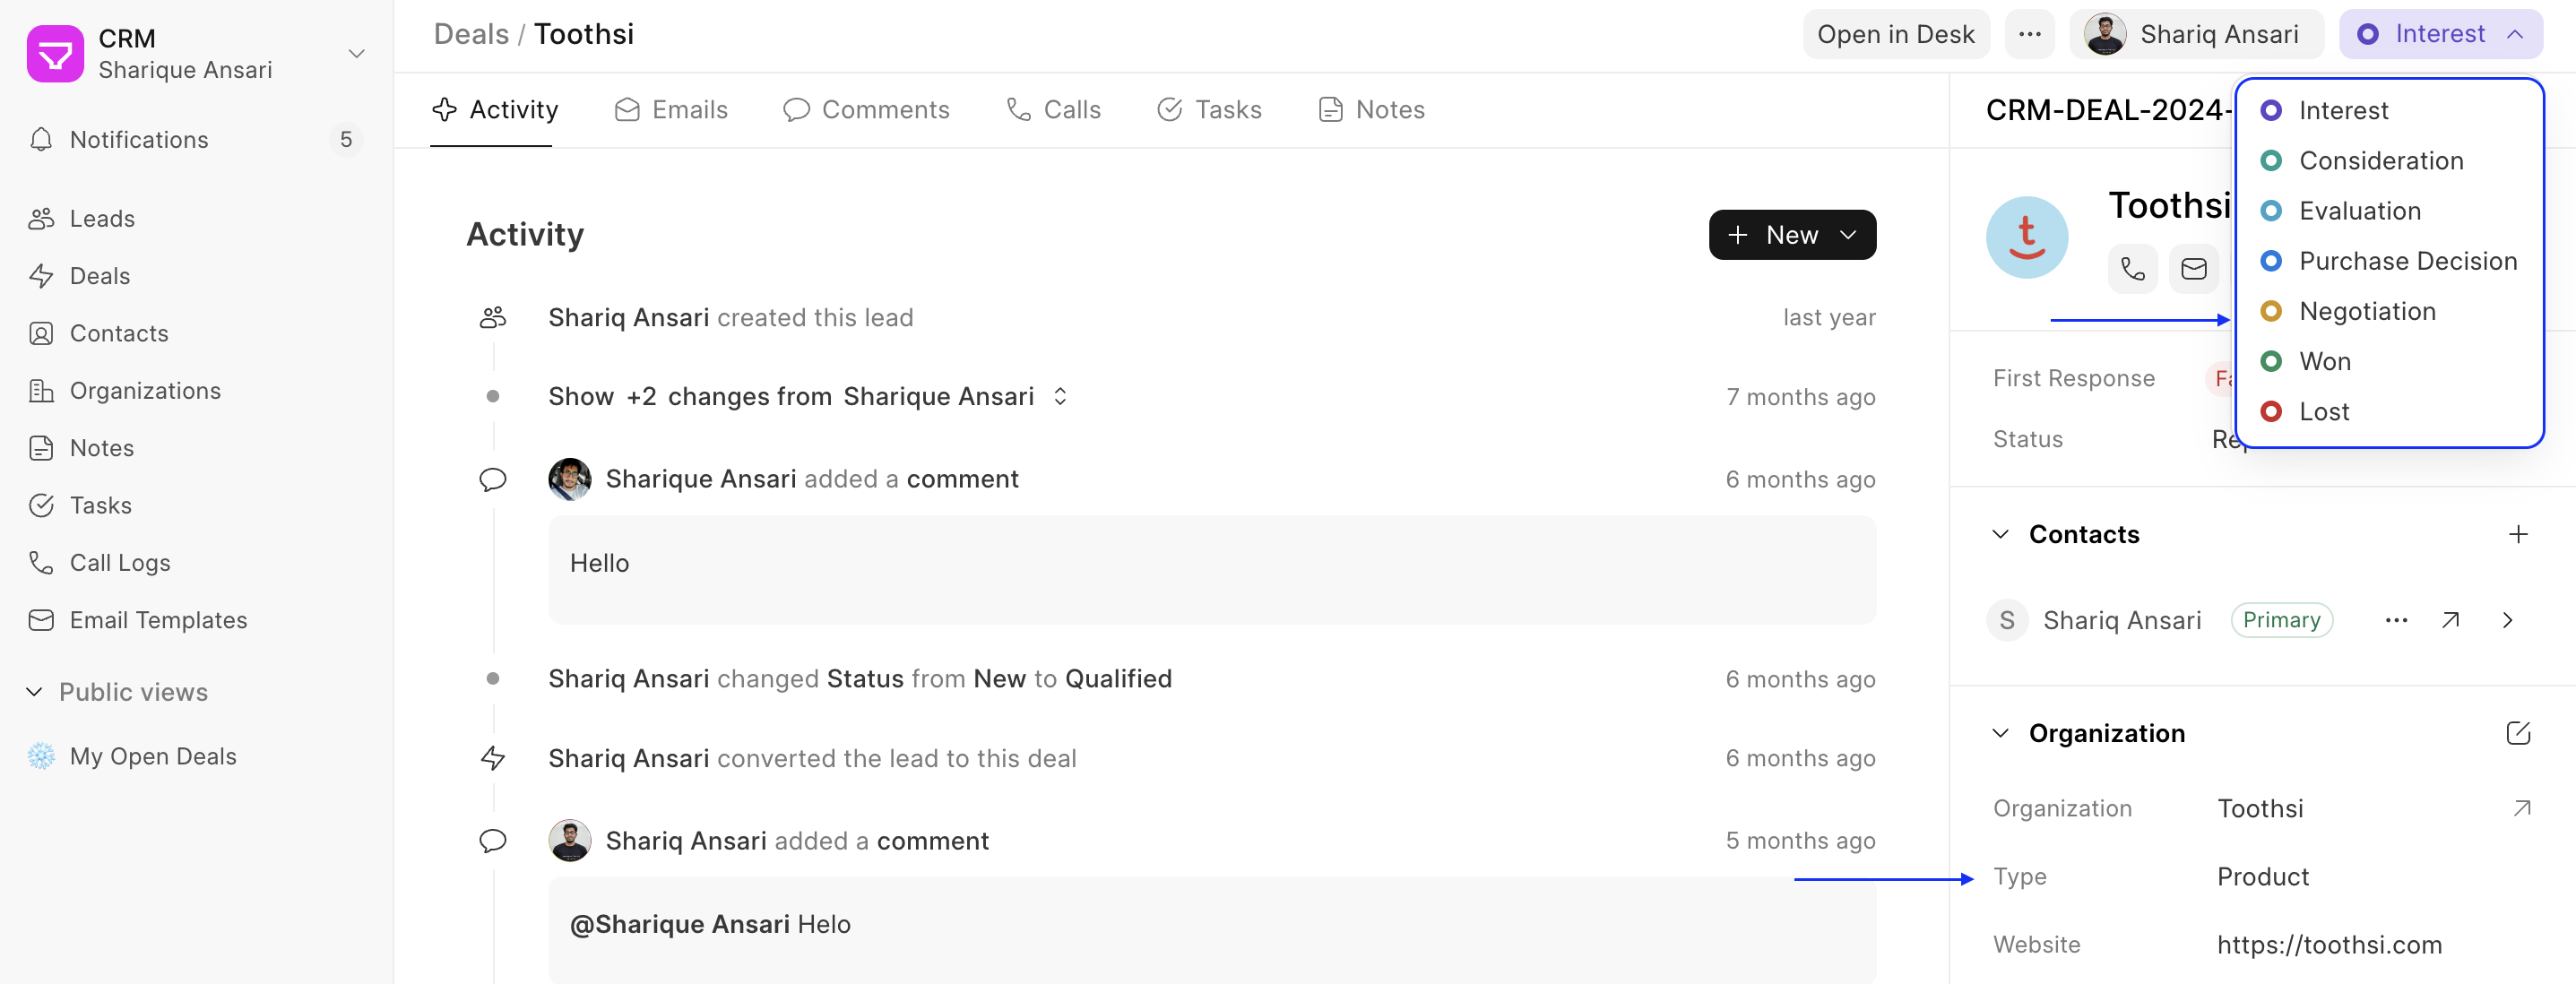
Custom List Actions #
Similar to Custom Actions, Custom List Actions allows you to add custom actions that you can perform directly from the list view of various Frappe CRM masters (e.g., Leads, Deals, Organizations). These actions enhance your workflow by allowing quick execution of specific tasks without needing to open individual records.
Types of List Actions #
There are two main categories of custom list actions:
- Actions: These resemble the custom actions you find on individual lead/deal pages. They appear as buttons in the list view header beside the create button. Example:

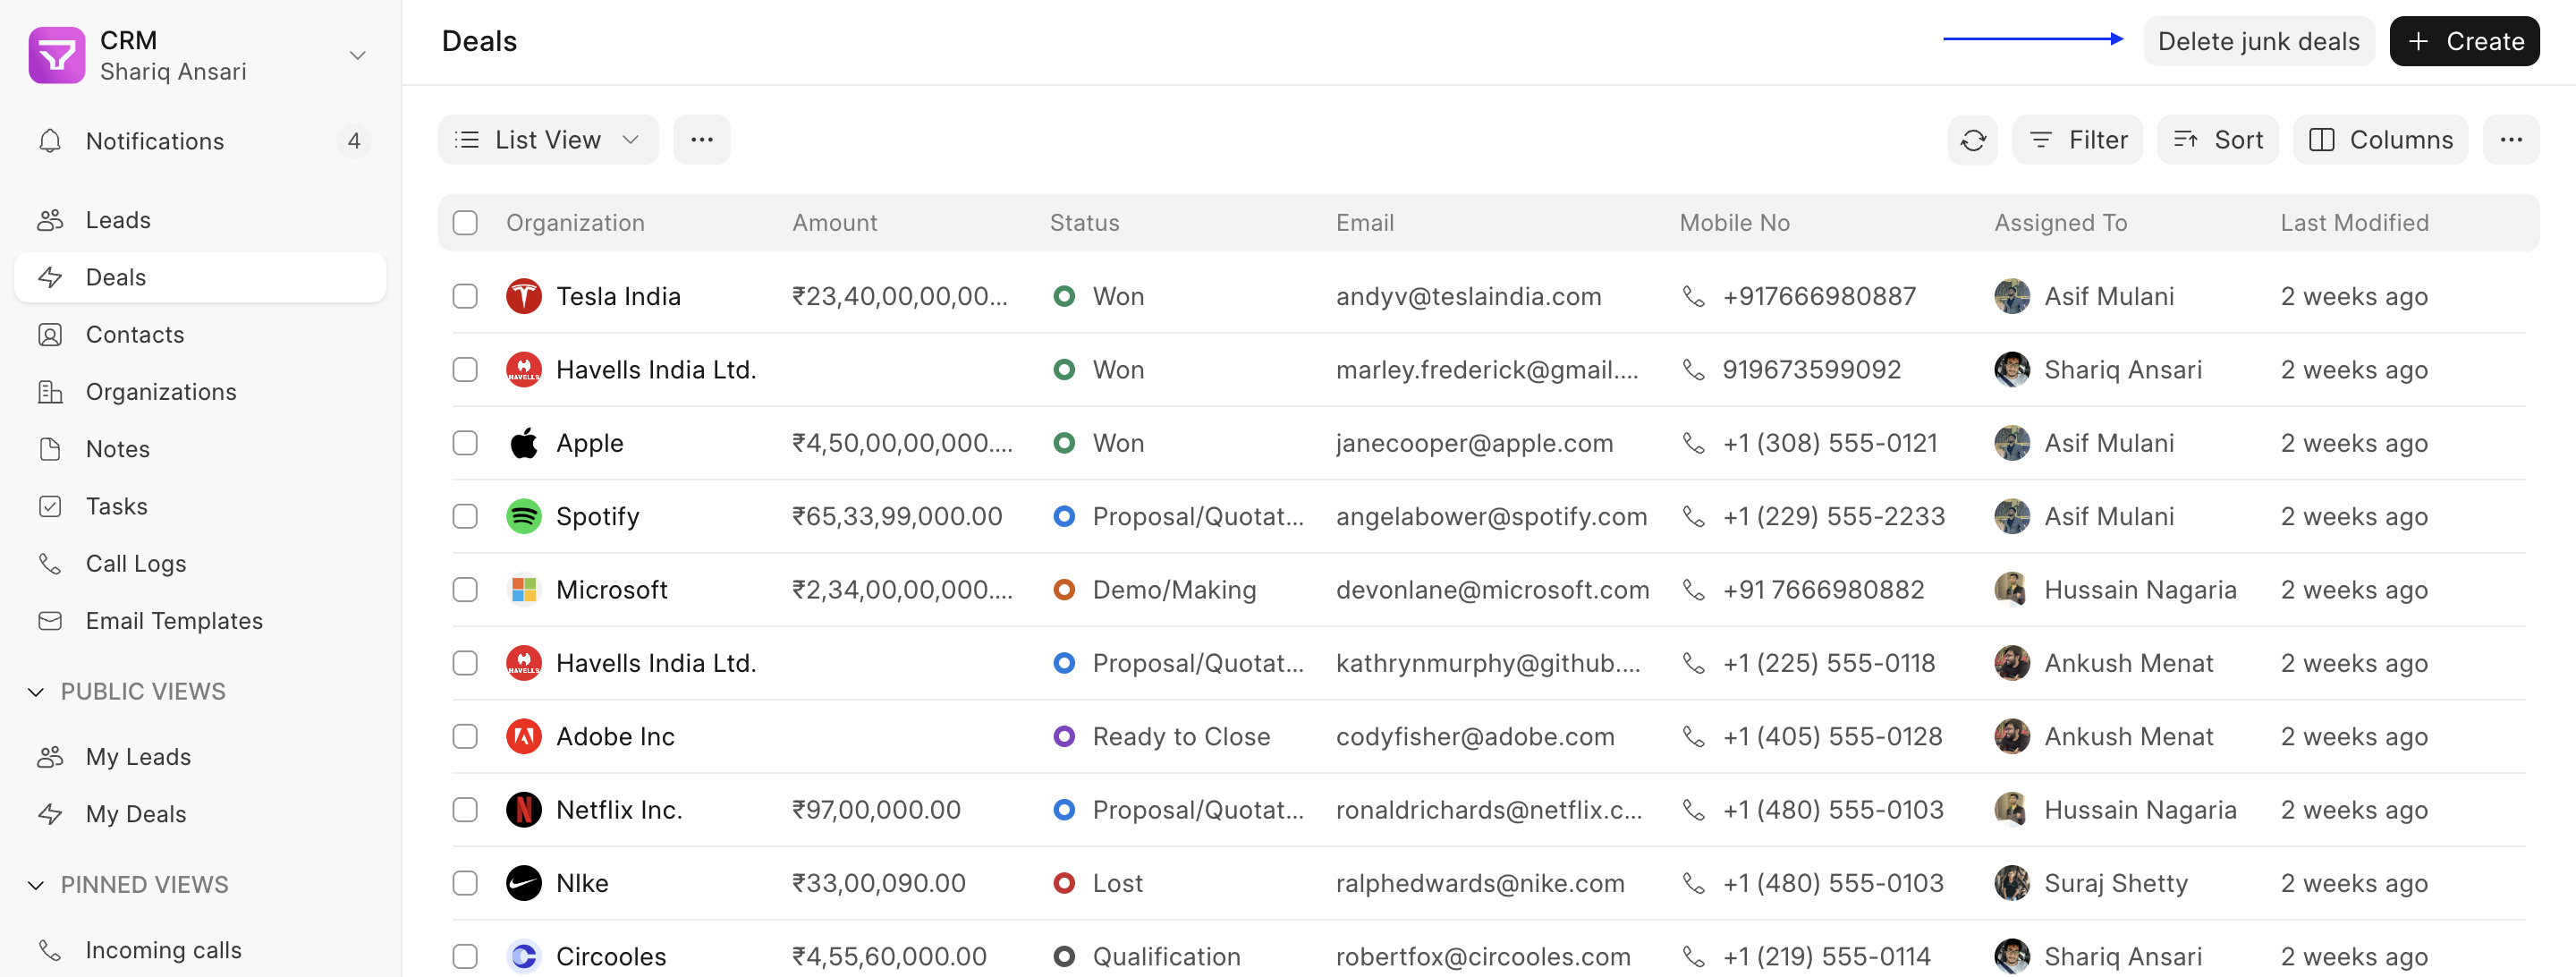 In this example, the “Delete junk deals” button was added on listview which will automatically delete all the junk deals.
You can create all types of actions (Normal Button, Grouped Actions, Grouped Actions with label and combination of all). 2. Bulk Actions: These are designed for performing specific tasks on multiple selected rows in the list view. This caters to situations where you need to apply the same action to a group of records simultaneously.
Example:


{ “label”: “Mark Won”, “onClick”: async ({ list, selections, unselectAll, call }) => { let docs = Array.from(selections) for (const doc of docs) { // Update the status of each selected Lead/Deal to “Won” let updated = await call(‘frappe.client.set_value’, { doctype: ‘CRM Deal’, name: doc, fieldname: ‘status’, value: ‘Won’, }) } unselectAll() list.reload() } }
In this example, the "Mark Won" button iterates through each selected Lead/Deal name (`selections`) and updates its status to "Won" using the `call` method. Finally, it unselects all rows using `unselectAll` method and reloads the list view using `list.reload()`.
Adding Custom List Actions #
You can define custom list actions using Frappe CRM’s Form Script functionality. Here’s a step-by-step guide:
- Navigate to Desk: Switch to Desk and navigate to CRM Form Script.
- Select Doctype and Apply To: Choose the Doctype (e.g., Customer) for which you want to create the list actions. In the “Apply To” field, select “List” and save the configuration. This will generate a boilerplate code snippet.
- Define Actions: The boilerplate code provides two options: actions: Here, you can specify a list of action buttons similar to custom actions on individual record pages (refer to the documentation for custom actions for detailed guidance on defining button functionality link). These buttons will be visible in the list view header. bulk_actions: This section allows you to define action buttons specifically designed for bulk operations on selected rows.
- List Context: Both action types utilize JavaScript code to perform the desired functionalities. You’ll have access to a
listobject as a parameter onsetupListand also ononClickevent, which provides valuable context about the list view. This object offers functionalities like reloading the list (list.reload()) and accessing additional information. Other thanlistother contexts are also passed like$dialog,router,createToast, andcall. (for more details check here) - Bulk Action Context: When defining bulk actions, the
onClickevent receives additional context besides the standard parameters. This context includes: selections: This is a Set object containing the names of all currently selected rows in the list view. unselectAll: This is a function that allows you to deselect all currently chosen rows.
By effectively utilizing these custom list actions, you can streamline your workflow and enhance your data management experience within Frappe CRM.
Leveraging Custom List Actions #
Custom List Actions offer a powerful way to automate repetitive tasks on multiple Leads or Deals. You can leverage them for various purposes, such as:
- Updating statuses for a group of Leads/Deals
- Sending mass emails or notifications
- Exporting selected data for further analysis
- Triggering custom workflows based on bulk actions
Quick Entry Layout #
The Quick Entry Layout Builder allows you to customize the layout of quick entry forms in Frappe CRM, similar to how you can add custom sections and fields to Lead and Deal pages. This gives you more control over the data capture process for different document types.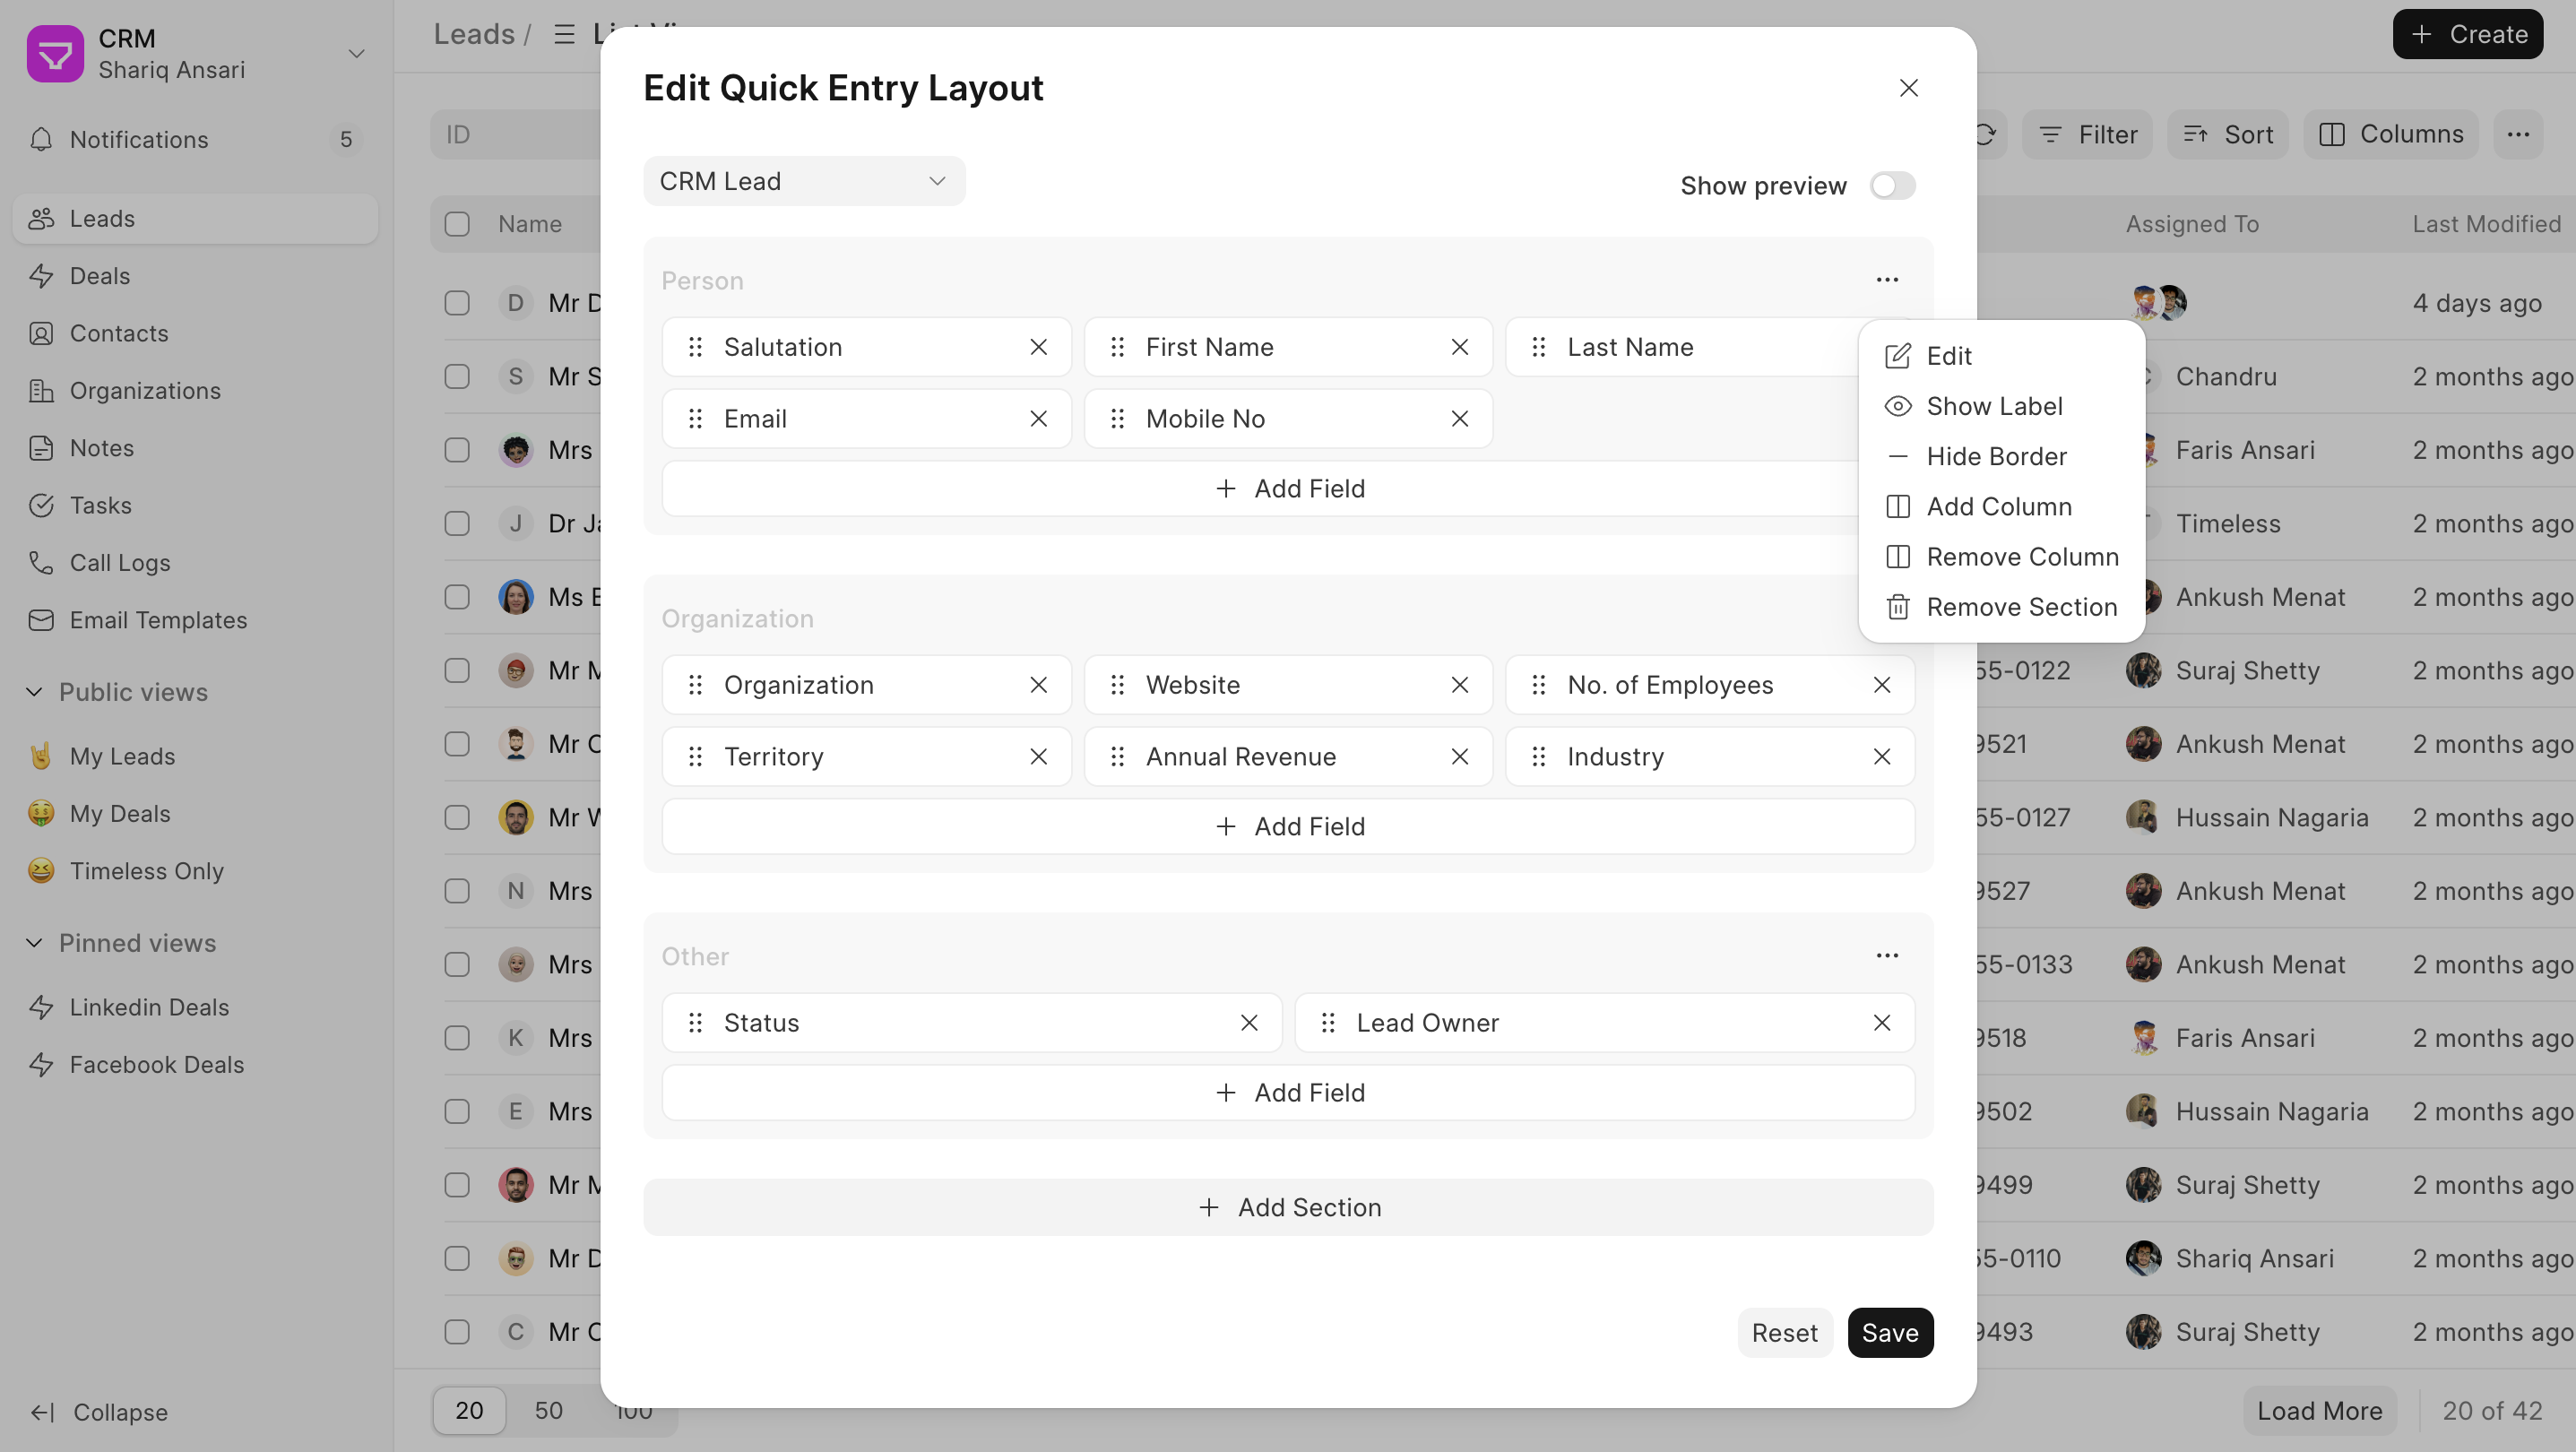
Steps #
- Navigate to Lead/Deal ListView: Go to Lead/Deal ListView and click on the “Create” to open quick entry modal. Click on the edit button.

- Select the Doctype: A modal will open and doctype will be selected automatically but can still choose the doctype for which you want to add or edit fields in the quick entry form.
- Utilize the Quick Entry Layout Builder: Once you’ve selected the doctype, the Quick Entry Layout Builder interface for that doctype will appear. This interface provides functionalities for:
- Adding new sections to the quick entry form.
- Adding fields within these sections.
- Dragging and dropping fields to reposition them within sections or between sections.
- Rearranging sections by dragging and dropping.
- Editing section labels to provide clear descriptions.
- and more
- Preview Your Work (Optional): The Quick Entry Layout Builder offers a Show Preview button. Clicking this button will display a preview of how the customized quick entry form will look for the chosen doctype. This allows you to visualize your layout changes before saving them.
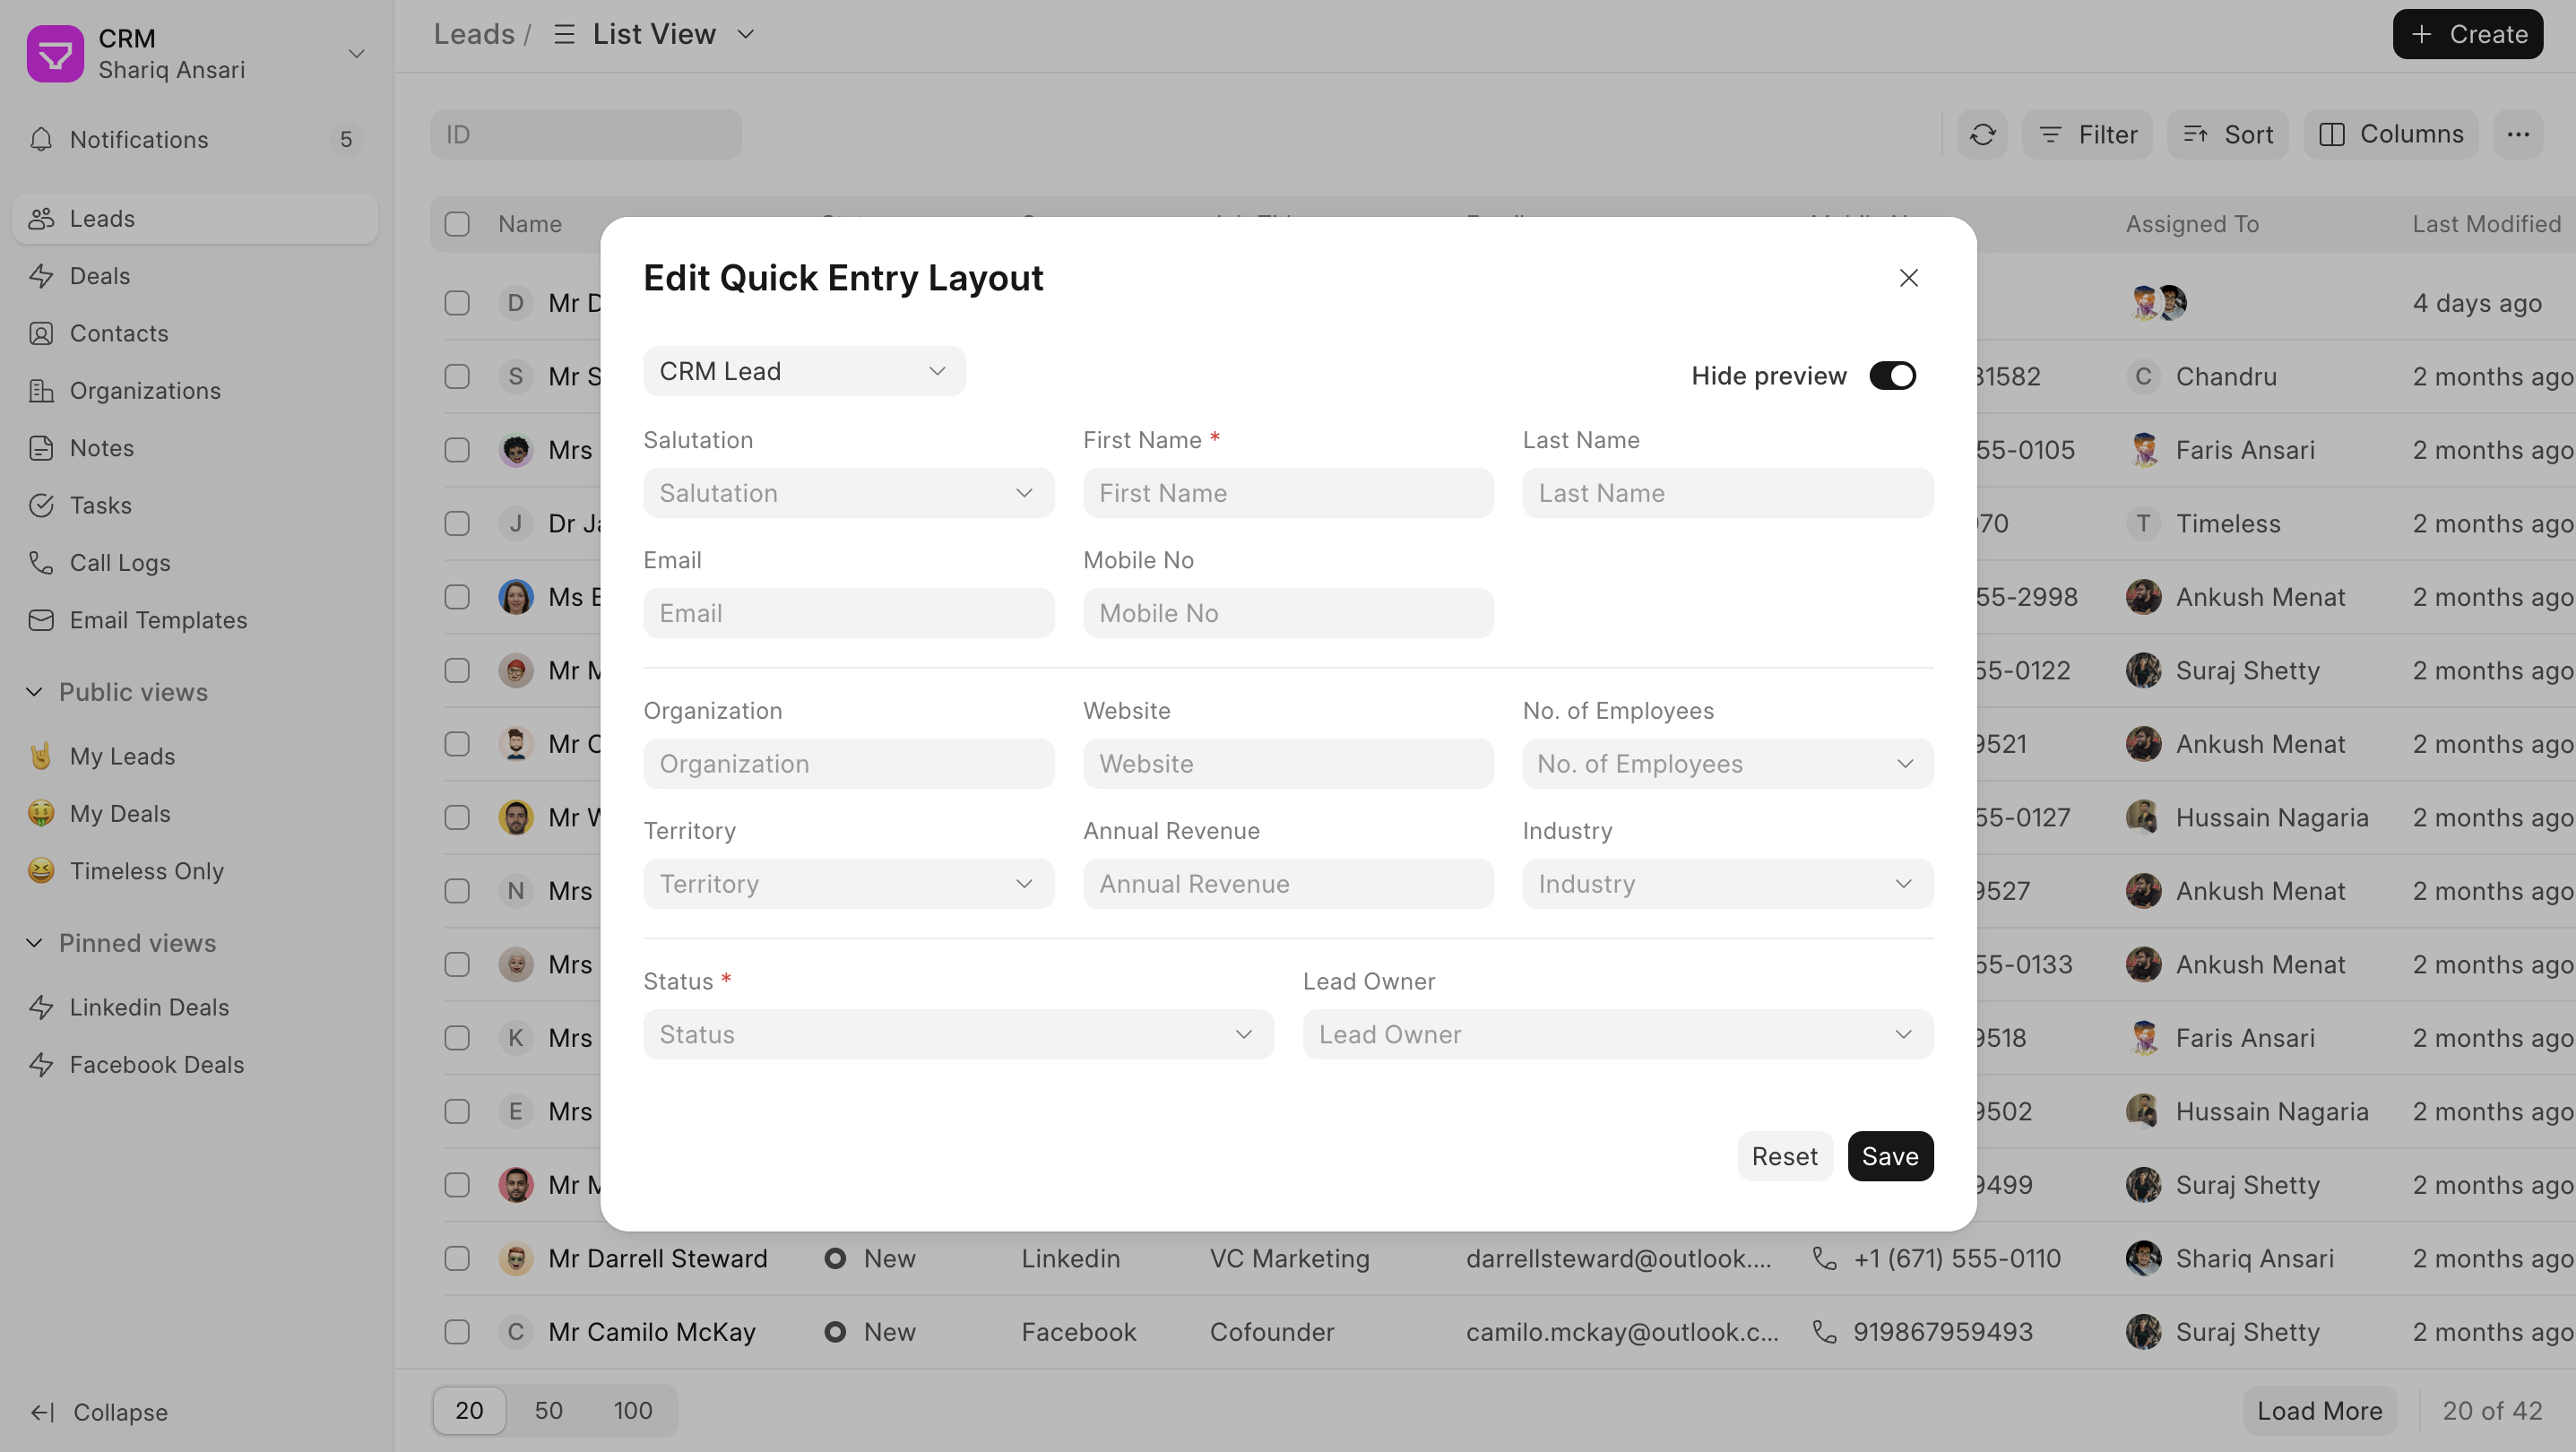
By following these steps, you can effectively customize quick entry forms in Frappe CRM to better suit your specific data collection requirements for different document types.