

Email Communication #
This feature allows you to seamlessly exchange emails with your customers directly from the Lead/Deal page within the system. All email interactions are conveniently stored and accessible, promoting efficient communication and record-keeping.
Sending Emails #
- Locate the Reply Button: On the Lead or Deal page, find the “Reply” button, typically situated at the bottom of the page.
- Compose Your Email: A new email composition window will appear. Here, you can:
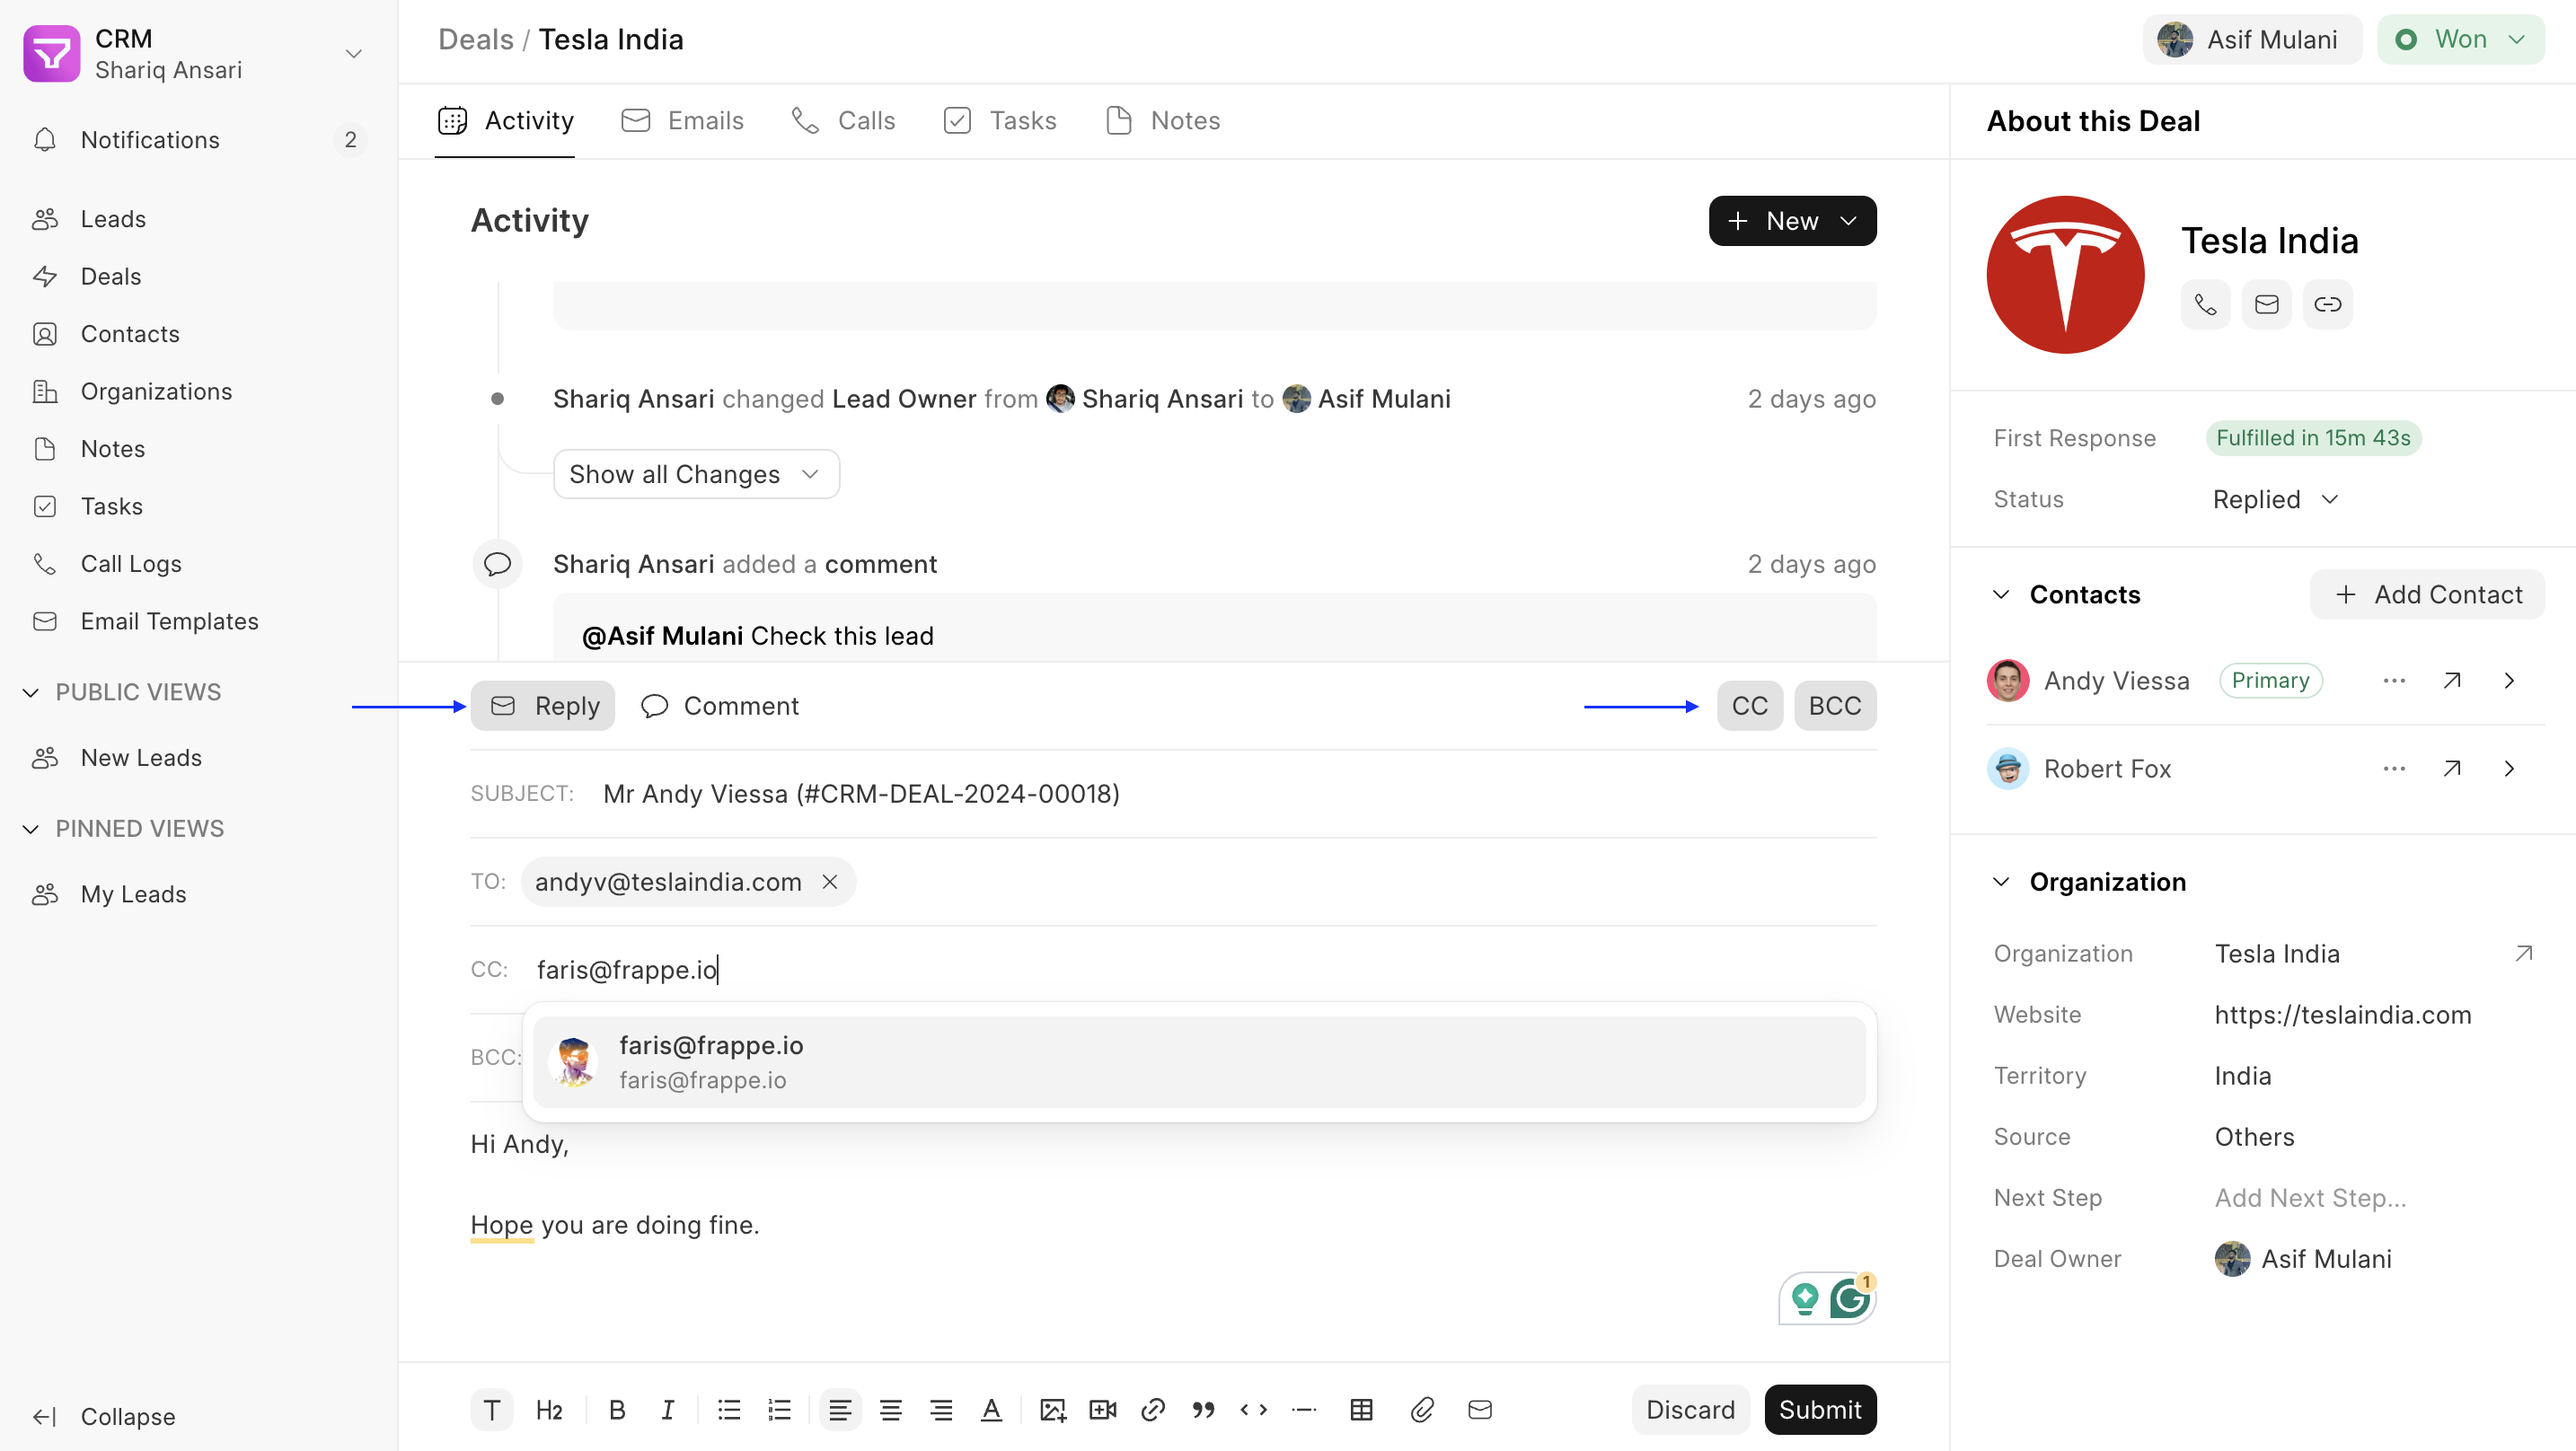
- Subject: Craft a clear and concise subject line that summarizes the email’s purpose.
- To: Enter the recipient’s email address in the “To” field.
- Cc & Bcc (Optional): Utilize the “Cc” (Carbon Copy) field to include additional recipients who should be informed but not required to respond. The “Bcc” (Blind Carbon Copy) field allows you to send a copy to recipients without revealing their addresses to other recipients.
- Message Body: Compose the main content of your email. You can leverage formatting options for better readability and include attachments if necessary.
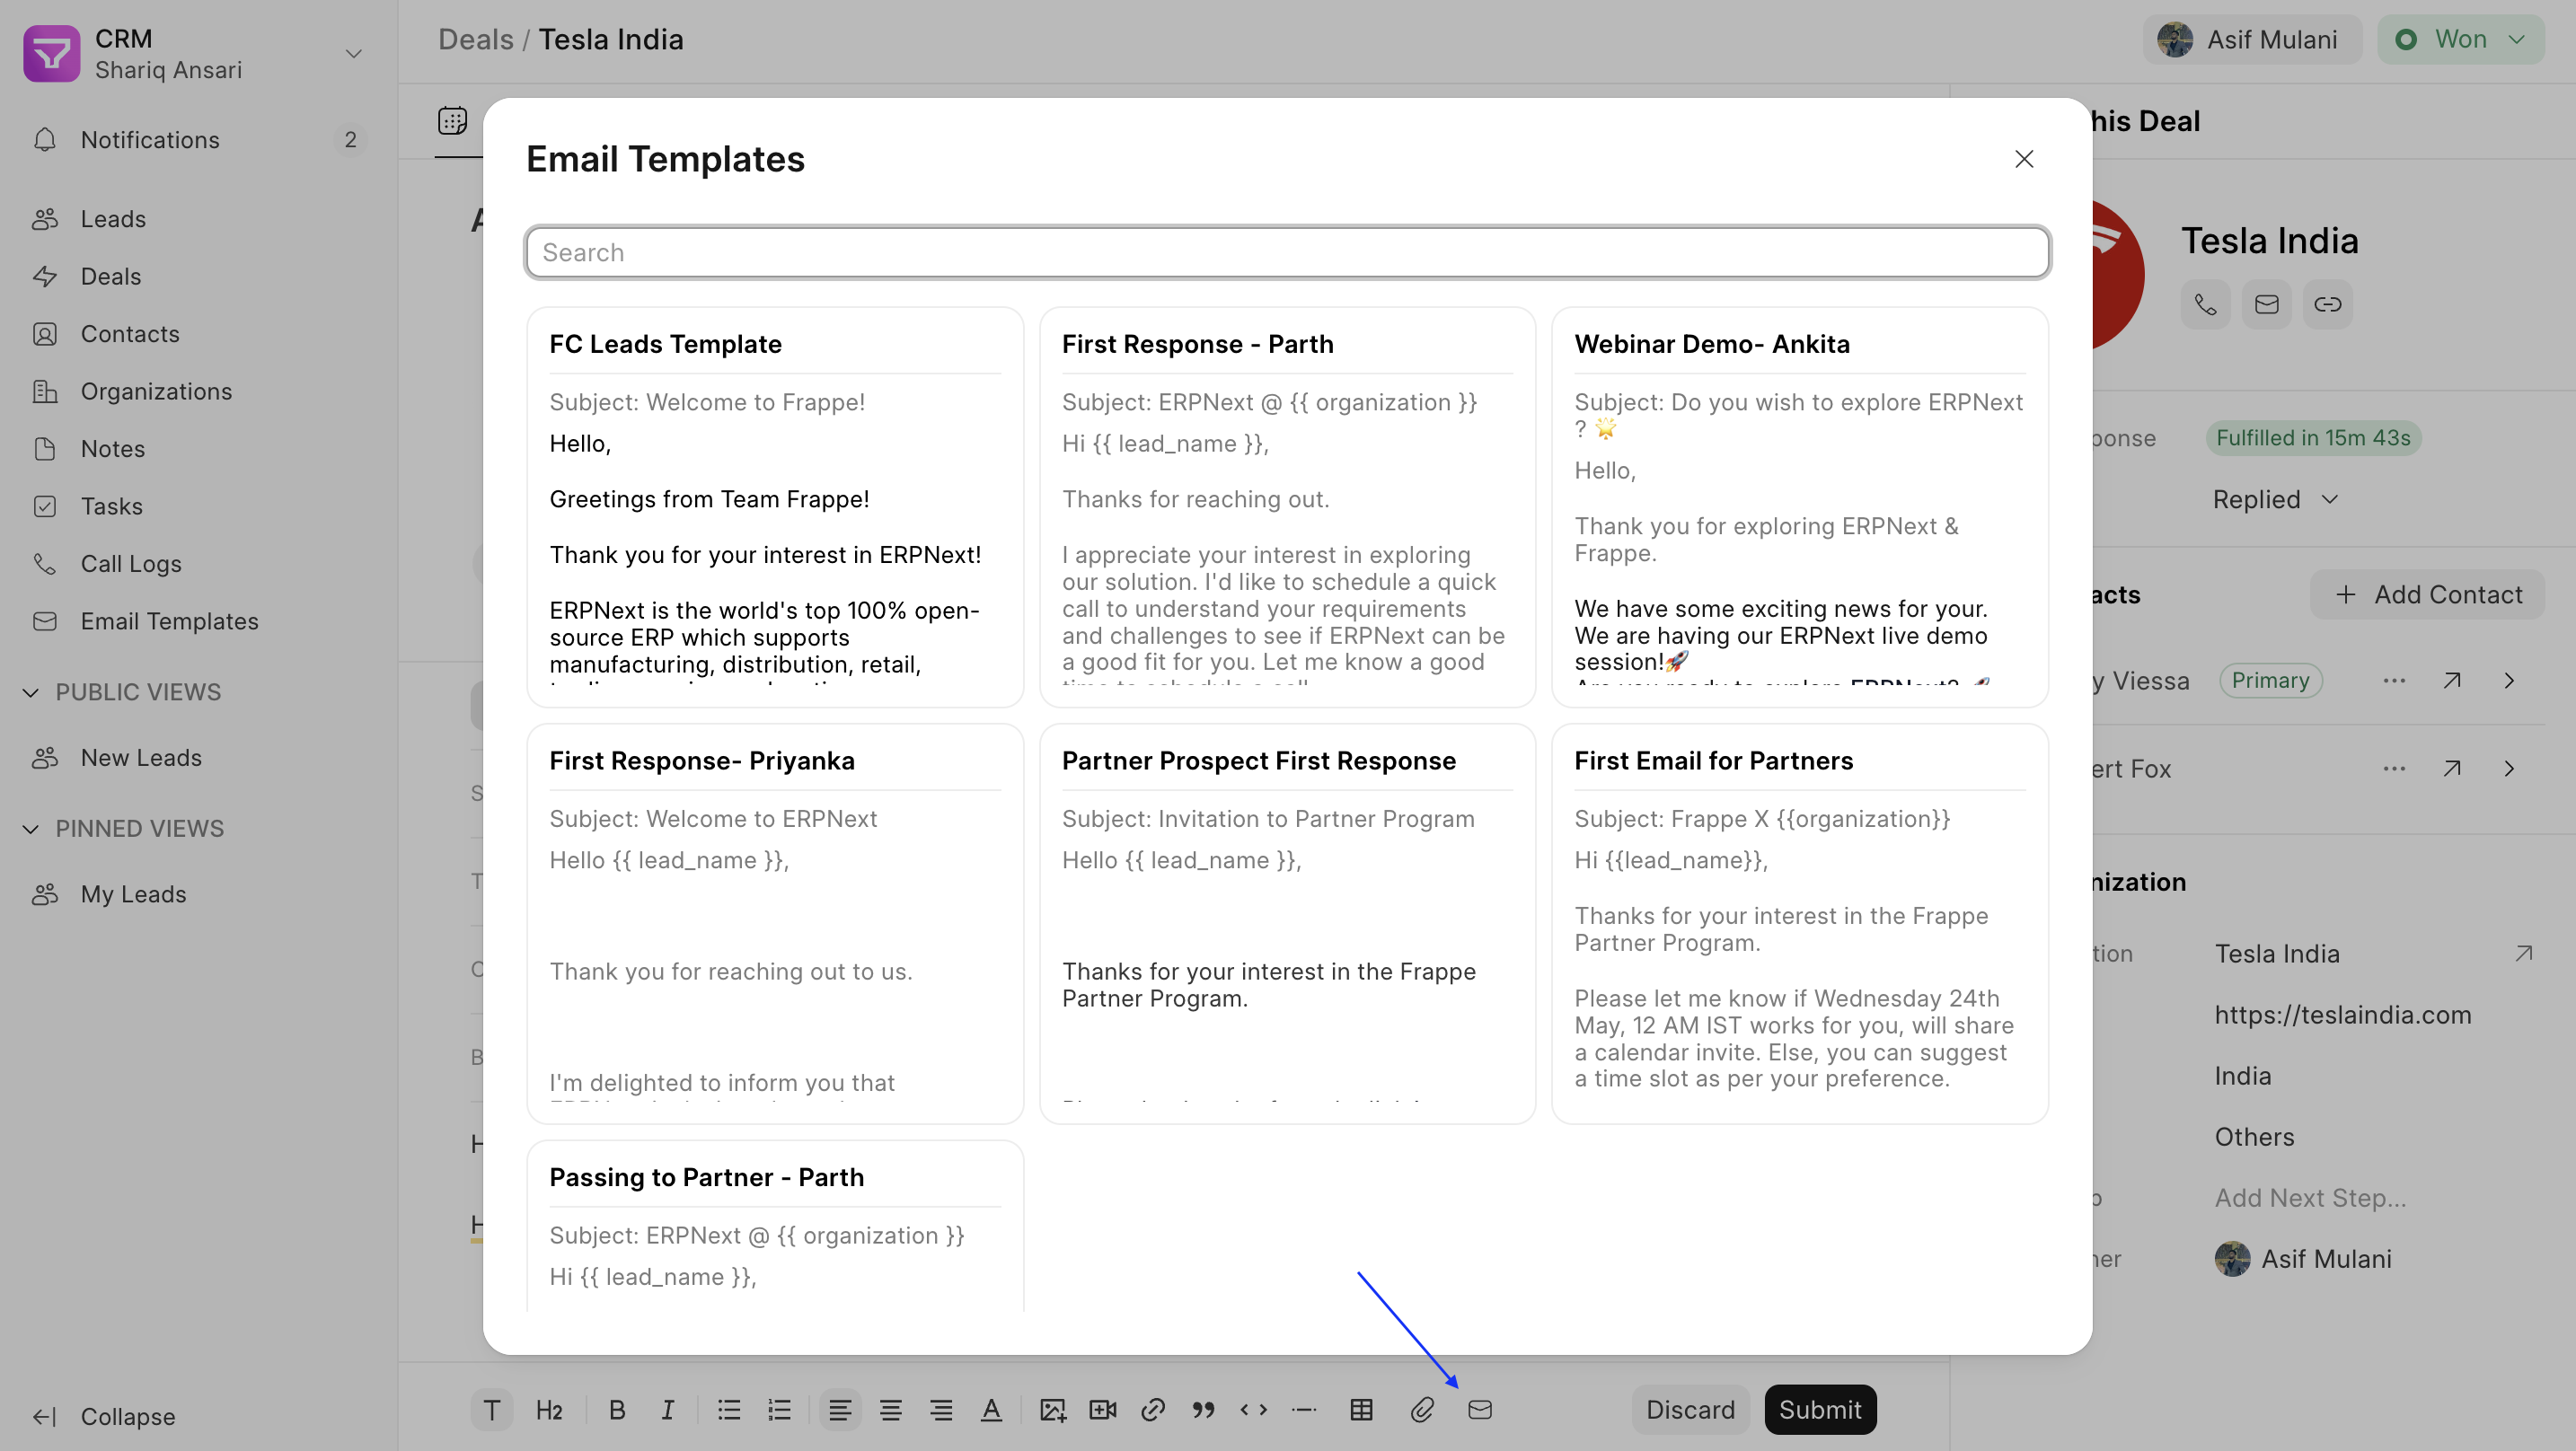
- Leverage Email Templates (Optional): Streamline communication by incorporating pre-defined email templates. Click on the “Email Template” icon and select the desired template from the available list. This pre-populates the message body, saving you time and ensuring consistency.
- Hit Submit: Once you’ve crafted your email, click the “Submit” button to send it to the recipient(s).
Viewing Email Communication #
All email interactions related to a specific Lead or Deal are consolidated within the system. You can access them in two ways:
- Activities Tab: This tab provides a comprehensive view of all activities associated with the Lead/Deal, including emails, calls, tasks, and notes.
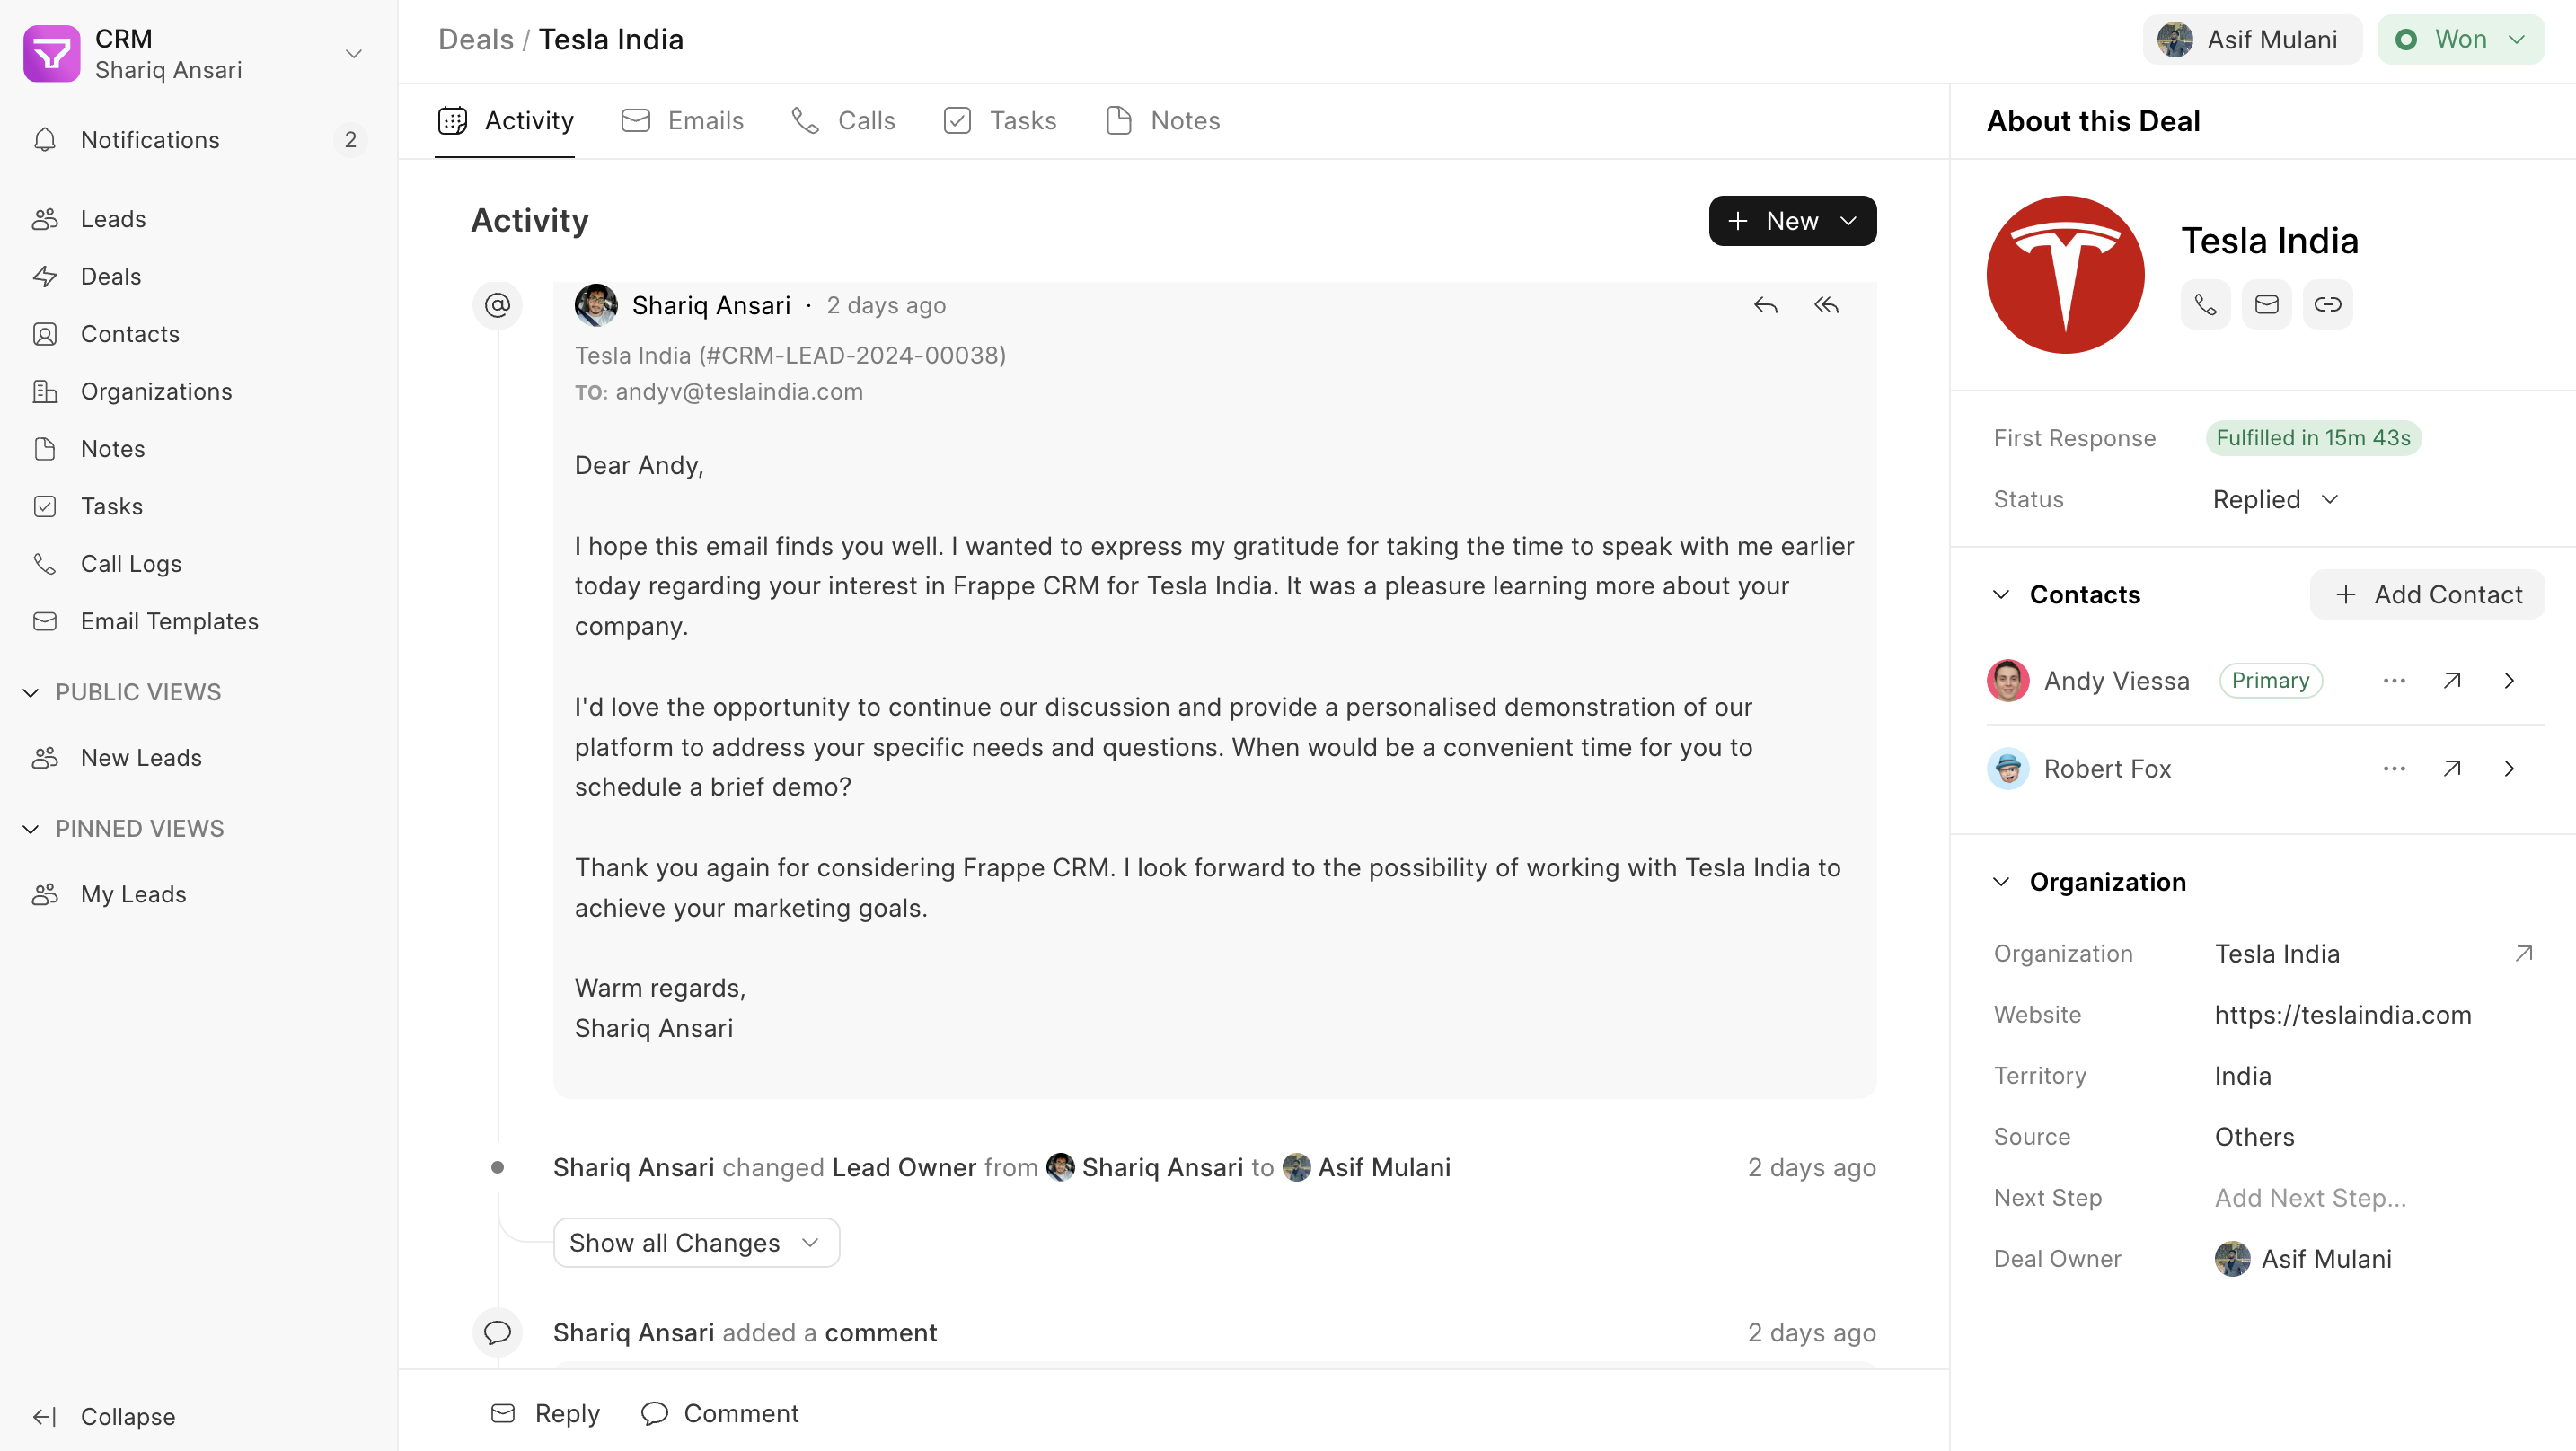
- Emails Tab: For a focused view solely on email communication, switch to the dedicated “Emails” tab. This tab exclusively displays email threads related to the Lead/Deal, offering a clear and organized record of your email exchanges.

Email Account Setup #
You can sync your email account with Frappe CRM to send and receive emails from Frappe CRM.
You can manage multiple incoming and outgoing Email Accounts in Frappe CRM. There has to be at least one default outgoing account and one default incoming account. If you are on the Frappe CRM cloud, the default outgoing email is set by us.
To access Email Accounts, go to Email Account Master from the desk.
1. Prerequisites #
Before creating an Email Account, you need an Email Domain. However, you can skip creating an Email Domain if you’re using one of the services listed.
For detailed Email Account setup you can check Emeron ERP documentation
2. How to create an Email Account #
- Go to the Email Account list, and click on New.
- Enter the email address with the domain. Domains need to be created to create an email account. You don’t need to create a domain if you’re syncing an email from certain providers as listed here.
- Enter the email account password.
- Save. If the credentials are correct, the email account will be synced.
For some services like Gmail, you may need to enable 2FA and use .
3. Additional options when creating an Email Account #
- Use Different Email Login ID: To use an alternative email login and password to access this account. For example, if you have notifications@example.com and you want users to access this email with an alternate email ID, they should tick this checkbox. The recipients will see notifications@example.com as the sender.
- Awaiting password: If you’re creating this account on behalf of someone and the password is unknown, tick this checkbox. When the other user logs in, they’ll be prompted to enter the password.
- Use ASCII encoding for the password: Ticking this will use ASCII encoding for the password.
Comment #
The comment feature allows internal communication and information sharing related to leads and deals. It facilitates collaboration among agents by providing a dedicated space to discuss, track progress, and share details.
Key Features #
- Internal Communication: Engage in discussions with other agents regarding leads and deals.
- Mentions: Use the “@” symbol followed by a username to notify specific agents about important updates or require their input within a comment.
- Information Storage: Store relevant details about the lead or deal within the comments section for easy reference. This can include notes from conversations, action items, or crucial milestones.
Add a Comment #
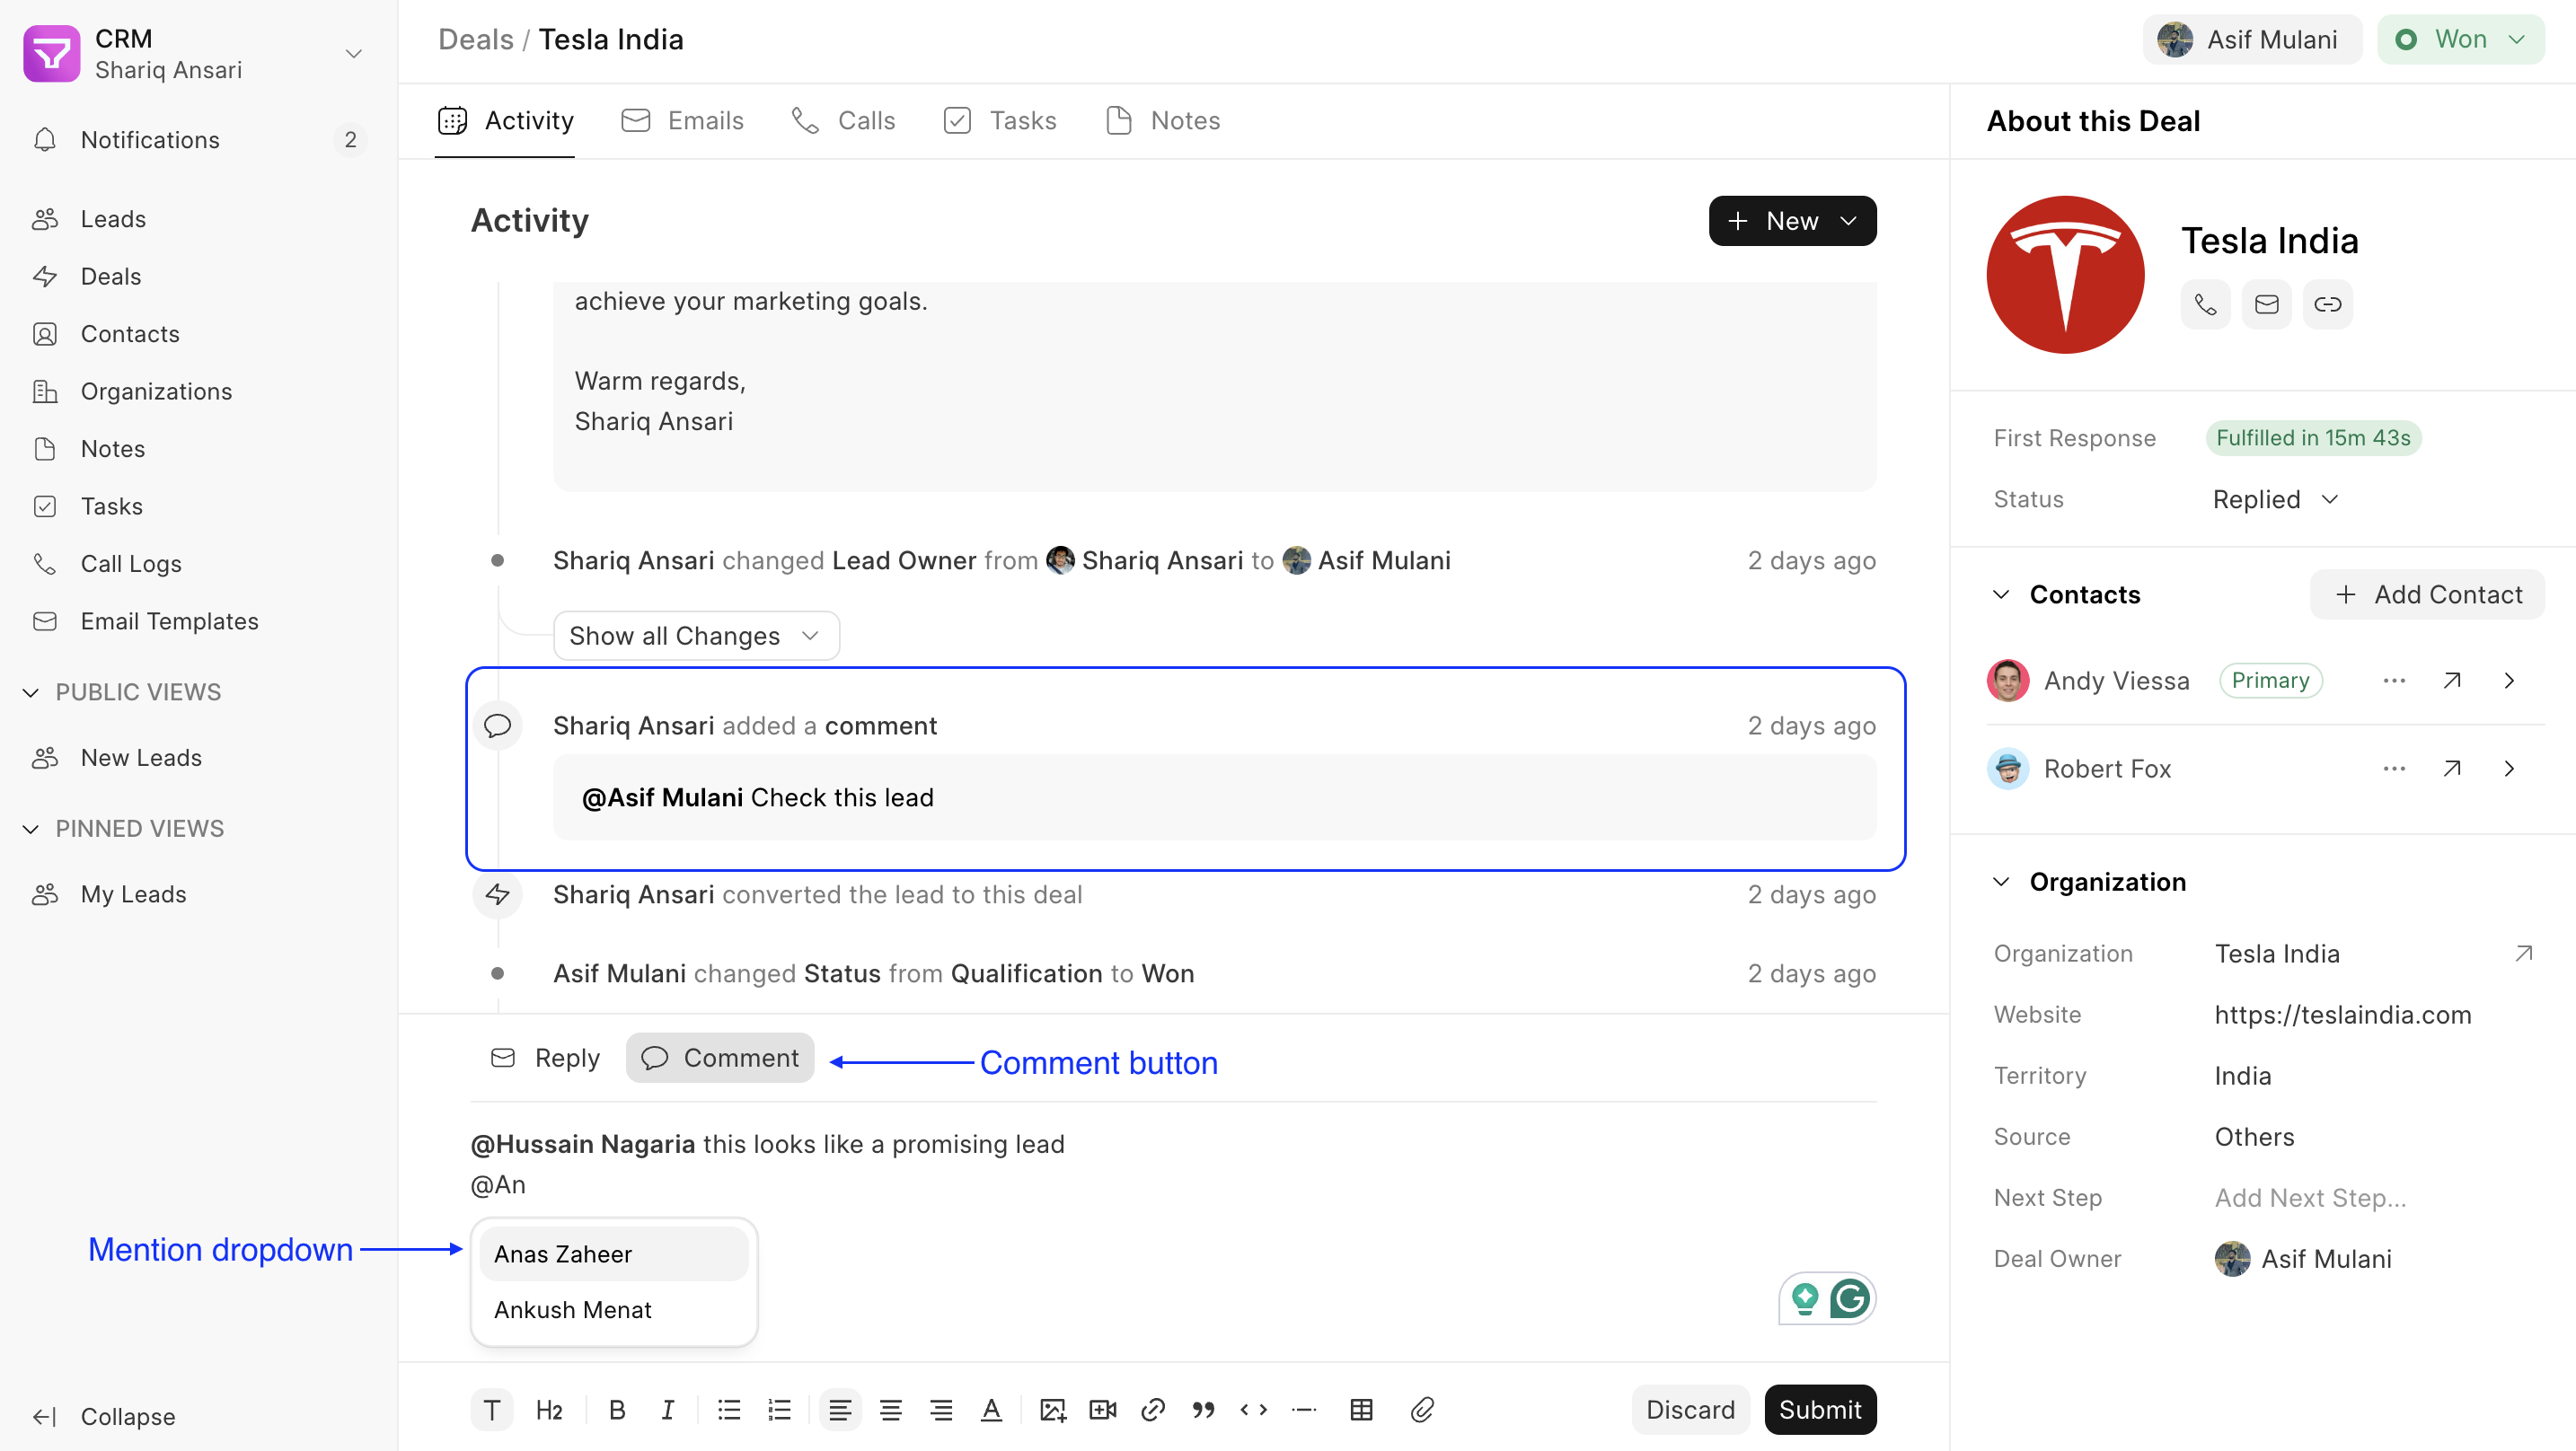
- Locate the “Comment” button at the bottom on the Lead or Deal page.
- Enter your comment in the designated text box.
- To mention a user, type “@” followed by their username. A dropdown menu will appear with matching usernames for ease of selection.
- Once you’ve crafted your comment and included any necessary mentions, click “Submit”.
Data #
The side panel allowed quick access to frequently used fields but had limitations like excessive scrolling and no support for child tables. The new Data Tab addresses these issues, offering a cleaner, more organized way to view and manage data efficiently.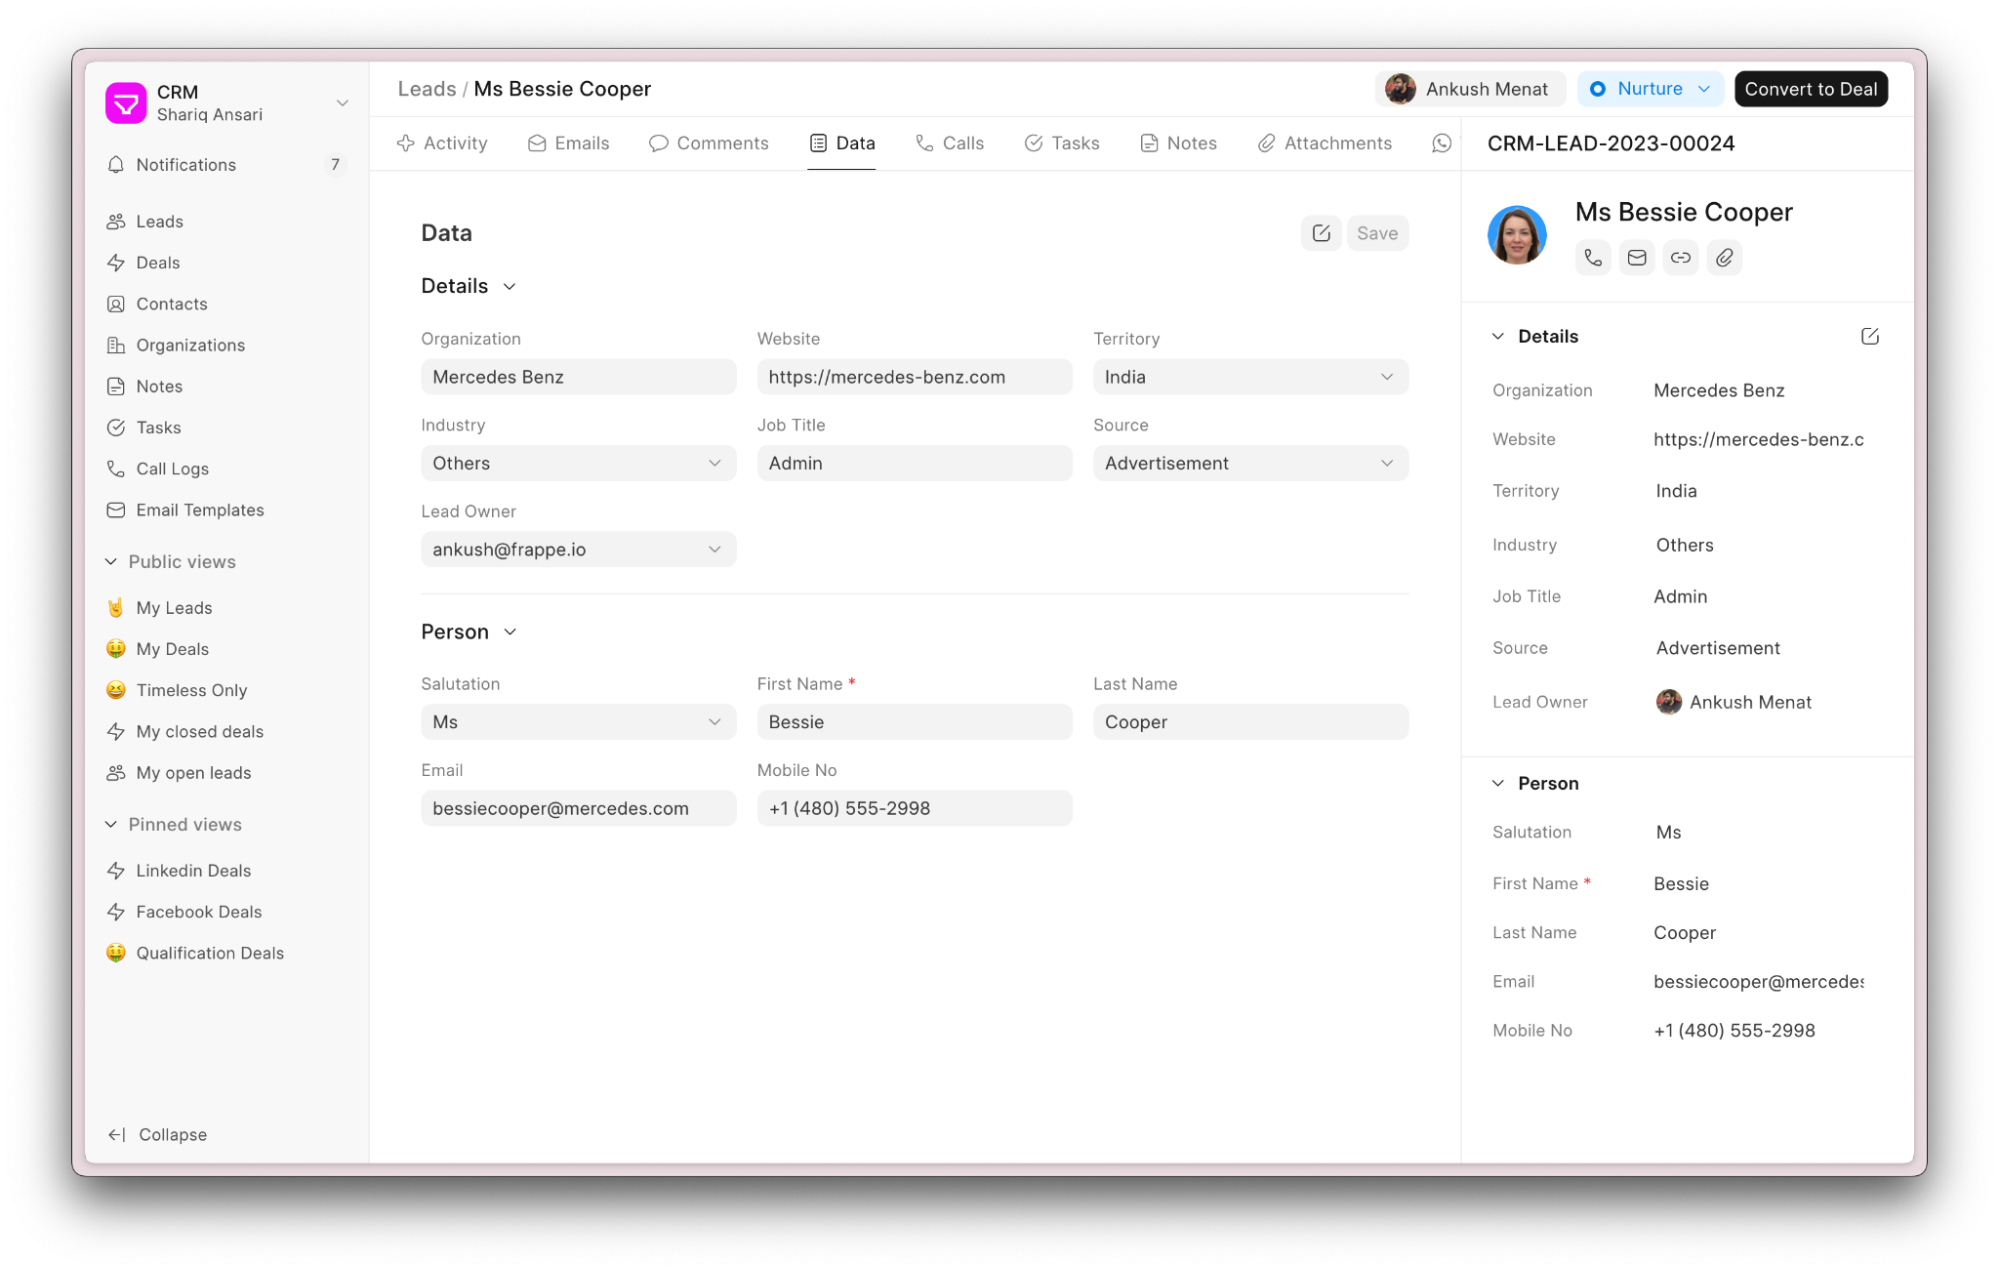
You can customize the data fields using Tabs, Sections, and Columns. Click the Edit button to modify the layout.
> The Edit button is only visible to Sales Managers.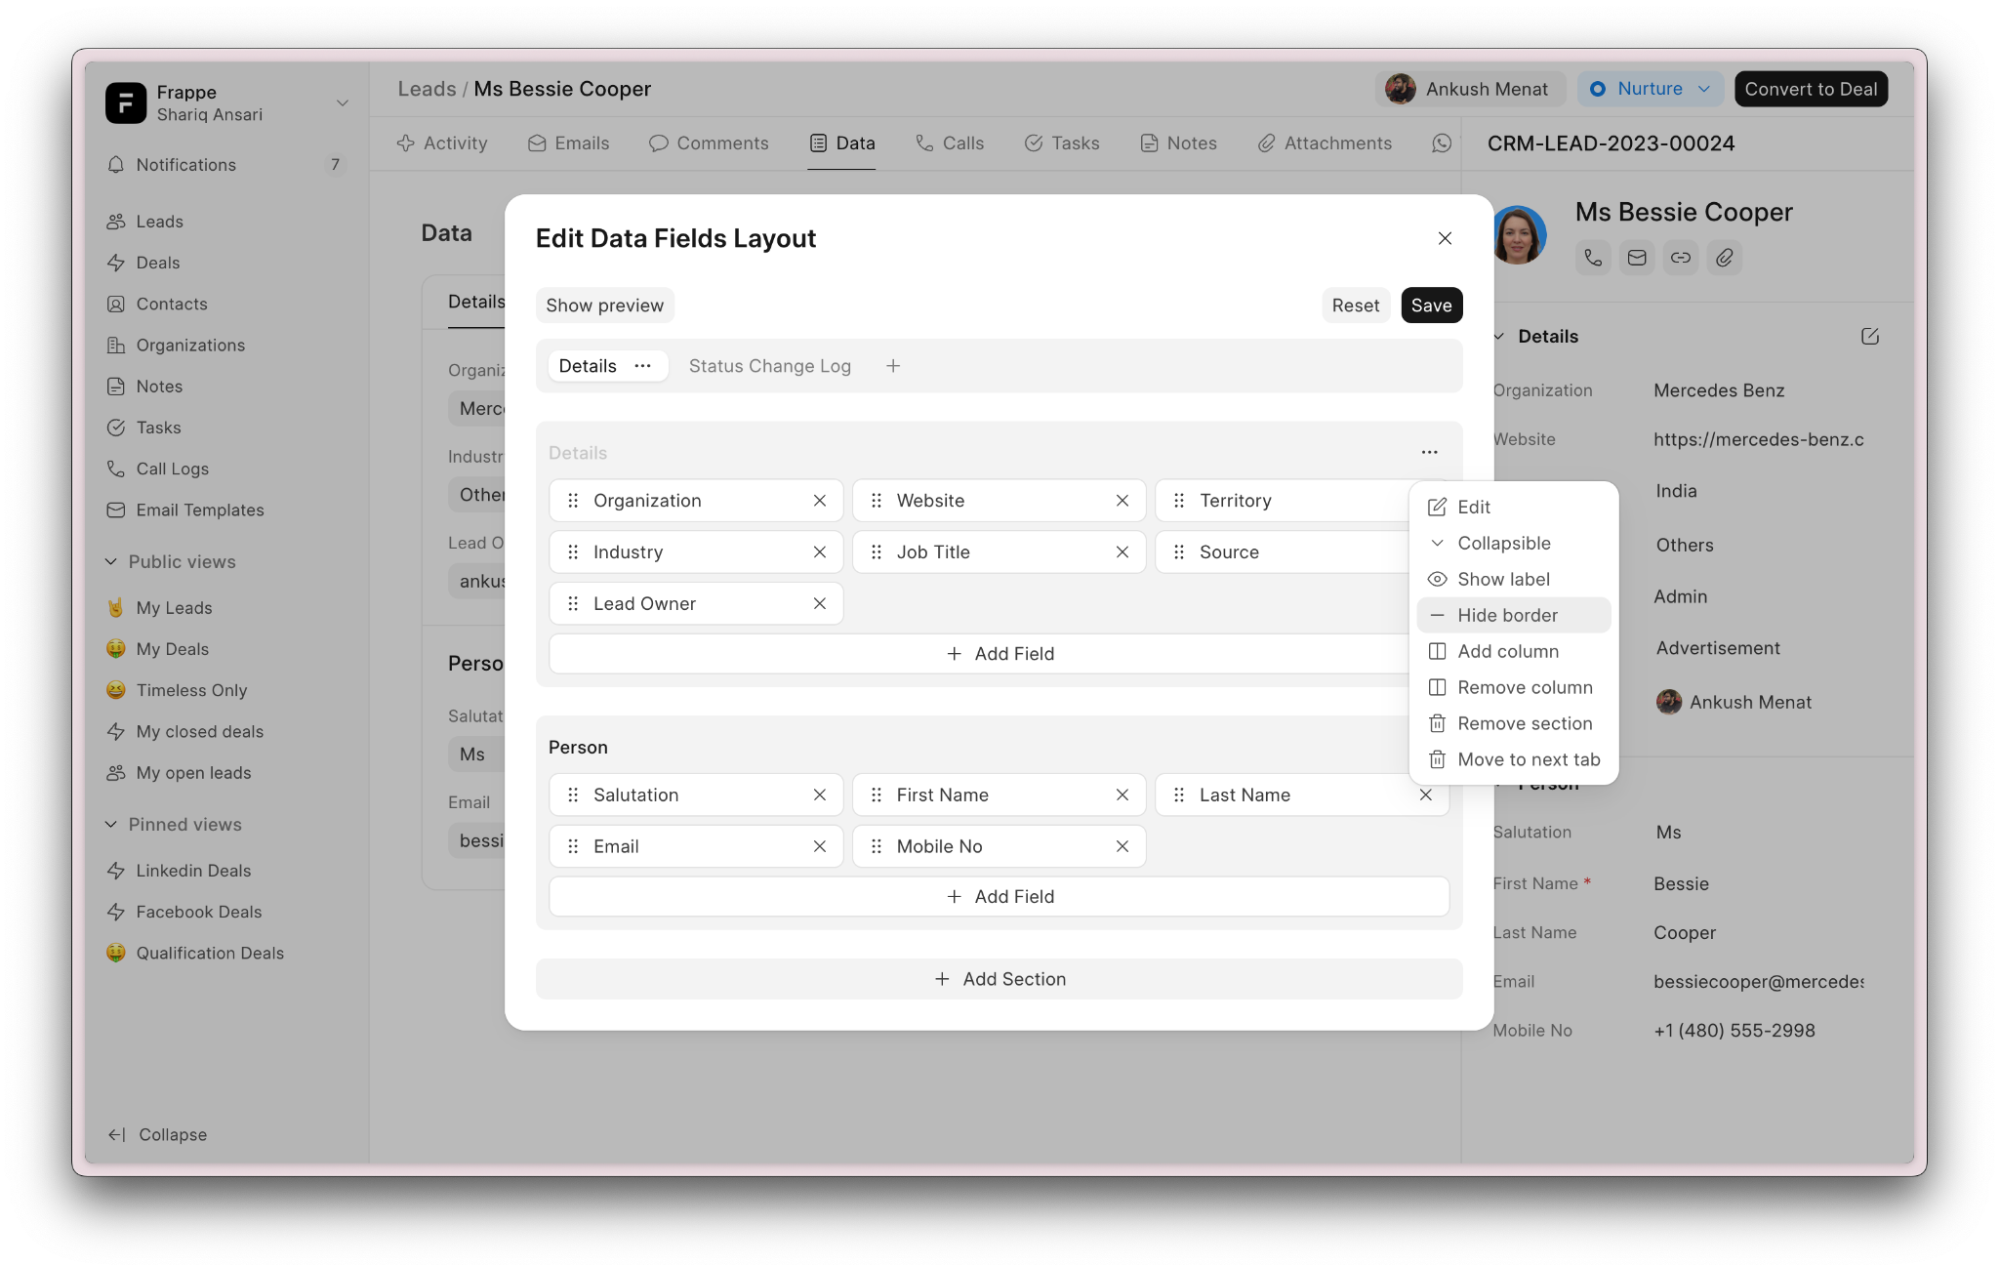
Service Level Agreement #
An SLA (Service Level Agreement) is a formal agreement outlining the level of service a provider commits to deliver and the expectations a customer has for that service. In Frappe CRM, SLAs establish response time benchmarks for communication-related to Leads and Deals.
Creating an SLA #
- Switch to Desk: Switch to the desk view by clicking the profile button in the top left corner and selecting “Switch to Desk.”

- Access SLA Master: Go to “CRM Service Level Agreement Master” and click “Add CRM Service Level Agreement”
- Define SLA Details: Fill in the following information:
- Apply On: Select whether the SLA applies to Leads or Deals.
- Start & End Date: Specify the date range during which the SLA will be active.
- Condition (Python Expression): Enter a Python expression to determine when the SLA applies. For instance, you can use
doc.status == "Open"to only set SLA for Open Leads/Deals. - Priorities Table: Define communication statuses and their corresponding first response time durations. The SLA will enforce the specific duration based on the communication status.
- Holiday List: Create and link a holiday list to exclude holidays from response time calculations.
- Working Hours: Set working hours for each day. Only communication received during these hours will be considered for calculating the first response due time.
- Enable the SLA: Once you’ve configured the SLA details, ensure it’s enabled.
Benefits of Using SLAs #
SLAs offer several advantages for your sales team:
- Improved Response Times: By establishing clear response time goals, SLAs encourage prompt communication with potential and existing customers, leading to better engagement and conversion rates.
- Enhanced Customer Satisfaction: Timely responses demonstrate your commitment to customer service, fostering trust and positive client relationships.
- Streamlined Workflow: SLAs help prioritize communication tasks, ensuring your team focuses on the most critical leads and deals within designated timeframes.
- Performance Measurement: SLAs provide a benchmark for evaluating your team’s responsiveness and identifying areas for improvement.
By effectively utilizing SLAs in Frappe CRM, you can empower your sales team to deliver exceptional customer service and achieve optimal sales performance.
Notification #
Stay informed about important activities within your CRM system using the Notifications feature. This page serves as a central hub for all your CRM-related alerts and updates.
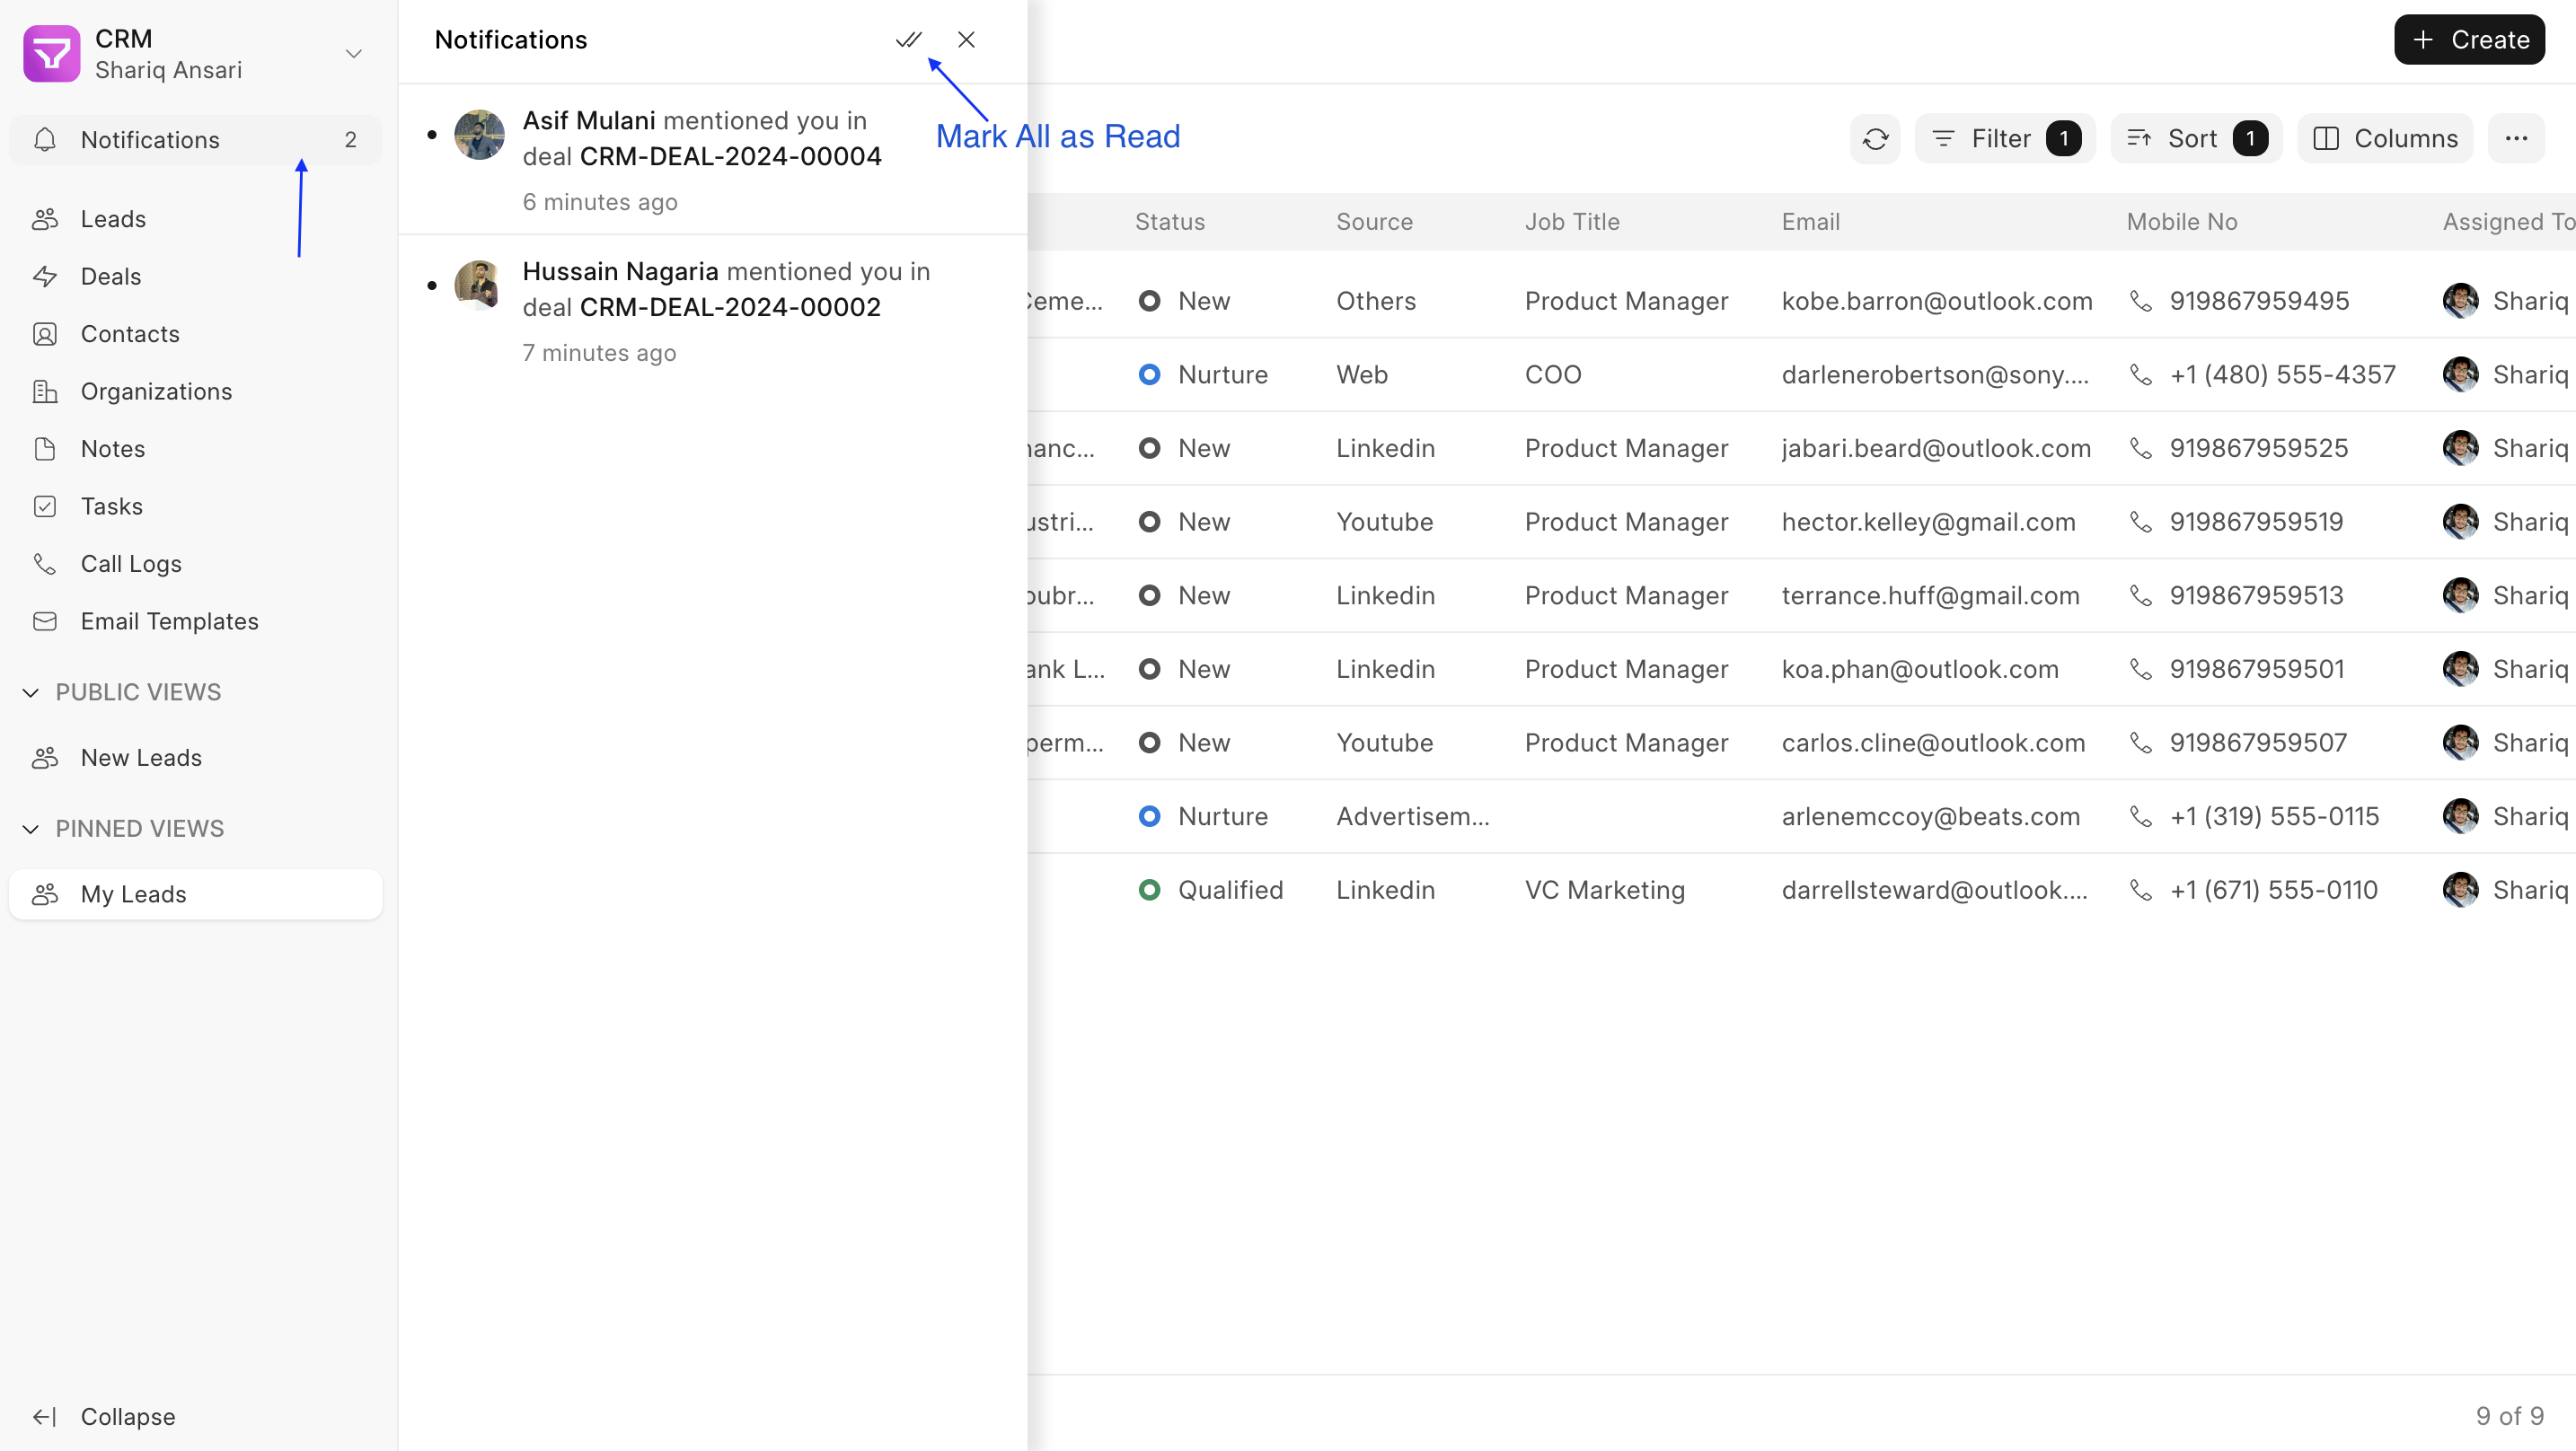
Accessing Notifications #
- Locate the Notifications option in the sidebar.
- Click to open the Notifications Panel.
Understanding Notifications #
The Notifications Panel displays a list of alerts related to your CRM activities. These alerts currently includes:
- Mentions in comment
- Task assignments/unassignment (changing assigned user)
- Lead/Deal assignments/unassignment
Managing Notifications #
Within the Notifications Panel, you can perform the following actions:
- Open a Notification: Click on an individual notification to view the specific comment or activity it refers to. This action will also mark the notification as read.
- Mark All as Read: Click the dedicated button at the top of the panel to mark all your current notifications as read.